> ## Documentation Index
> Fetch the complete documentation index at: https://docs.coverbase.com/llms.txt
> Use this file to discover all available pages before exploring further.
# Admin and setup guide
> Stand up your Coverbase environment from scratch: vendors, tags, questionnaires, scales, control sets, templates, monitoring, and integrations.
This guide is part of the [User Guides](/user-guides/overview) collection. It's for the TPRM program owner or administrator setting up the environment. Once setup is done, your analysts pick up the [Analyst and reviewer guide](/user-guides/analyst-reviewer).
Welcome. This guide takes you from a blank environment to a fully configured one. You'll import vendors, build the inherent risk questionnaire (IRQ), tune scales and control sets, and configure the templates, monitoring, and integrations that everything downstream depends on.
Configuration is where the AI gets its instructions. The better this upfront work, the fewer issues your reviewers triage later, so it's worth doing thoughtfully. Most teams finish core setup in 1 to 2 weeks with roughly 20 hours of effort, and your Coverbase contact runs live working sessions to do it alongside you.
New to how the platform works? Read the short [How Coverbase thinks](/user-guides/overview#how-coverbase-thinks) primer first. The quick version: Coverbase is document-first (it measures vendor evidence against your controls), tags drive most of the automation, and configuration changes apply going forward, never retroactively.
## Setup checklist
Here's the whole journey at a glance. Each item is a step below.
Add your team and apply your organization's branding.
Import your existing vendor inventory.
Create the tags that route everything.
Build, weight, and map your intake questionnaire.
Configure your risk and compliance scales.
Upload, tune, and map your control frameworks.
Set assessment plans and reassessment timing.
Build report and vendor-email templates.
Configure continuous-monitoring sources and detectors.
Turn on obligations and CUEC extraction.
Connect the Export API and external tools (optional).
***
## Step 1: Organization, users, and branding
This step gets your team into the platform and makes everything vendor-facing and stakeholder-facing carry your brand.
1. Go to **Configuration → Organization** and add your users. Assign a role to each one as you go:
* Admin has full platform access.
* Reviewer can assess vendors and manage workflows.
* Requester can submit vendor requests only.
2. For a broader rollout, configure a verified domain so anyone from your email domain is provisioned automatically on first login. That saves you from creating accounts by hand while you pilot.
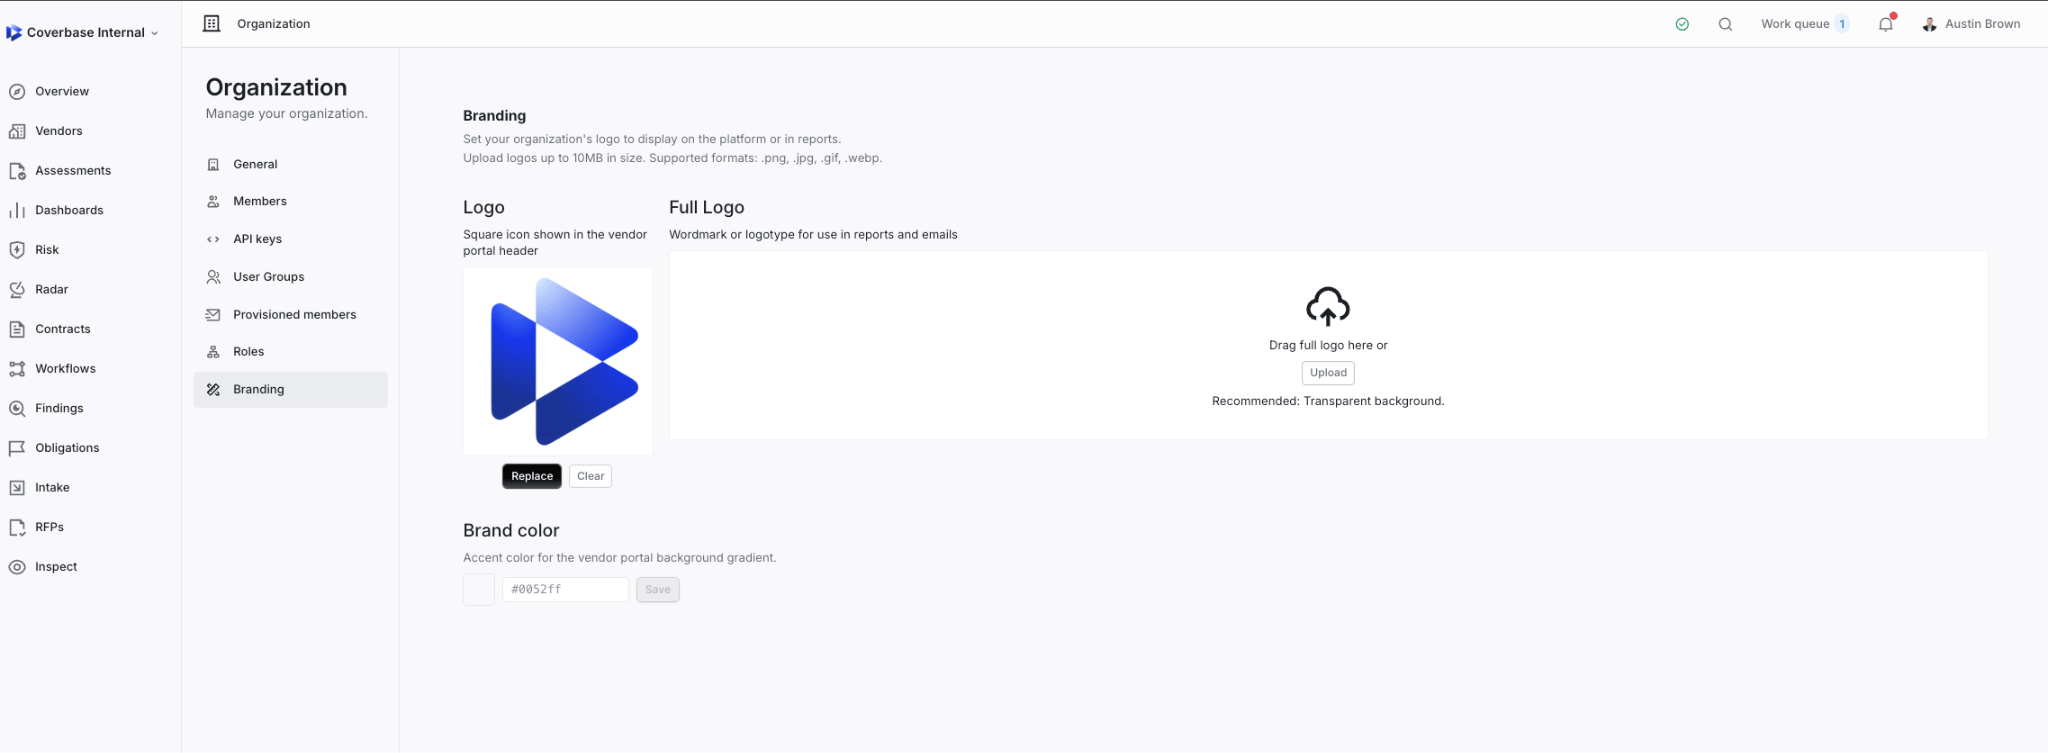
3. Under **Branding**, upload two logos. The Simple Logo shows up in the app header, navigation, and emails (around 200x50px works well). The Large Logo goes on generated reports and vendor-facing documents, including the portal (around 400x100px).
 When vendors get an assessment request, they should see your brand, not Coverbase's. And provisioning from verified domains means your pilot team can start testing right away.
***
## Step 2: Import your vendor portfolio
Loading your existing vendor inventory gives assessments, monitoring, and redundancy checks something to work against. It becomes the library you run reassessments and continuous monitoring from.
You'll need your vendor list with attributes like name, website, description, relationship owner, and contract dates. Your Coverbase contact can hand you the bulk-upload template, along with an enrichment workflow that fills in missing fields.
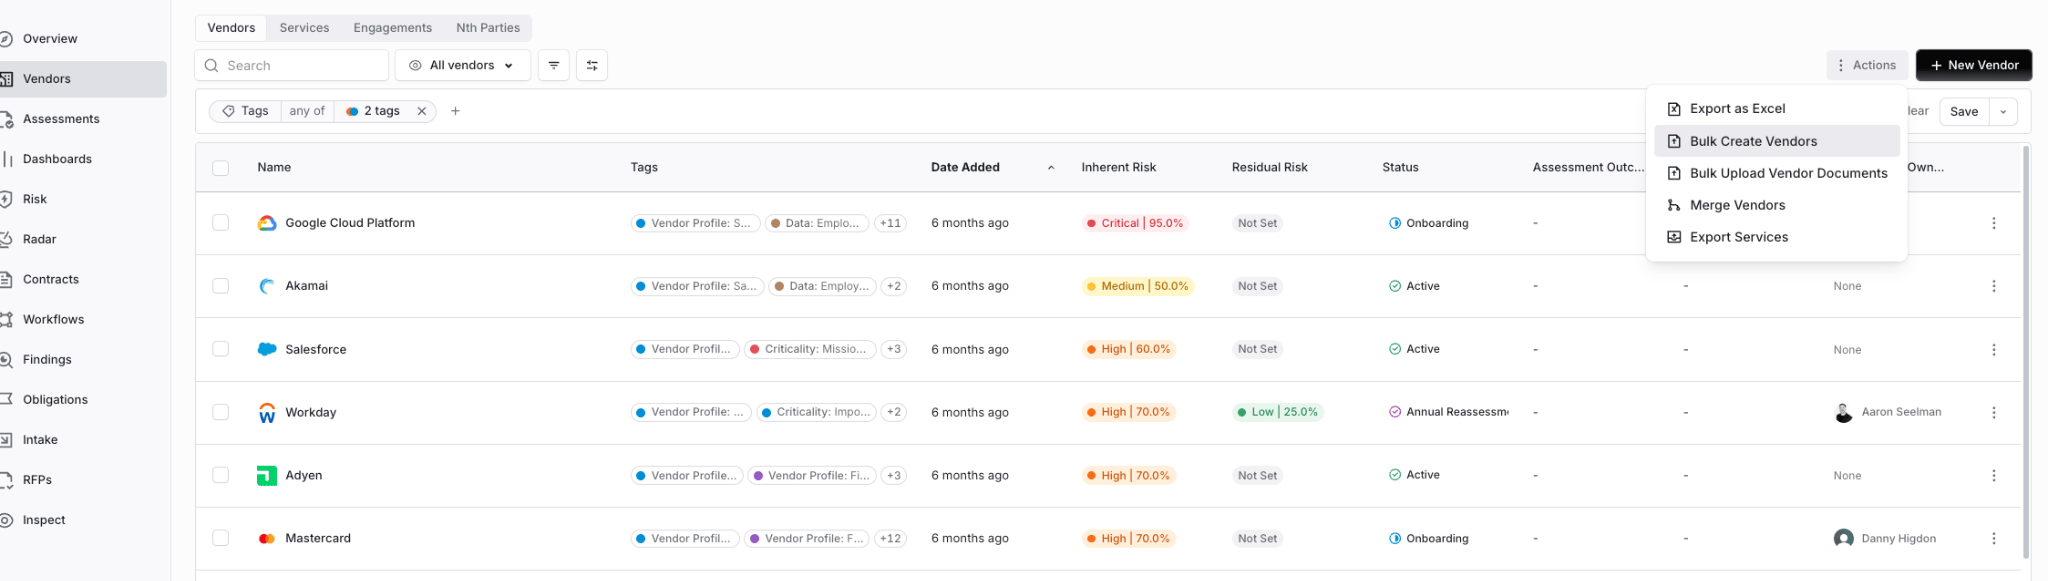
1. Go to **Actions → Bulk Create Vendors**.
2. Download the template to see the required fields, then map your existing data into it.
3. Upload your file.
4. Validate the result. Confirm the vendor count matches your source file, and spot-check a few records to make sure the field values populated correctly.
When vendors get an assessment request, they should see your brand, not Coverbase's. And provisioning from verified domains means your pilot team can start testing right away.
***
## Step 2: Import your vendor portfolio
Loading your existing vendor inventory gives assessments, monitoring, and redundancy checks something to work against. It becomes the library you run reassessments and continuous monitoring from.
You'll need your vendor list with attributes like name, website, description, relationship owner, and contract dates. Your Coverbase contact can hand you the bulk-upload template, along with an enrichment workflow that fills in missing fields.
1. Go to **Actions → Bulk Create Vendors**.
2. Download the template to see the required fields, then map your existing data into it.
3. Upload your file.
4. Validate the result. Confirm the vendor count matches your source file, and spot-check a few records to make sure the field values populated correctly.
 Start with your top 100 to 200 vendors rather than the entire database. That lets you refine the configuration before scaling. You can also pre-load historical documents (SOC 2s, contracts, policies) against vendor records, so your first assessments run against real evidence instead of an empty set.
***
## Step 3: Create your tag structure
Tags are the routing layer of the platform. IRQ answers apply tags, and tags then decide which control sets apply, which documents are required, and which due-diligence track a vendor gets.
Design the taxonomy before the IRQ, because the IRQ is what fills it in. Here's a structure that works well in practice. Adapt it to your program.
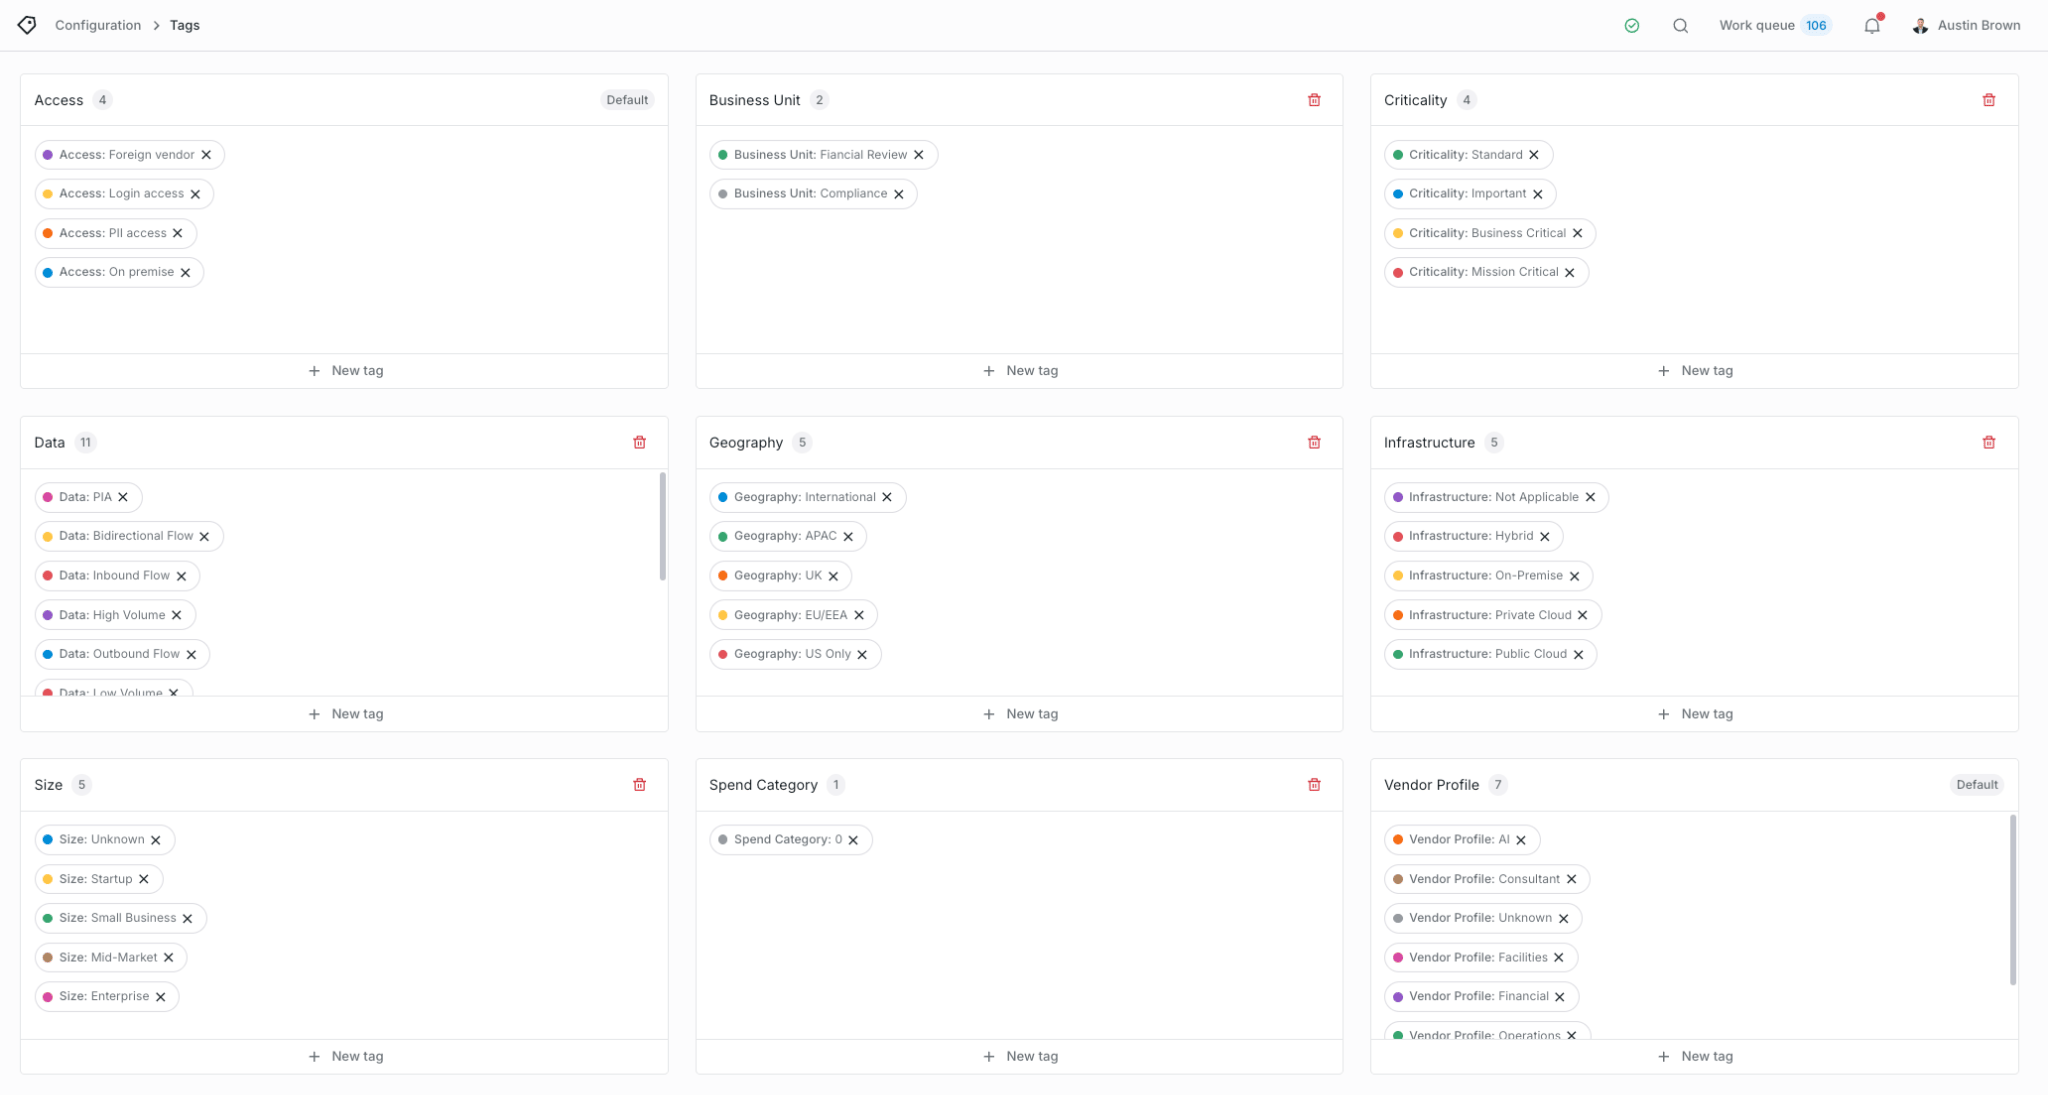
Standard, Important, Business Critical, Mission Critical
PII, PHI, Financial, Employee, plus flow and volume tags (Inbound, Outbound, Bidirectional, High Volume, Low Volume, No Data Access)
Login access, PII access, On-premise, Foreign vendor
US Only, EU/EEA, UK, APAC, International
Public Cloud, Private Cloud, Hybrid, On-Premise, Not Applicable
Startup through Enterprise, plus SaaS, Consultant, Facilities, Financial, Operations
To set this up, go to **Configuration → Tags**, create a tag group for each category, and add the individual tags within each group.
Start with your top 100 to 200 vendors rather than the entire database. That lets you refine the configuration before scaling. You can also pre-load historical documents (SOC 2s, contracts, policies) against vendor records, so your first assessments run against real evidence instead of an empty set.
***
## Step 3: Create your tag structure
Tags are the routing layer of the platform. IRQ answers apply tags, and tags then decide which control sets apply, which documents are required, and which due-diligence track a vendor gets.
Design the taxonomy before the IRQ, because the IRQ is what fills it in. Here's a structure that works well in practice. Adapt it to your program.
Standard, Important, Business Critical, Mission Critical
PII, PHI, Financial, Employee, plus flow and volume tags (Inbound, Outbound, Bidirectional, High Volume, Low Volume, No Data Access)
Login access, PII access, On-premise, Foreign vendor
US Only, EU/EEA, UK, APAC, International
Public Cloud, Private Cloud, Hybrid, On-Premise, Not Applicable
Startup through Enterprise, plus SaaS, Consultant, Facilities, Financial, Operations
To set this up, go to **Configuration → Tags**, create a tag group for each category, and add the individual tags within each group.
 A plain high/medium/low rating tells you a vendor is risky. Tags tell you why it's risky and how it should be assessed, which is what the automation needs. Almost everything you configure later keys off tags. A "Foreign" tag routes to extra controls, a "PCI" tag makes a PCI AOC required, an "AI SaaS" tag can attach a different clause set. Keep the taxonomy clean and the rest gets easier.
***
## Step 4: Build and weight your IRQ
The inherent risk questionnaire is what business requesters, and Coverbase's research agent, answer at intake. Its weights produce the inherent risk score, and its response mapping applies your tags. Aim for 15 to 25 concise questions.
1. Go to **Configuration → Questionnaires** and create your Inherent Risk Questionnaire. Use **Actions → Bulk Create Questions** to import an existing IRQ from the spreadsheet template instead of building it question by question.
2. Weight every answer with a risk score on a 0 to 20 scale, where higher means more risk. The sum of all maximum answer scores is the risk ceiling, and a vendor's actual answers as a percentage of that ceiling is their inherent risk score.
3. Open **Response Mapping** (the gear icon) and map answers to tags. Data handled outside the US applies "Foreign", card data applies "PCI", and so on.
4. Add conditional logic where a follow-on question should only appear based on a prior answer, like asking for data-flow details only if data is exchanged.
5. Set per-question AI guidance to control what the research agent may use when it auto-answers. For example, "only source from the vendor's trust center, exclude blogs and CVE chatter."
6. Mark judgment questions as Required so the AI never auto-answers them without human input.
A plain high/medium/low rating tells you a vendor is risky. Tags tell you why it's risky and how it should be assessed, which is what the automation needs. Almost everything you configure later keys off tags. A "Foreign" tag routes to extra controls, a "PCI" tag makes a PCI AOC required, an "AI SaaS" tag can attach a different clause set. Keep the taxonomy clean and the rest gets easier.
***
## Step 4: Build and weight your IRQ
The inherent risk questionnaire is what business requesters, and Coverbase's research agent, answer at intake. Its weights produce the inherent risk score, and its response mapping applies your tags. Aim for 15 to 25 concise questions.
1. Go to **Configuration → Questionnaires** and create your Inherent Risk Questionnaire. Use **Actions → Bulk Create Questions** to import an existing IRQ from the spreadsheet template instead of building it question by question.
2. Weight every answer with a risk score on a 0 to 20 scale, where higher means more risk. The sum of all maximum answer scores is the risk ceiling, and a vendor's actual answers as a percentage of that ceiling is their inherent risk score.
3. Open **Response Mapping** (the gear icon) and map answers to tags. Data handled outside the US applies "Foreign", card data applies "PCI", and so on.
4. Add conditional logic where a follow-on question should only appear based on a prior answer, like asking for data-flow details only if data is exchanged.
5. Set per-question AI guidance to control what the research agent may use when it auto-answers. For example, "only source from the vendor's trust center, exclude blogs and CVE chatter."
6. Mark judgment questions as Required so the AI never auto-answers them without human input.
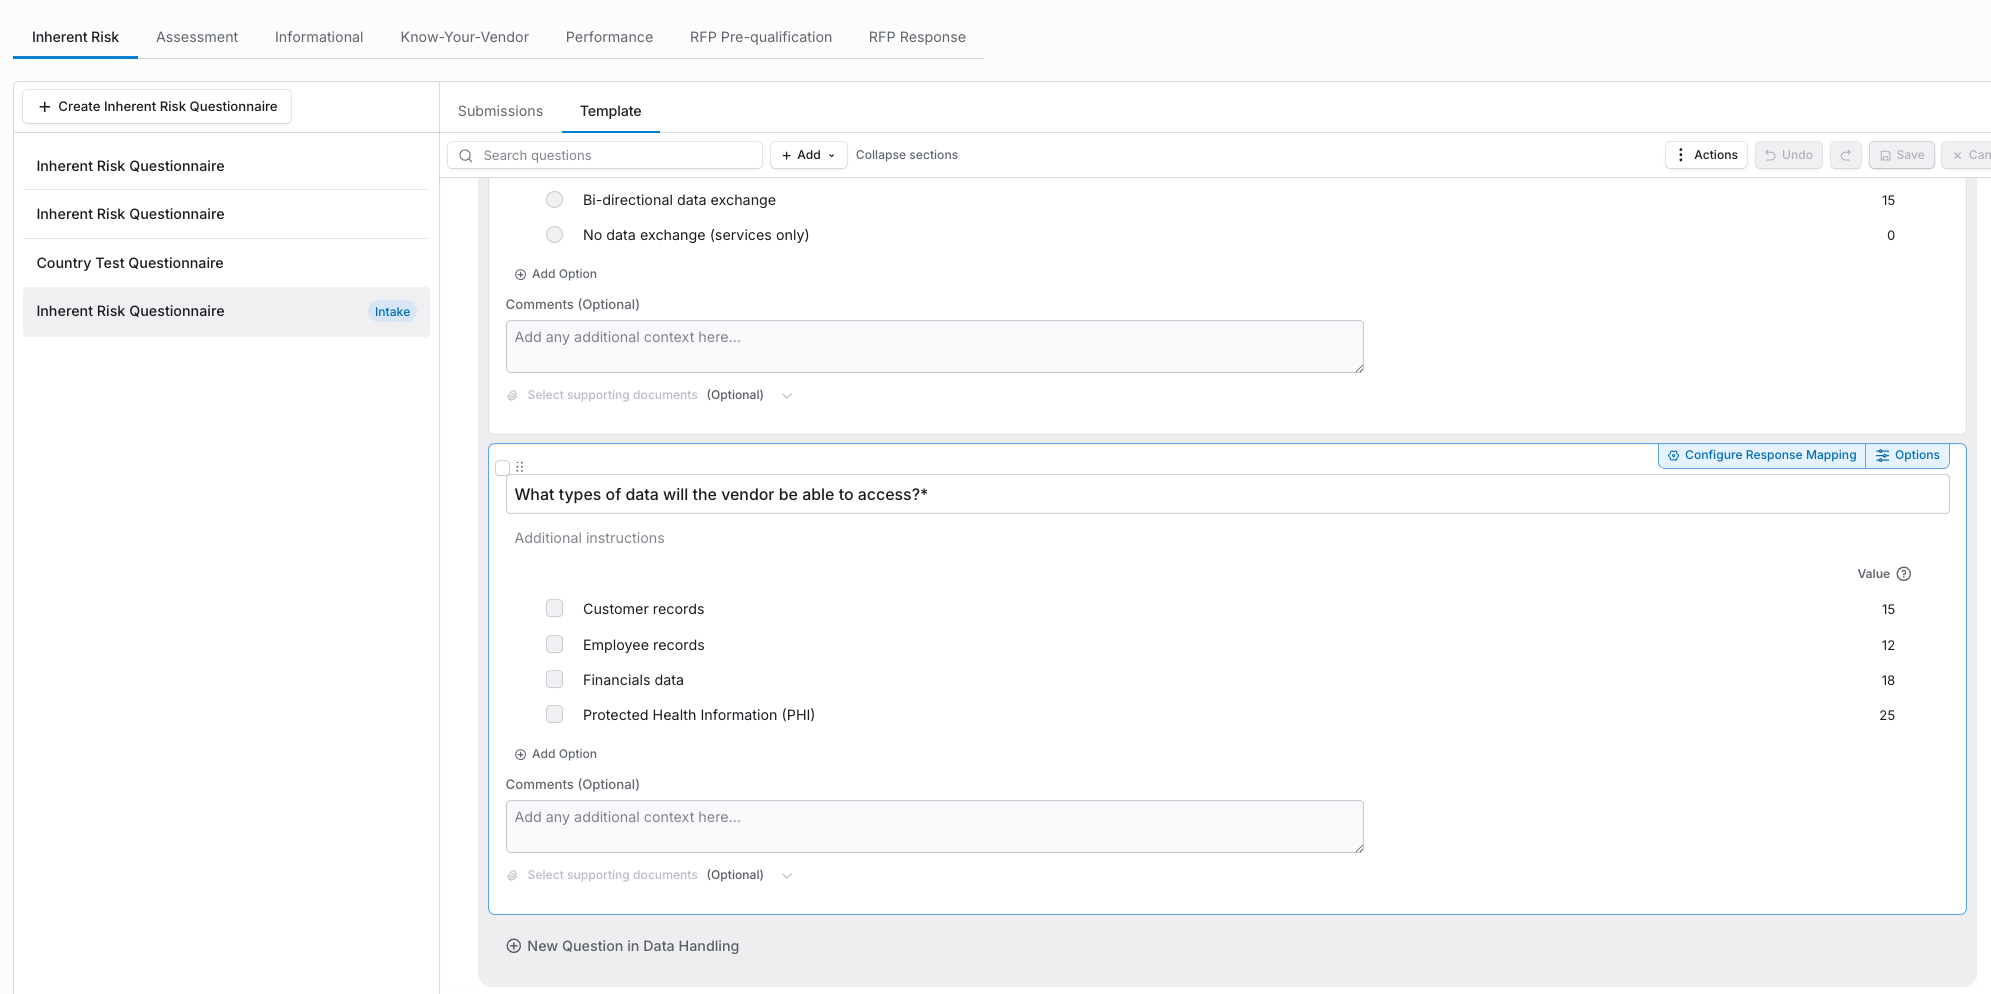 Weight the template before your first real intake. The default IRQ ships with dozens of zero-value answer scores. Left unweighted, inherent risk reads artificially low across your whole portfolio, and an API vendor can score like a stationery supplier.
### Example: mapping answers to tags
The mapping is what powers automated routing. When someone answers "This vendor will process employee data," Coverbase applies the Employee Data tag, which then triggers specific control sets and document requests.
| Question | Answer | Tags applied | Weight |
| ------------------------------------------ | --------------------- | -------------------------------------- | ------ |
| What type of data will this vendor access? | Employee PII | PII Access, Employee Data, High Volume | High |
| | Public marketing data | Low Volume, No PII | Low |
| Where is this vendor located? | European Union | EU/EEA, International | Medium |
| | United States only | US Only | Low |
### Pattern: auto-escalating vendors to Critical
A common requirement is that if a vendor answers "yes" to two or three specific questions, they should land in the strictest track regardless of overall score. Use two mechanisms together for redundancy:
* Weight those questions heavily, so any "yes" pushes the score into your critical band on its own.
* Map those answers to a tag that routes the vendor to the stricter due-diligence track, with control sets and document requirements keyed to that tag.
Scored multi-select questions with precedence logic also work here. A data-elements question can max the weight the moment someone selects PAN, for instance.
***
## Step 5: Configure risk and compliance scales
Scales define the bands your program scores against. There's the vendor-level risk scale and the per-control compliance scale.
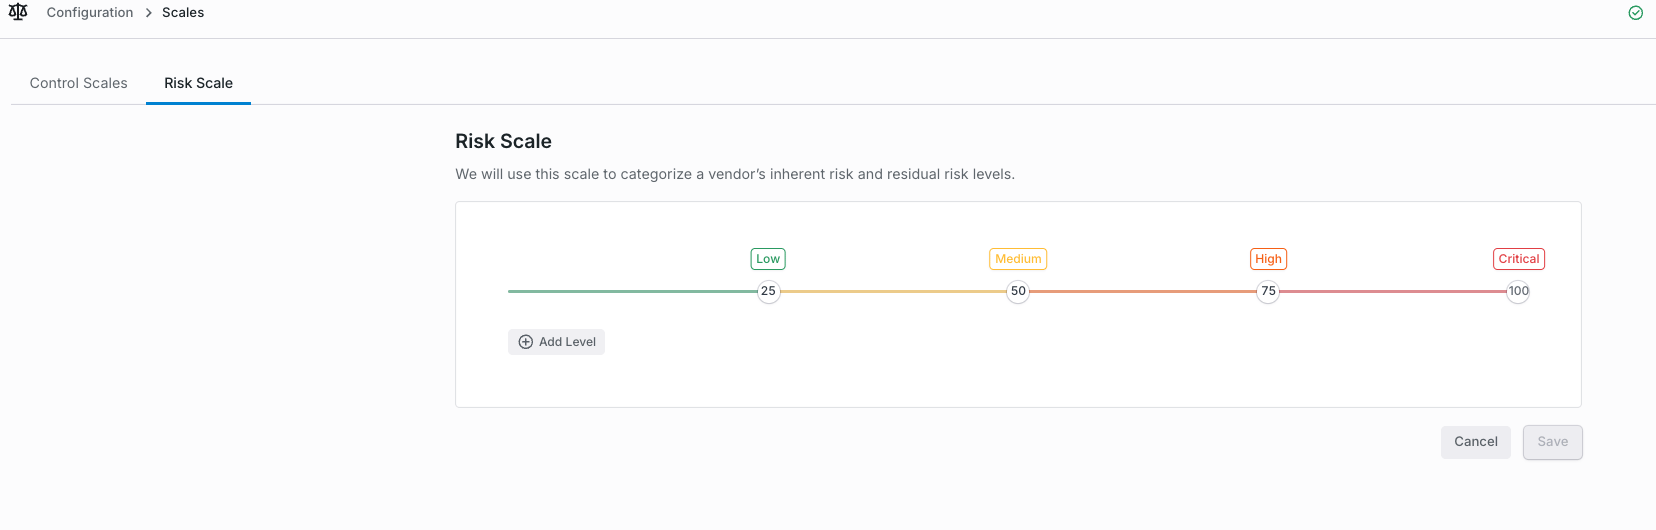
1. Go to **Configuration → Scales → Risk Scale**. The default bands are 0 to 25 low, 25 to 50 medium, 50 to 75 high, and 75 to 100 critical. Every threshold is adjustable, and you can add or remove tiers, collapse to three, or lower the critical threshold.
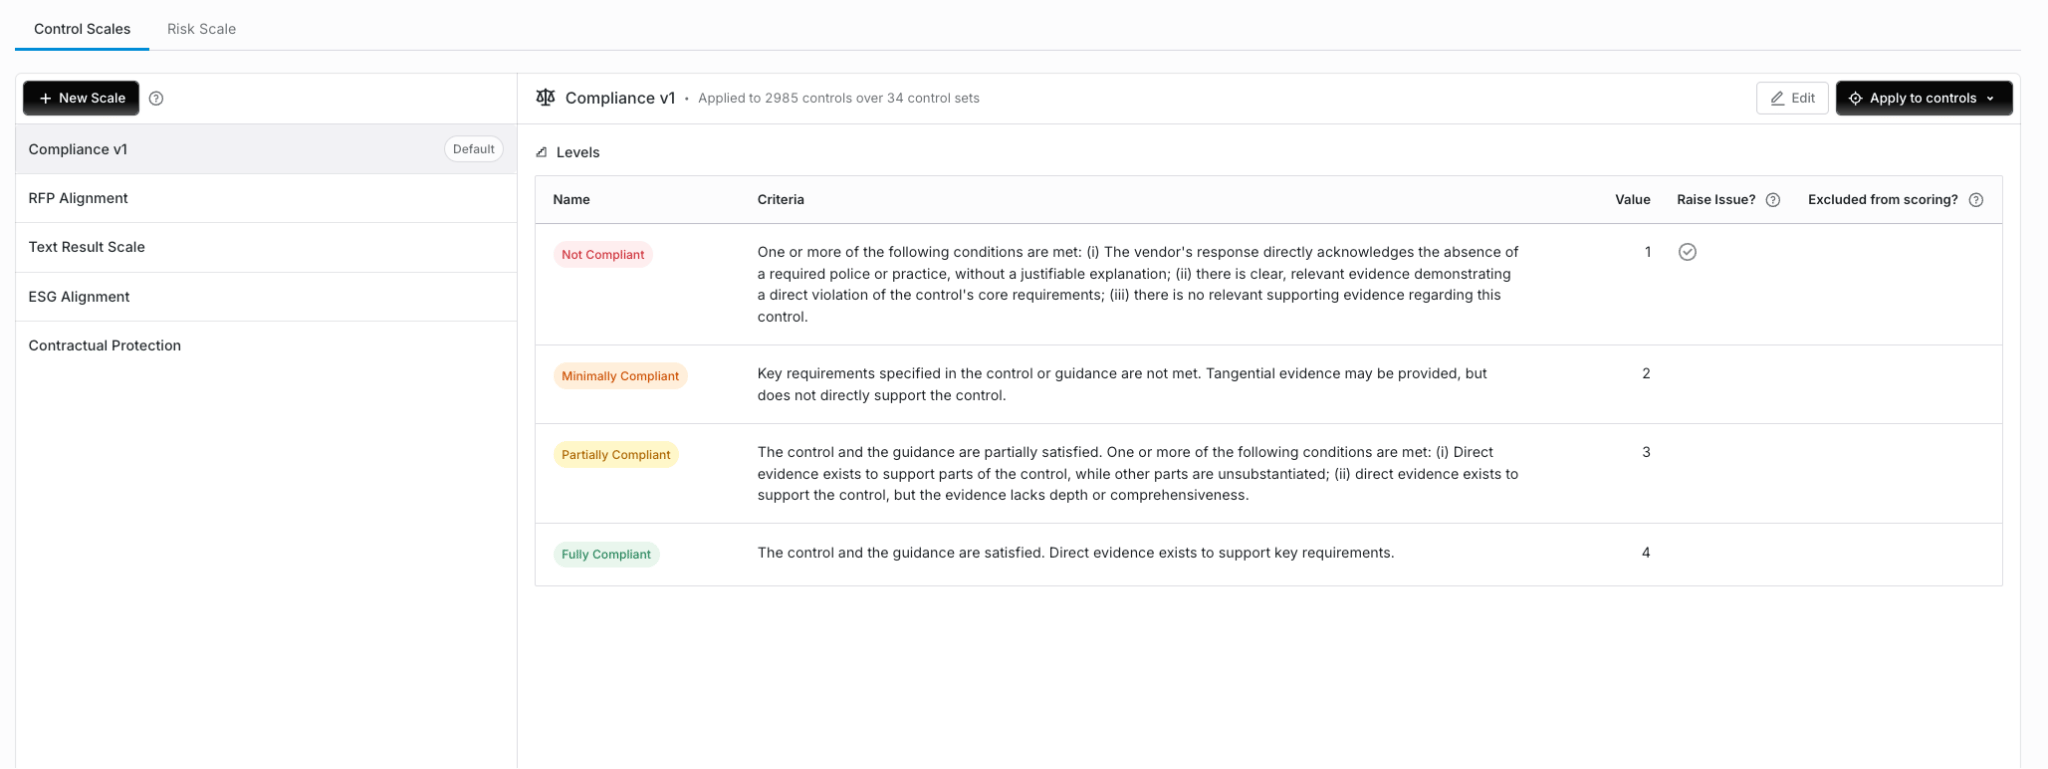
2. Review the compliance scale used on controls. The default runs from 4 (fully compliant) down to 1 (not compliant). You can rename levels, add or remove them, or make it boolean.
3. Write real criteria into each level, and don't stop at labels. The criteria text gets used when scores are assigned, so "one or more failing conditions met" is more useful than a bare "low."
4. Add custom assessment scales if your program rates other dimensions, like RFP alignment, ESG alignment, or contractual protection.
Weight the template before your first real intake. The default IRQ ships with dozens of zero-value answer scores. Left unweighted, inherent risk reads artificially low across your whole portfolio, and an API vendor can score like a stationery supplier.
### Example: mapping answers to tags
The mapping is what powers automated routing. When someone answers "This vendor will process employee data," Coverbase applies the Employee Data tag, which then triggers specific control sets and document requests.
| Question | Answer | Tags applied | Weight |
| ------------------------------------------ | --------------------- | -------------------------------------- | ------ |
| What type of data will this vendor access? | Employee PII | PII Access, Employee Data, High Volume | High |
| | Public marketing data | Low Volume, No PII | Low |
| Where is this vendor located? | European Union | EU/EEA, International | Medium |
| | United States only | US Only | Low |
### Pattern: auto-escalating vendors to Critical
A common requirement is that if a vendor answers "yes" to two or three specific questions, they should land in the strictest track regardless of overall score. Use two mechanisms together for redundancy:
* Weight those questions heavily, so any "yes" pushes the score into your critical band on its own.
* Map those answers to a tag that routes the vendor to the stricter due-diligence track, with control sets and document requirements keyed to that tag.
Scored multi-select questions with precedence logic also work here. A data-elements question can max the weight the moment someone selects PAN, for instance.
***
## Step 5: Configure risk and compliance scales
Scales define the bands your program scores against. There's the vendor-level risk scale and the per-control compliance scale.
1. Go to **Configuration → Scales → Risk Scale**. The default bands are 0 to 25 low, 25 to 50 medium, 50 to 75 high, and 75 to 100 critical. Every threshold is adjustable, and you can add or remove tiers, collapse to three, or lower the critical threshold.
2. Review the compliance scale used on controls. The default runs from 4 (fully compliant) down to 1 (not compliant). You can rename levels, add or remove them, or make it boolean.
3. Write real criteria into each level, and don't stop at labels. The criteria text gets used when scores are assigned, so "one or more failing conditions met" is more useful than a bare "low."
4. Add custom assessment scales if your program rates other dimensions, like RFP alignment, ESG alignment, or contractual protection.
 * RFP alignment: Exceeds, Meets, Partially meets, Does not meet requirements
* ESG alignment: Strong, Developing, Limited, No ESG program
* Contractual protection: Strong (indemnification, insurance, SLAs), Standard, Limited, Inadequate
Different risk domains need different criteria. Your legal team evaluating contract terms uses a different scale than your InfoSec team evaluating technical controls. Custom scales let each domain score its own way while keeping the overall picture consistent.
***
## Step 6: Upload and tune control sets
Control sets are what assessments measure against. They define what "good" looks like. Coverbase ships with SIG, NIST (CSF and AI RMF), ISO 27001, NYDFS, FFIEC, PCI DSS, DORA, and more out of the box, and your own frameworks import from a spreadsheet.
* RFP alignment: Exceeds, Meets, Partially meets, Does not meet requirements
* ESG alignment: Strong, Developing, Limited, No ESG program
* Contractual protection: Strong (indemnification, insurance, SLAs), Standard, Limited, Inadequate
Different risk domains need different criteria. Your legal team evaluating contract terms uses a different scale than your InfoSec team evaluating technical controls. Custom scales let each domain score its own way while keeping the overall picture consistent.
***
## Step 6: Upload and tune control sets
Control sets are what assessments measure against. They define what "good" looks like. Coverbase ships with SIG, NIST (CSF and AI RMF), ISO 27001, NYDFS, FFIEC, PCI DSS, DORA, and more out of the box, and your own frameworks import from a spreadsheet.
 ### Importing your own controls
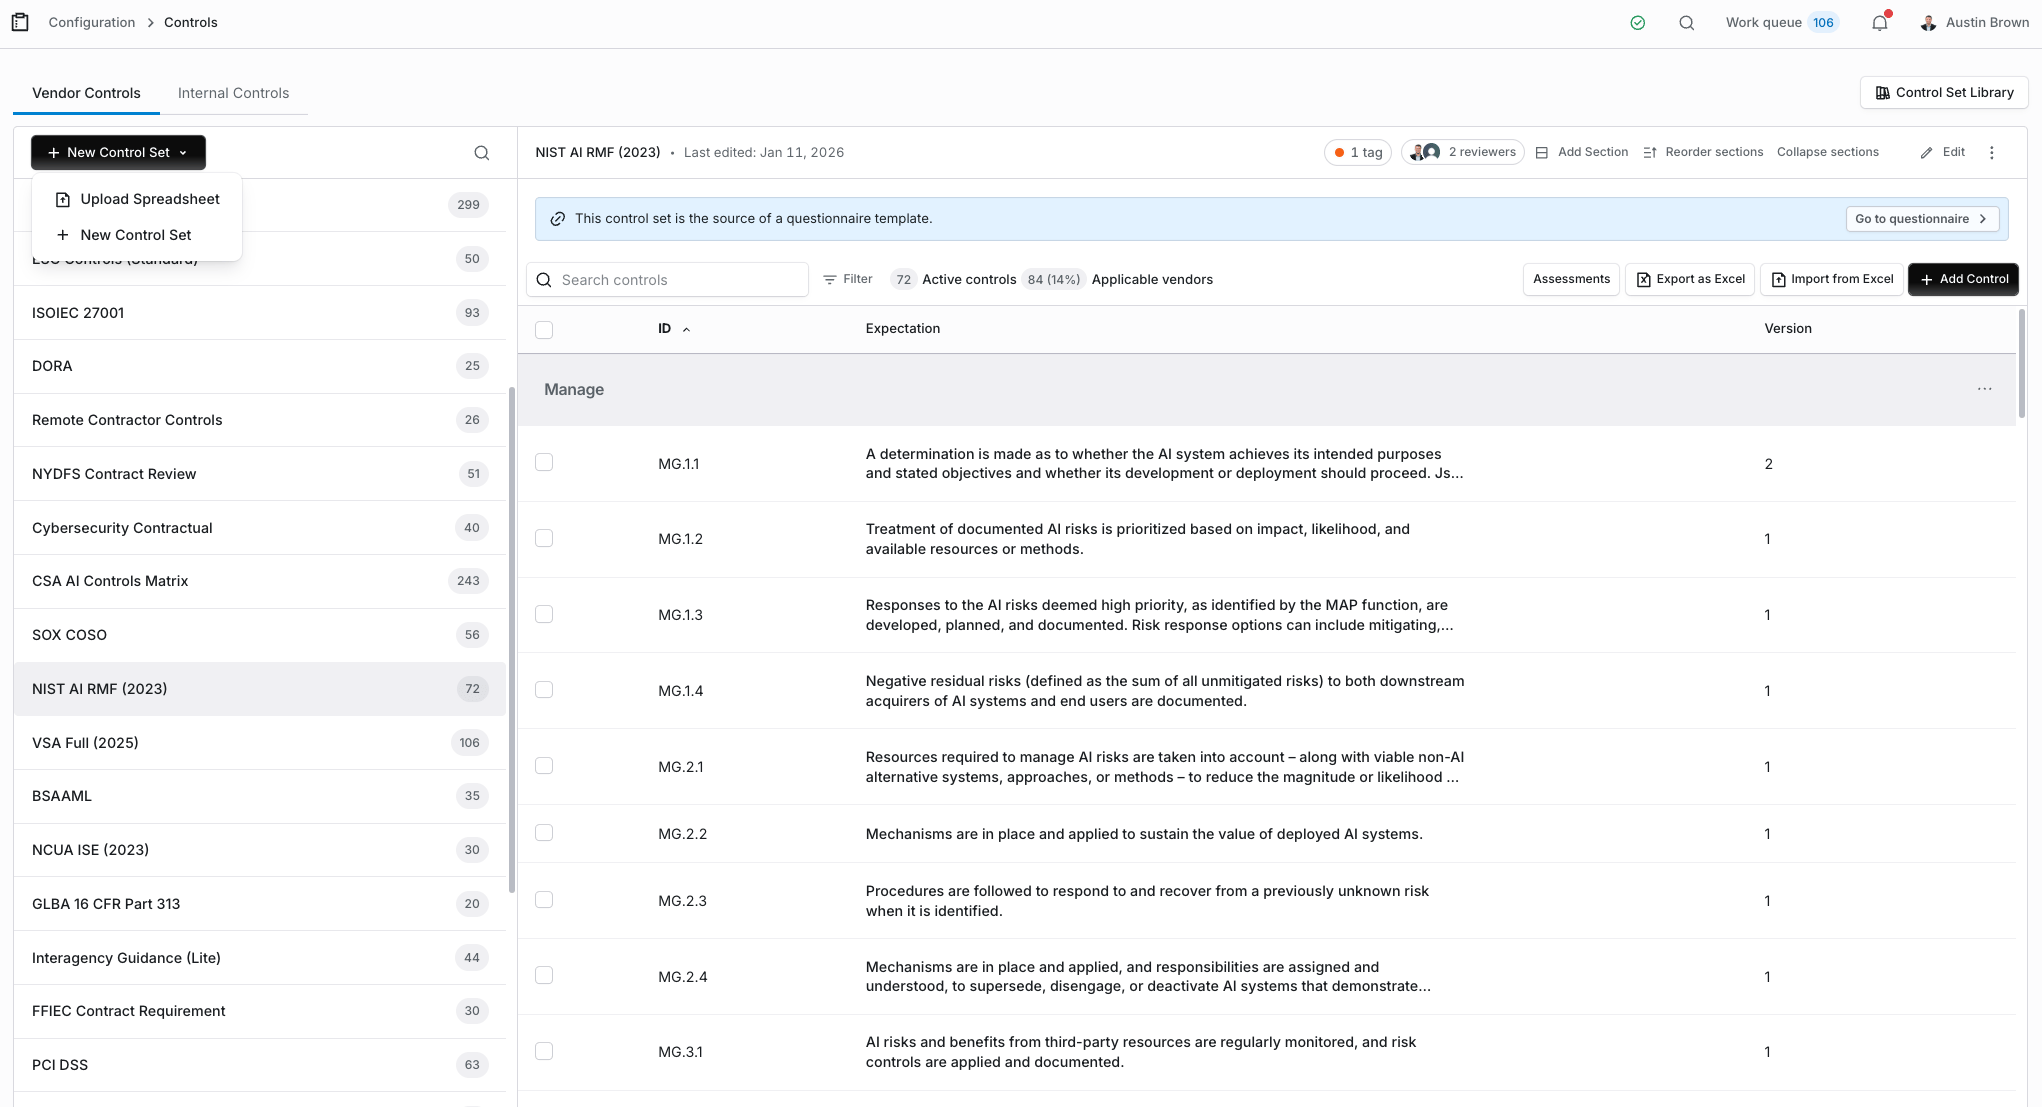
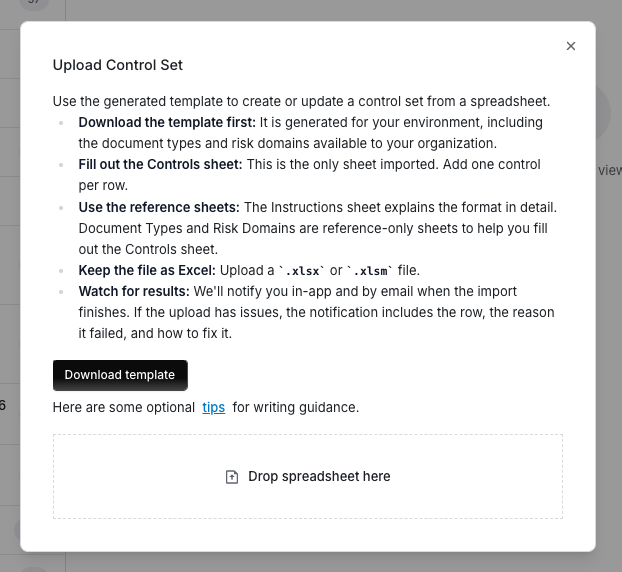
1. Go to **Control Sets** and click **+ New Control Set → Upload Spreadsheet**. Download the template workbook and the tips document from that dialog; that's where the current version always lives. In the workbook, the **Controls** tab is the one that gets imported; the **Instructions** tab carries the tips, and the **Document Types** and **Risk Domains** tabs are there for reference.
2. Use an LLM to convert your existing framework (from your GRC tool, a spreadsheet, wherever it lives) into the template format. Paste your controls plus the tips doc and ask for the conversion.
3. Upload one control set at a time and verify the import. Start with your two or three most critical frameworks.
### Importing your own controls
1. Go to **Control Sets** and click **+ New Control Set → Upload Spreadsheet**. Download the template workbook and the tips document from that dialog; that's where the current version always lives. In the workbook, the **Controls** tab is the one that gets imported; the **Instructions** tab carries the tips, and the **Document Types** and **Risk Domains** tabs are there for reference.
2. Use an LLM to convert your existing framework (from your GRC tool, a spreadsheet, wherever it lives) into the template format. Paste your controls plus the tips doc and ask for the conversion.
3. Upload one control set at a time and verify the import. Start with your two or three most critical frameworks.
 ### Per-set configuration
Every control has three parts: the expectation (what you're measuring), the question (how it would be asked of a vendor if evidence is missing), and the guidance (how the AI should evaluate it). Then, per set:
* Applicability: map which tags and inherent-risk levels this set applies to. This is what makes assessment assignment automatic.
* Risk domains: assign controls to domains like InfoSec, compliance, or operational resilience, so review work can later be split across specialists.
* Strictness: set the evaluation toggle (lenient, standard, or strict) per set.
* Evidence sources: choose what the AI may draw on per control, from specific document types to web search to a vendor's Vendor Intelligence. These combine and can be prioritized, so you might put the information security policy first and web search as a fallback.
* Minimum credibility: on each web-search source, set how accountable a publisher has to be before its page can be cited: **No minimum**, **Reputable** (the default), or **Authoritative**. Pages below the bar are discarded before the AI reads them. See [Evidence quality and source credibility](/user-guides/evidence-quality) for the scale, where to tighten it, and what it doesn't cover.
* Restrict evidence to these sources: on by default once you add evidence sources at the set level, this keeps the analysis inside the sources you listed. Turn it off when you want to ask the vendor for particular document types without narrowing what the AI may read. The sources still drive the portal request and stay the AI's first stop, but other submitted documents remain admissible. Evidence sources set on an individual control always restrict that control.
* Document requirements: mark documents required or suggested. Required blocks portal submission until the document is uploaded, so use it sparingly.
SOC 2 and pen test required. PCI AOC required only for PCI-tagged vendors. A bridge letter left as a suggested remediation when a SOC 2 is past your currency window. Everything else suggested. Default to suggested unless it's a hard gate.
### Per-control tuning
Open any control to edit its expectation, weight, and guidance. Guidance is where conditional logic and exceptions live, like "mark fully compliant if the vendor is not a professional services company with a physical on-site presence," or "accept an infosec training attestation as sufficient evidence."
You don't have to write guidance up front. Reviewers refine it from real results using Correct the AI (see the [Analyst and reviewer guide](/user-guides/analyst-reviewer#step-4-correct-the-ai)), and every accepted correction applies to all future assessments. Specific guidance beats cranking the global strictness toggle. It's more effective, and it's easier to defend to a regulator.
Framework gaps are normal. Not every framework covers every topic. NIST CSF, for example, doesn't explicitly cover penetration testing. When your program cares about something a framework doesn't name, add a control for it and point the guidance at the specific evidence.
***
## Step 7: Assessment plans and reassessment cadence
This step decides which assessment a vendor gets, and when they get looked at again.
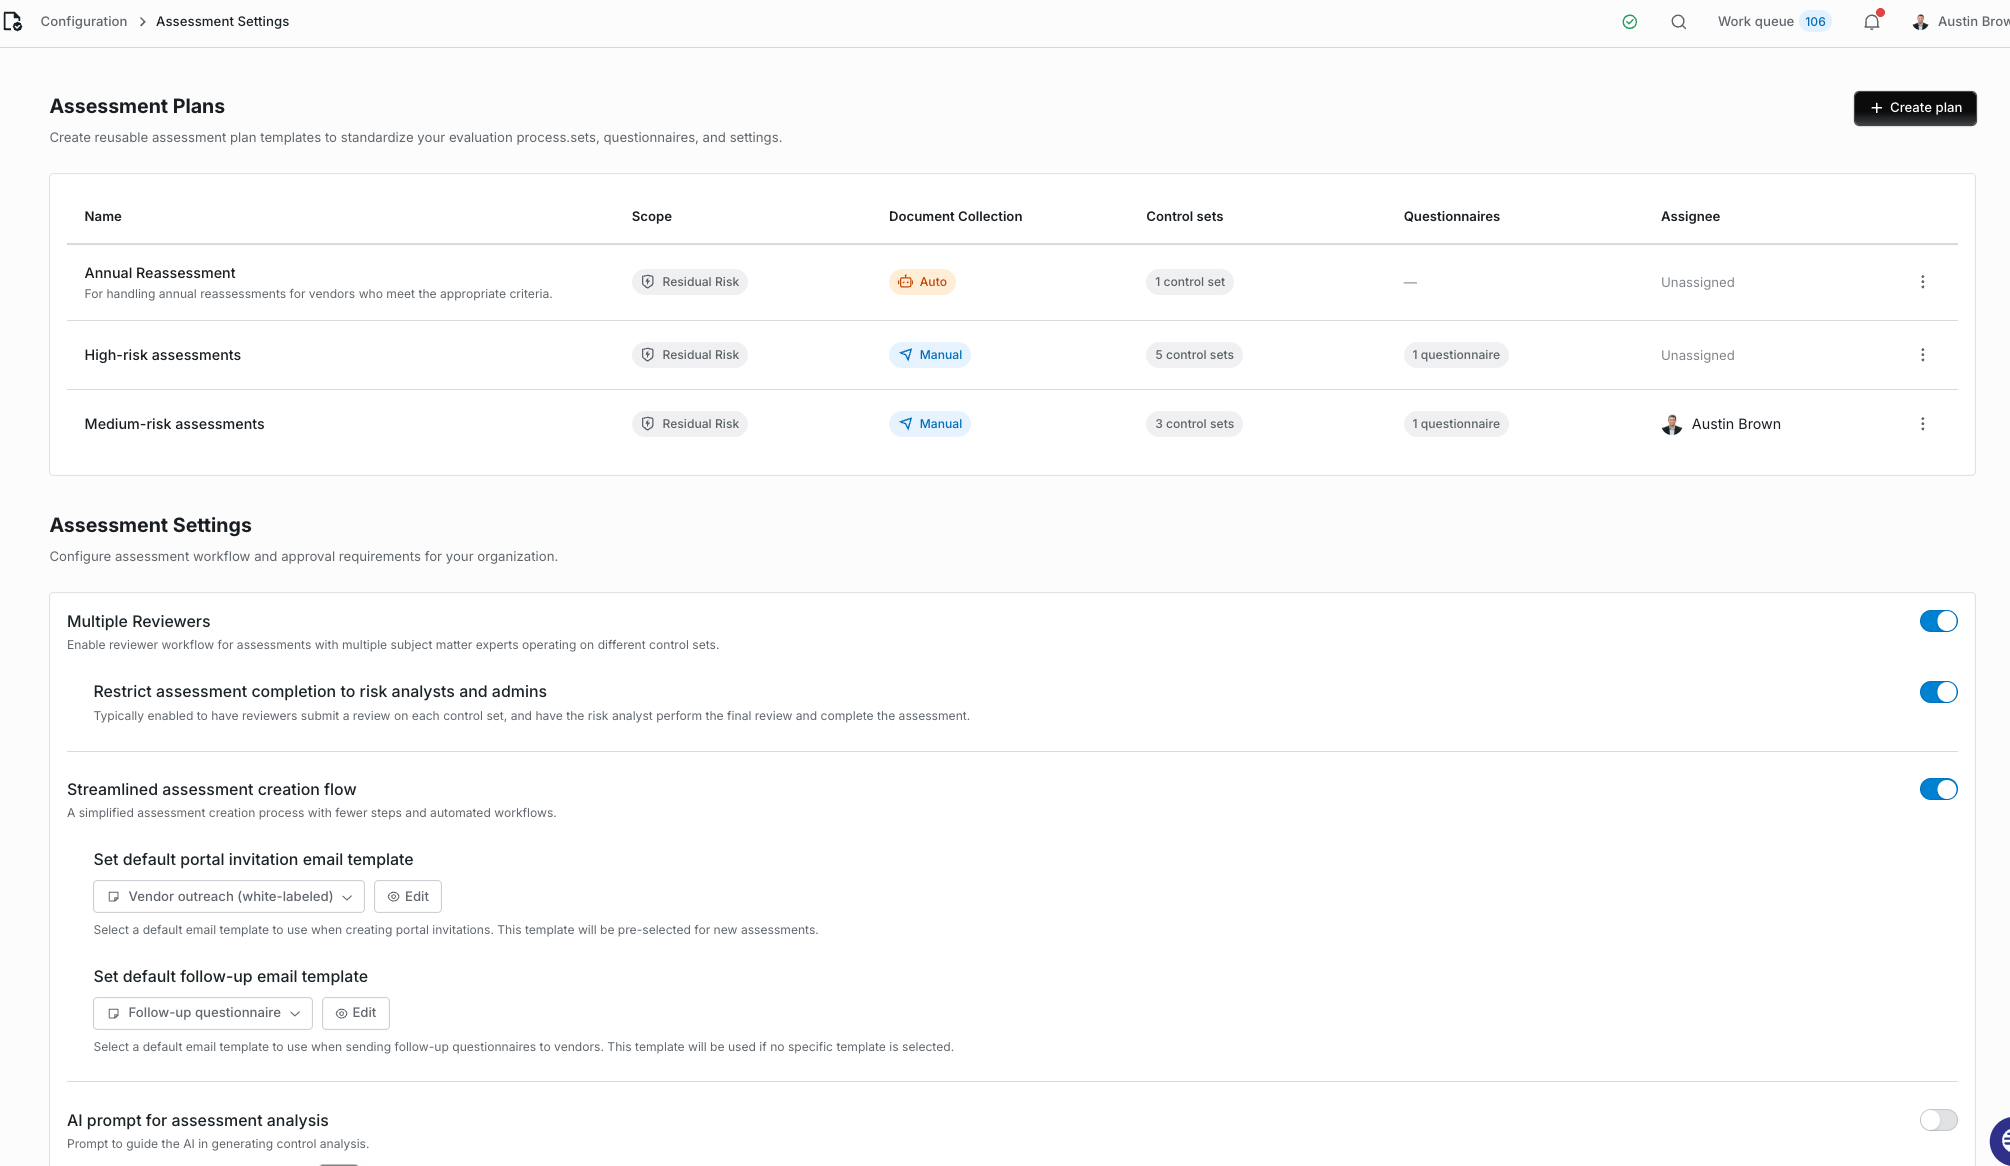
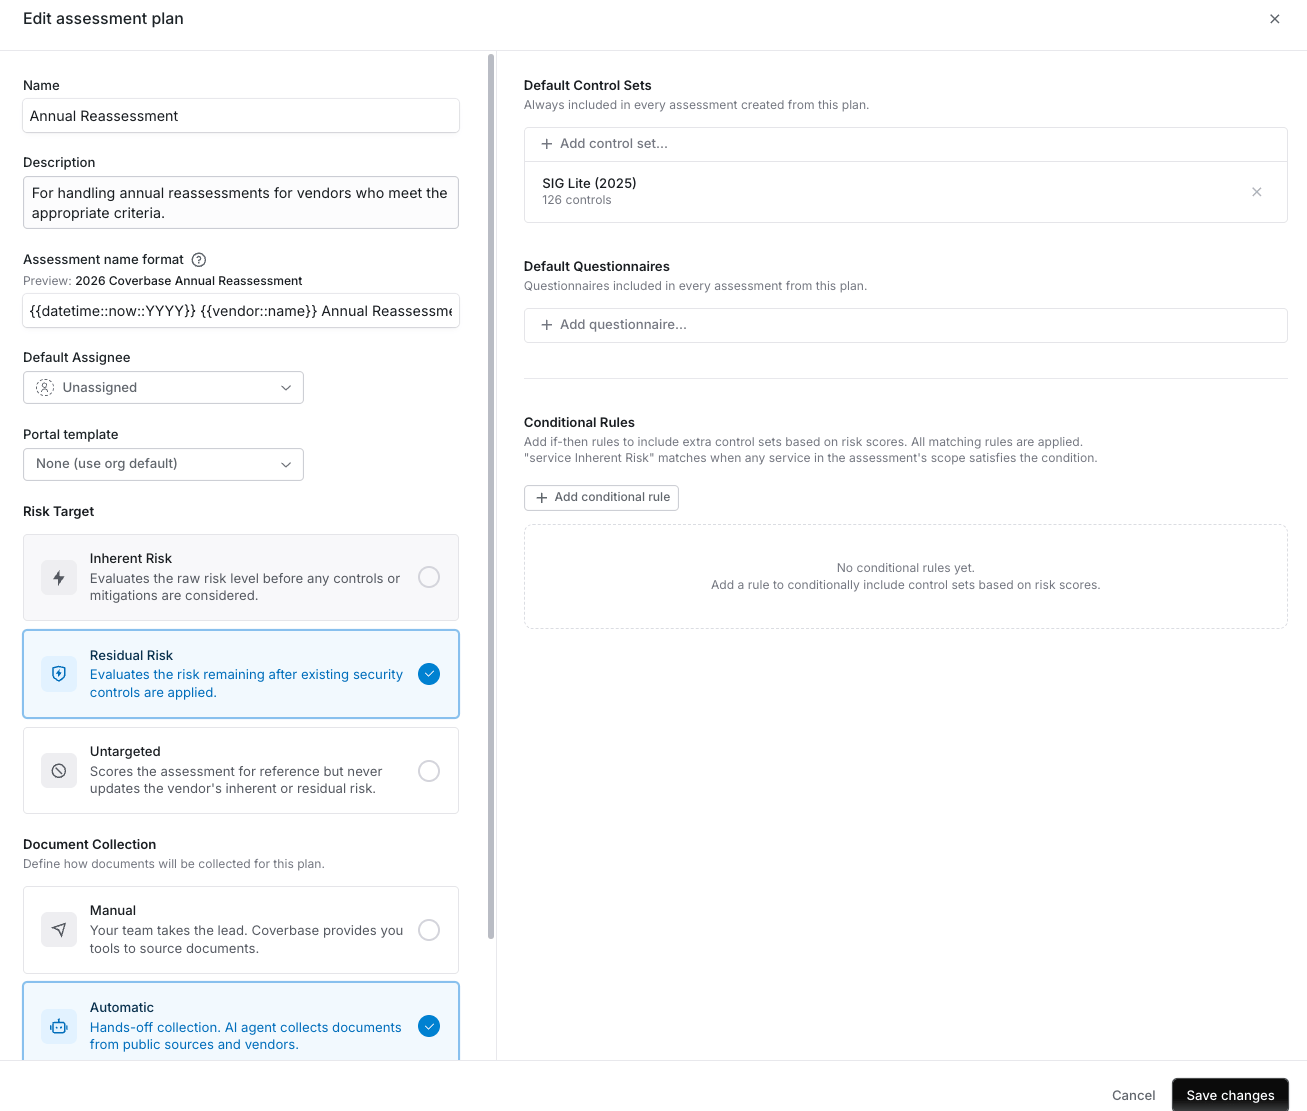
* Build assessment plans that bundle control sets by tier, so high and critical vendors get the fuller plan. Plans can be assigned statically or dynamically off tags and inherent risk.
* Set the reassessment cadence in assessment settings. It defaults off residual risk (low might be every three years), but it can key off inherent risk instead, and it's fully overridable per vendor.
* Layer on trigger-based reassessments so a Radar event or a risk-score change can open an off-cycle review automatically.
### Per-set configuration
Every control has three parts: the expectation (what you're measuring), the question (how it would be asked of a vendor if evidence is missing), and the guidance (how the AI should evaluate it). Then, per set:
* Applicability: map which tags and inherent-risk levels this set applies to. This is what makes assessment assignment automatic.
* Risk domains: assign controls to domains like InfoSec, compliance, or operational resilience, so review work can later be split across specialists.
* Strictness: set the evaluation toggle (lenient, standard, or strict) per set.
* Evidence sources: choose what the AI may draw on per control, from specific document types to web search to a vendor's Vendor Intelligence. These combine and can be prioritized, so you might put the information security policy first and web search as a fallback.
* Minimum credibility: on each web-search source, set how accountable a publisher has to be before its page can be cited: **No minimum**, **Reputable** (the default), or **Authoritative**. Pages below the bar are discarded before the AI reads them. See [Evidence quality and source credibility](/user-guides/evidence-quality) for the scale, where to tighten it, and what it doesn't cover.
* Restrict evidence to these sources: on by default once you add evidence sources at the set level, this keeps the analysis inside the sources you listed. Turn it off when you want to ask the vendor for particular document types without narrowing what the AI may read. The sources still drive the portal request and stay the AI's first stop, but other submitted documents remain admissible. Evidence sources set on an individual control always restrict that control.
* Document requirements: mark documents required or suggested. Required blocks portal submission until the document is uploaded, so use it sparingly.
SOC 2 and pen test required. PCI AOC required only for PCI-tagged vendors. A bridge letter left as a suggested remediation when a SOC 2 is past your currency window. Everything else suggested. Default to suggested unless it's a hard gate.
### Per-control tuning
Open any control to edit its expectation, weight, and guidance. Guidance is where conditional logic and exceptions live, like "mark fully compliant if the vendor is not a professional services company with a physical on-site presence," or "accept an infosec training attestation as sufficient evidence."
You don't have to write guidance up front. Reviewers refine it from real results using Correct the AI (see the [Analyst and reviewer guide](/user-guides/analyst-reviewer#step-4-correct-the-ai)), and every accepted correction applies to all future assessments. Specific guidance beats cranking the global strictness toggle. It's more effective, and it's easier to defend to a regulator.
Framework gaps are normal. Not every framework covers every topic. NIST CSF, for example, doesn't explicitly cover penetration testing. When your program cares about something a framework doesn't name, add a control for it and point the guidance at the specific evidence.
***
## Step 7: Assessment plans and reassessment cadence
This step decides which assessment a vendor gets, and when they get looked at again.
* Build assessment plans that bundle control sets by tier, so high and critical vendors get the fuller plan. Plans can be assigned statically or dynamically off tags and inherent risk.
* Set the reassessment cadence in assessment settings. It defaults off residual risk (low might be every three years), but it can key off inherent risk instead, and it's fully overridable per vendor.
* Layer on trigger-based reassessments so a Radar event or a risk-score change can open an off-cycle review automatically.
 * Critical: every 12 months
* High: every 24 months
* Medium: every 36 months
* Low: manual only
Manual reassessment tracking falls apart at scale. Spreadsheets go stale and vendors slip through. Automated schedules keep consistent oversight without the admin overhead.
***
## Step 8: Report and email templates
This step makes every output, whether an assessment readout or a vendor email, land in your organization's format and voice.
For report templates, go to **Configuration → Assessment Settings → Assessment Report Templates**. Build a branded template using tokens (fields from the assessment and vendor record) plus custom AI prompts for freeform sections, like "give a meaningful analysis of the limitation of liability as it relates to their DPA." If you don't have a house format yet, start from the Coverbase best-practice template with your branding.
* Critical: every 12 months
* High: every 24 months
* Medium: every 36 months
* Low: manual only
Manual reassessment tracking falls apart at scale. Spreadsheets go stale and vendors slip through. Automated schedules keep consistent oversight without the admin overhead.
***
## Step 8: Report and email templates
This step makes every output, whether an assessment readout or a vendor email, land in your organization's format and voice.
For report templates, go to **Configuration → Assessment Settings → Assessment Report Templates**. Build a branded template using tokens (fields from the assessment and vendor record) plus custom AI prompts for freeform sections, like "give a meaningful analysis of the limitation of liability as it relates to their DPA." If you don't have a house format yet, start from the Coverbase best-practice template with your branding.
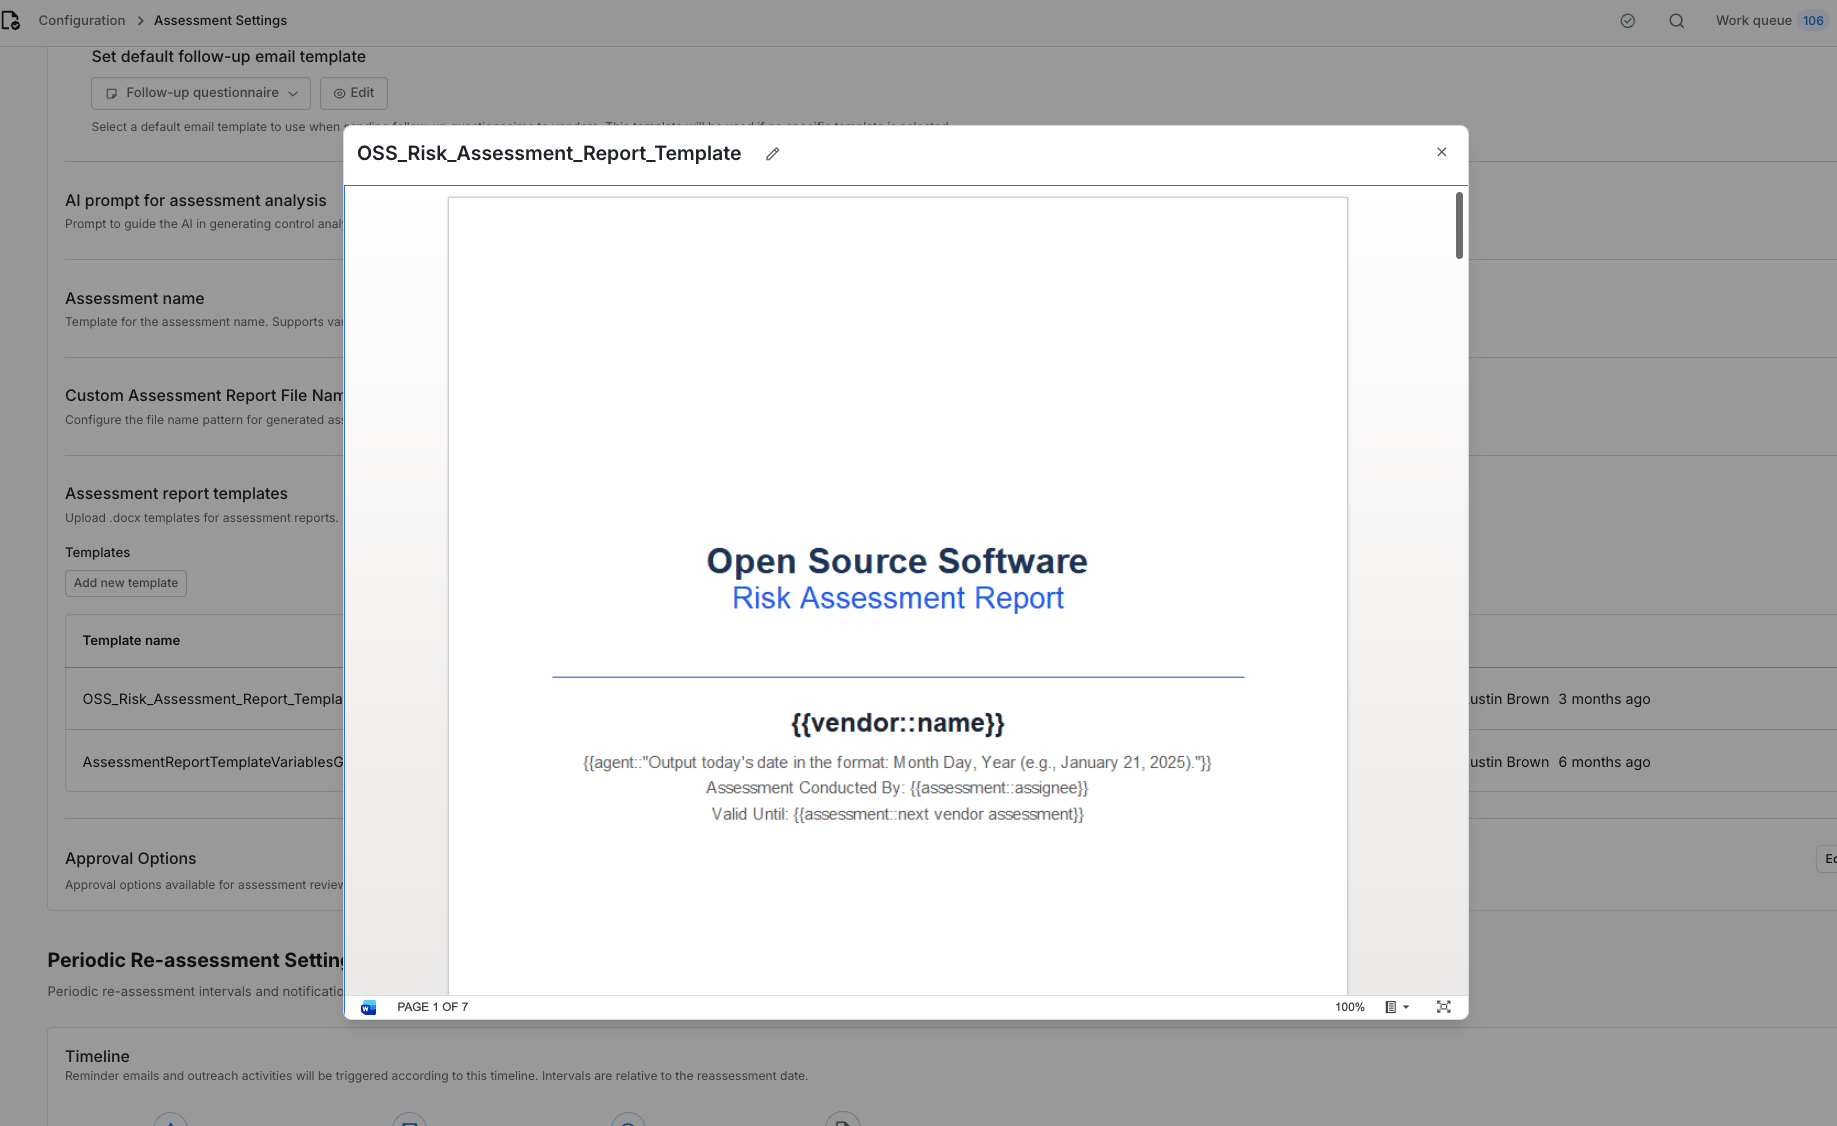 Whoever writes the `.docx` will want the full reference open alongside it. Tokens are called **placeholders** in those pages.
How to author the `.docx`: placeholder syntax, AI prompt sections, repeating findings tables, signature anchors, and what happens when a placeholder cannot be filled.
Every placeholder available, what it resolves to, and how each value is formatted.
Three exports come built in: Standard PDF, Executive Summary, and Full (every control with all evidence, the one examiners like).
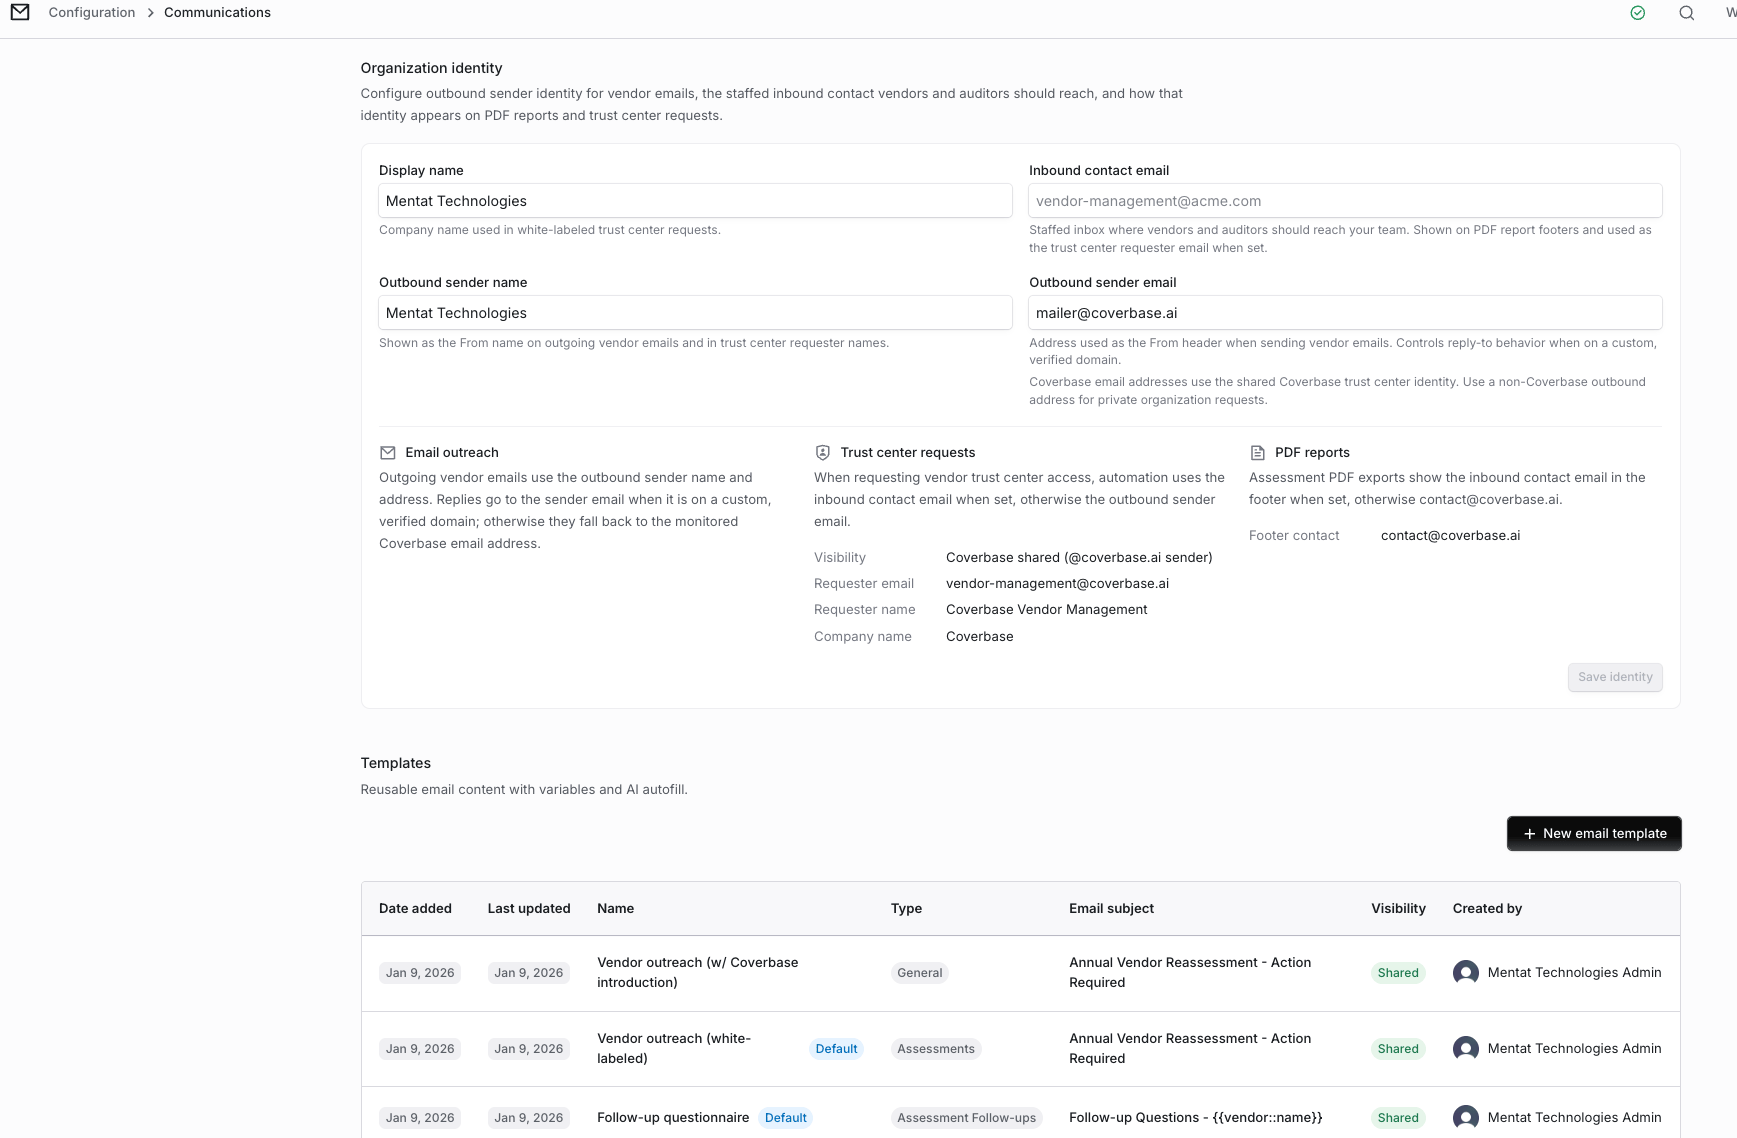
For email templates, configure the vendor emails used for portal invitations and follow-ups. You control the sender identity, instructions, reminder cadence (every two days, for example), and whether the internal requester is CC'd automatically. Attach a pre-signed MNDA to invitations so legal back-and-forth doesn't stall document sharing.
Whoever writes the `.docx` will want the full reference open alongside it. Tokens are called **placeholders** in those pages.
How to author the `.docx`: placeholder syntax, AI prompt sections, repeating findings tables, signature anchors, and what happens when a placeholder cannot be filled.
Every placeholder available, what it resolves to, and how each value is formatted.
Three exports come built in: Standard PDF, Executive Summary, and Full (every control with all evidence, the one examiners like).
For email templates, configure the vendor emails used for portal invitations and follow-ups. You control the sender identity, instructions, reminder cadence (every two days, for example), and whether the internal requester is CC'd automatically. Attach a pre-signed MNDA to invitations so legal back-and-forth doesn't stall document sharing.
 ***
## Step 9: Configure Radar (continuous monitoring)
Radar is the external intelligence layer. Sources feed detectors, and detectors raise alerts on your third and fourth parties.
1. Review the out-of-the-box sources: SEC filings, CVE feeds, CISA advisories, and security and financial news, all pulled several times a day. Add any public RSS feed at no extra cost, or connect a ratings platform like Black Kite as an API source.
2. Create detectors around what you actually act on, such as breaches and vulnerabilities, supply-chain disruption, or SEC and regulatory actions. Each detector takes plain-language guidance, example events to hone in on, impacted risk domains, and a severity threshold.
3. Test each detector before you enable it, and start with tight severity thresholds.
***
## Step 9: Configure Radar (continuous monitoring)
Radar is the external intelligence layer. Sources feed detectors, and detectors raise alerts on your third and fourth parties.
1. Review the out-of-the-box sources: SEC filings, CVE feeds, CISA advisories, and security and financial news, all pulled several times a day. Add any public RSS feed at no extra cost, or connect a ratings platform like Black Kite as an API source.
2. Create detectors around what you actually act on, such as breaches and vulnerabilities, supply-chain disruption, or SEC and regulatory actions. Each detector takes plain-language guidance, example events to hone in on, impacted risk domains, and a severity threshold.
3. Test each detector before you enable it, and start with tight severity thresholds.
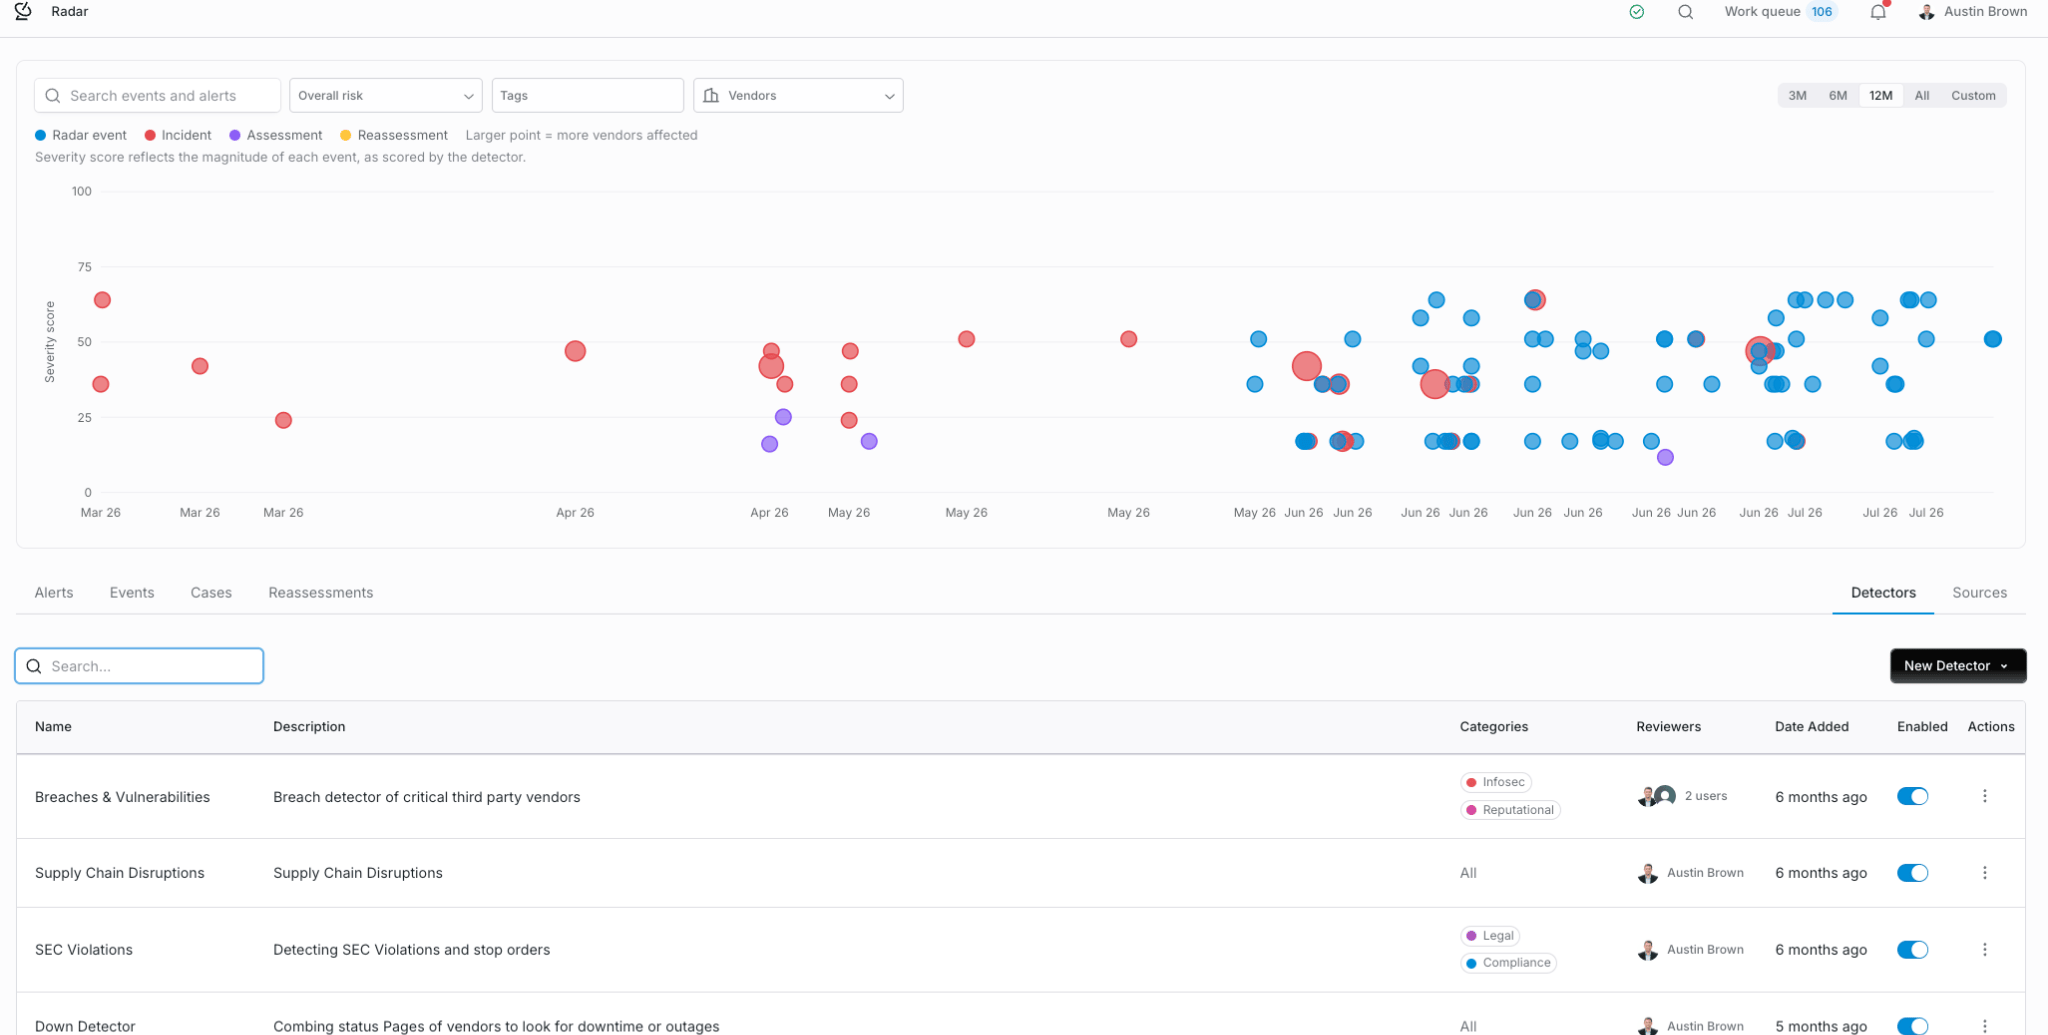
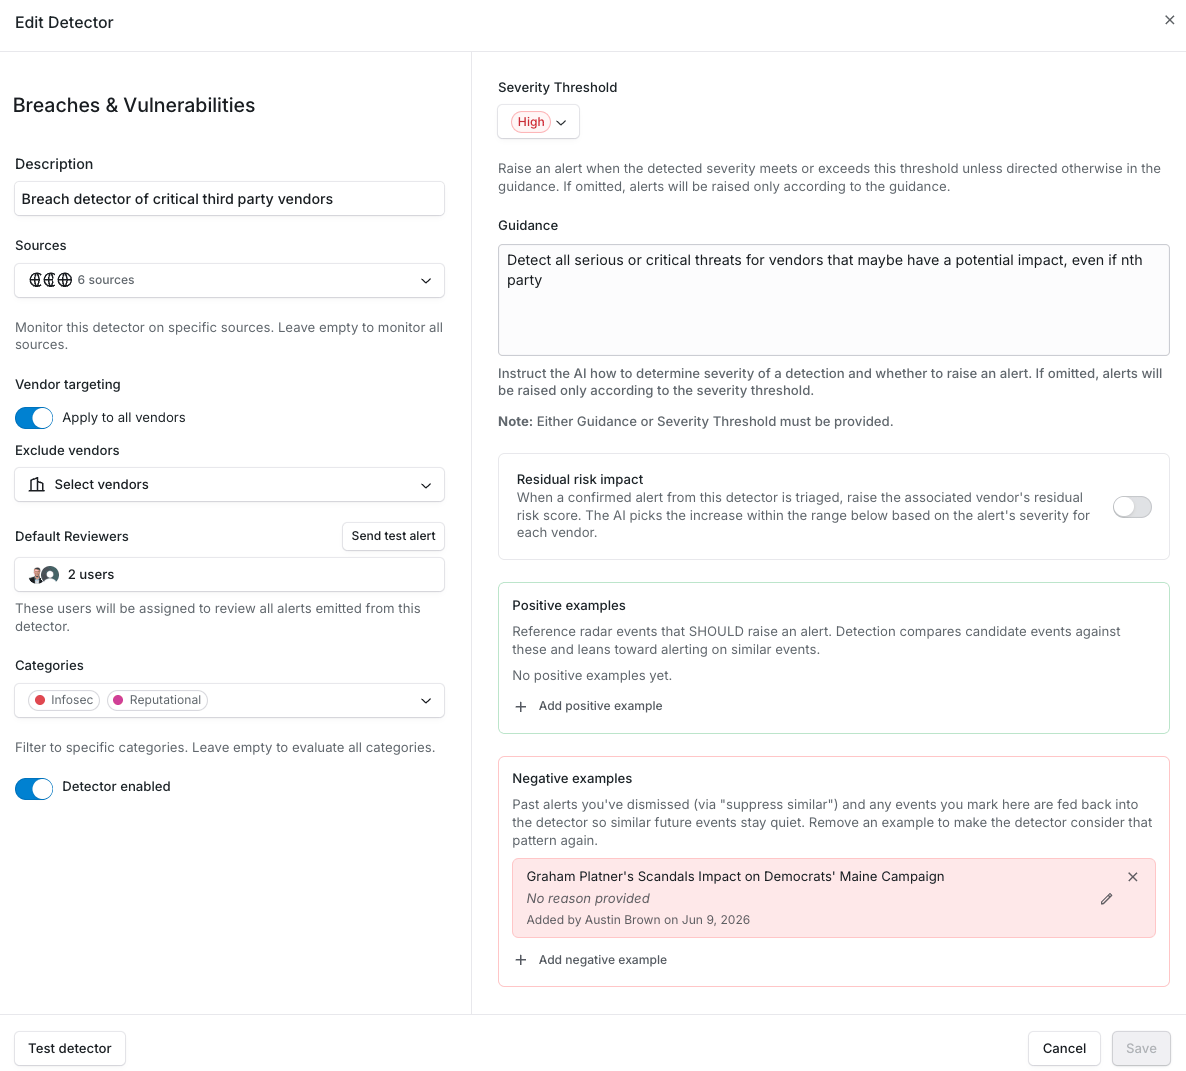 Tuning is what makes or breaks continuous monitoring. The failure mode is noise, and a single well-covered vendor can throw a dozen hits in a week. Keep detectors narrow and severities high at first, watch what fires for two weeks, then loosen deliberately. Fourth-party relationships get extracted automatically from SOC 2s, subprocessor lists, and SBOMs, so one event can implicate many vendors at once. That's exactly why precision matters.
***
## Step 10: Enable obligations extraction
This step turns on extraction of what vendors require of you: CUECs from SOC reports (pulled verbatim) and shared responsibilities from contracts, DPAs, and terms.
1. In settings, enable auto-create for CUECs and obligations from uploaded documents, and confirm which document types trigger extraction (SOC 1 Type 2, SOC 2 Type 2, contracts).
2. Re-trigger analysis on documents you uploaded before you enabled this. Extraction only runs on documents processed after the setting is on.
3. Optionally, upload your internal control set so extracted obligations can be checked automatically against controls you already have in place.
Tuning is what makes or breaks continuous monitoring. The failure mode is noise, and a single well-covered vendor can throw a dozen hits in a week. Keep detectors narrow and severities high at first, watch what fires for two weeks, then loosen deliberately. Fourth-party relationships get extracted automatically from SOC 2s, subprocessor lists, and SBOMs, so one event can implicate many vendors at once. That's exactly why precision matters.
***
## Step 10: Enable obligations extraction
This step turns on extraction of what vendors require of you: CUECs from SOC reports (pulled verbatim) and shared responsibilities from contracts, DPAs, and terms.
1. In settings, enable auto-create for CUECs and obligations from uploaded documents, and confirm which document types trigger extraction (SOC 1 Type 2, SOC 2 Type 2, contracts).
2. Re-trigger analysis on documents you uploaded before you enabled this. Extraction only runs on documents processed after the setting is on.
3. Optionally, upload your internal control set so extracted obligations can be checked automatically against controls you already have in place.
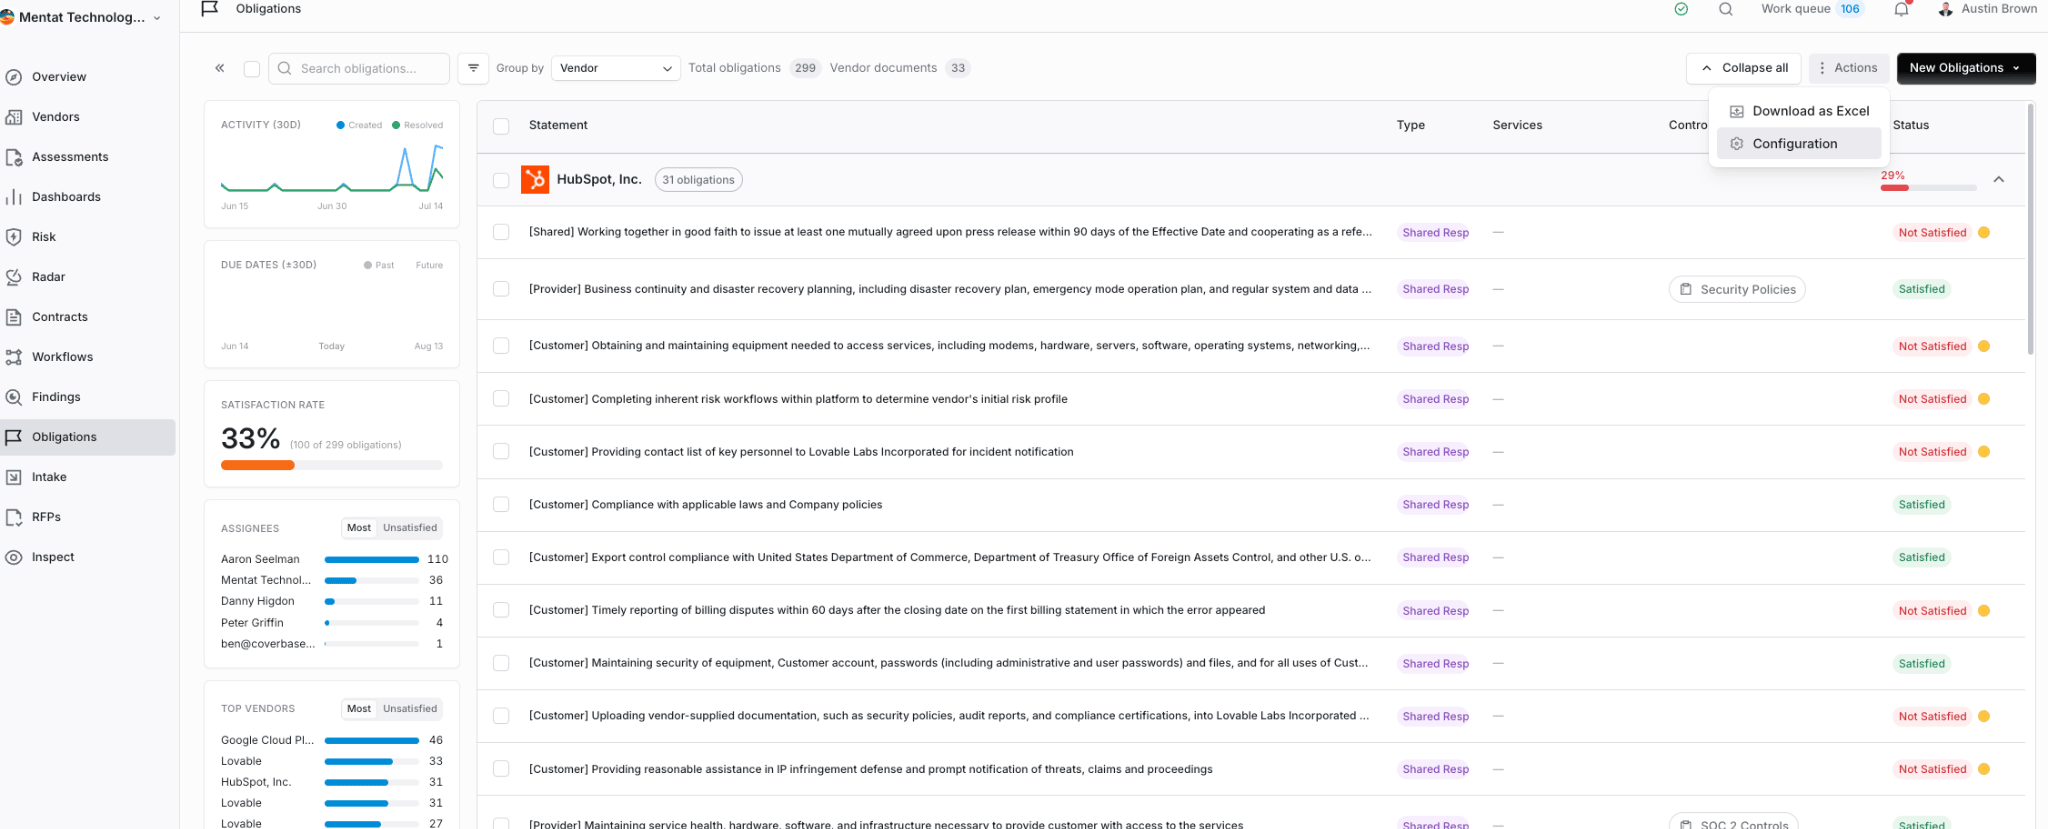 The full obligations workflow (validation, ownership, and stakeholder attestations) has its own dedicated guide, which we'll add to this collection.
***
## Step 11: Integrations and Export API (optional)
This step exposes Coverbase data to external systems like GRC platforms, ticketing, and data warehouses.
1. Go to **Organization → API Keys → Add new key**, name it, set an expiration, and store the bearer token securely.
2. Go to **Configuration → Export API** and map which Coverbase objects and fields to expose. Note the source schema and GET endpoint shown on screen.
3. For GRC integrations (findings out to your audit platform, controls back in), scope what needs to flow with your Coverbase contact, whether that's findings, residual-risk ratings, or control-environment scores.
The full obligations workflow (validation, ownership, and stakeholder attestations) has its own dedicated guide, which we'll add to this collection.
***
## Step 11: Integrations and Export API (optional)
This step exposes Coverbase data to external systems like GRC platforms, ticketing, and data warehouses.
1. Go to **Organization → API Keys → Add new key**, name it, set an expiration, and store the bearer token securely.
2. Go to **Configuration → Export API** and map which Coverbase objects and fields to expose. Note the source schema and GET endpoint shown on screen.
3. For GRC integrations (findings out to your audit platform, controls back in), scope what needs to flow with your Coverbase contact, whether that's findings, residual-risk ratings, or control-environment scores.
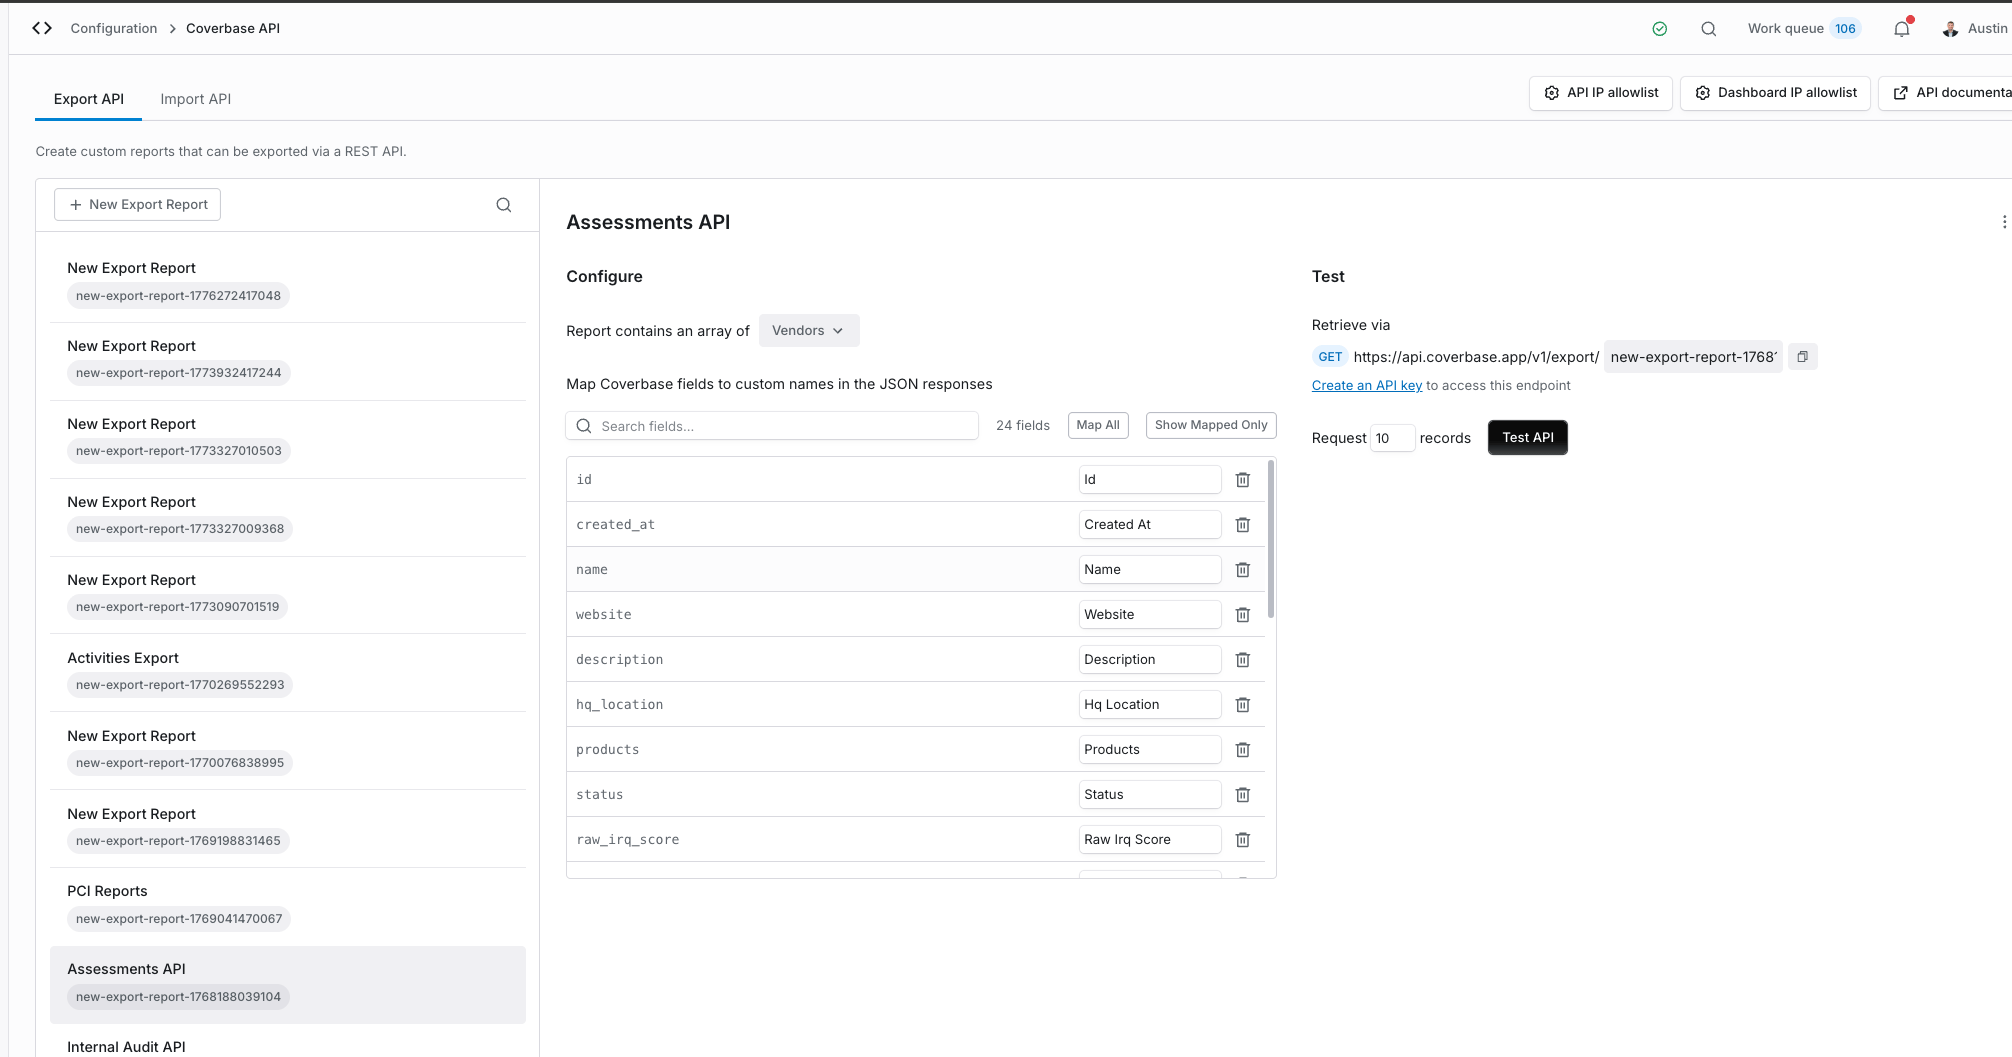 Coverbase uses a pull model. External systems request data via the API, and there's no automatic push. You can also connect vendor status pages for SLA-adjacent monitoring. For the full developer reference, see the [Export API concepts](/export-api-concepts).
***
## Admin quick reference
Five rules that save the most grief:
IRQ and control-set edits apply going forward. Use a bulk reassessment to apply new standards to existing vendors. Control sets are version-controlled, so an edit creates a new version.
Zero-value IRQ scores are the most common cause of "why is everything low risk?"
Control-set applicability, document requirements, clause sets, and escalation tracks all key off tags. Keep the taxonomy clean.
A required document stops portal submission entirely. Default to suggested unless it's a hard gate like a PCI AOC.
Specific control guidance (who's exempt, what evidence counts) is more effective than the global strictness toggle, and easier to defend to a regulator.
## Frequently asked questions
Most organizations finish core configuration in 1 to 2 weeks with roughly 20 hours of effort. Organizations with complex control sets or a lot of integrations may need 4 to 6 weeks.
No. Start with your two or three most critical frameworks, usually NIST CSF and one industry-specific standard. Add more as your program matures.
Use Coverbase's enhanced template. It includes industry best practices and can be customized to your requirements.
When you start an assessment, Coverbase searches the vendor's website, trust center, and security documentation, analyzes uploaded documents like SOC 2 reports and contracts, pulls data from integrated services, and evaluates all of it against your control requirements. It surfaces gaps as issues for human review and generates follow-up questions only for what it couldn't verify.
Coverbase assumes the AI will make errors. Every assessment includes a human review phase where your team validates findings before finalizing, and every result carries citations, so errors are easy to spot and correct. In practice the AI drafts most of the assessment and your team quality-checks the rest.
***
## You're set up. Now run the work
With the environment configured, your analysts can start assessing vendors.
The day-to-day: triage, assess, review, correct, follow up, and report.
A one-page cheat sheet to keep open while you work.
Email [support@coverbase.ai](mailto:support@coverbase.ai), or ask your Coverbase contact to run a live working session with your team.
Coverbase uses a pull model. External systems request data via the API, and there's no automatic push. You can also connect vendor status pages for SLA-adjacent monitoring. For the full developer reference, see the [Export API concepts](/export-api-concepts).
***
## Admin quick reference
Five rules that save the most grief:
IRQ and control-set edits apply going forward. Use a bulk reassessment to apply new standards to existing vendors. Control sets are version-controlled, so an edit creates a new version.
Zero-value IRQ scores are the most common cause of "why is everything low risk?"
Control-set applicability, document requirements, clause sets, and escalation tracks all key off tags. Keep the taxonomy clean.
A required document stops portal submission entirely. Default to suggested unless it's a hard gate like a PCI AOC.
Specific control guidance (who's exempt, what evidence counts) is more effective than the global strictness toggle, and easier to defend to a regulator.
## Frequently asked questions
Most organizations finish core configuration in 1 to 2 weeks with roughly 20 hours of effort. Organizations with complex control sets or a lot of integrations may need 4 to 6 weeks.
No. Start with your two or three most critical frameworks, usually NIST CSF and one industry-specific standard. Add more as your program matures.
Use Coverbase's enhanced template. It includes industry best practices and can be customized to your requirements.
When you start an assessment, Coverbase searches the vendor's website, trust center, and security documentation, analyzes uploaded documents like SOC 2 reports and contracts, pulls data from integrated services, and evaluates all of it against your control requirements. It surfaces gaps as issues for human review and generates follow-up questions only for what it couldn't verify.
Coverbase assumes the AI will make errors. Every assessment includes a human review phase where your team validates findings before finalizing, and every result carries citations, so errors are easy to spot and correct. In practice the AI drafts most of the assessment and your team quality-checks the rest.
***
## You're set up. Now run the work
With the environment configured, your analysts can start assessing vendors.
The day-to-day: triage, assess, review, correct, follow up, and report.
A one-page cheat sheet to keep open while you work.
Email [support@coverbase.ai](mailto:support@coverbase.ai), or ask your Coverbase contact to run a live working session with your team.