

Where vendors live
Click Vendors in the left navigation. The page opens on the vendor list, with a view switcher at the top: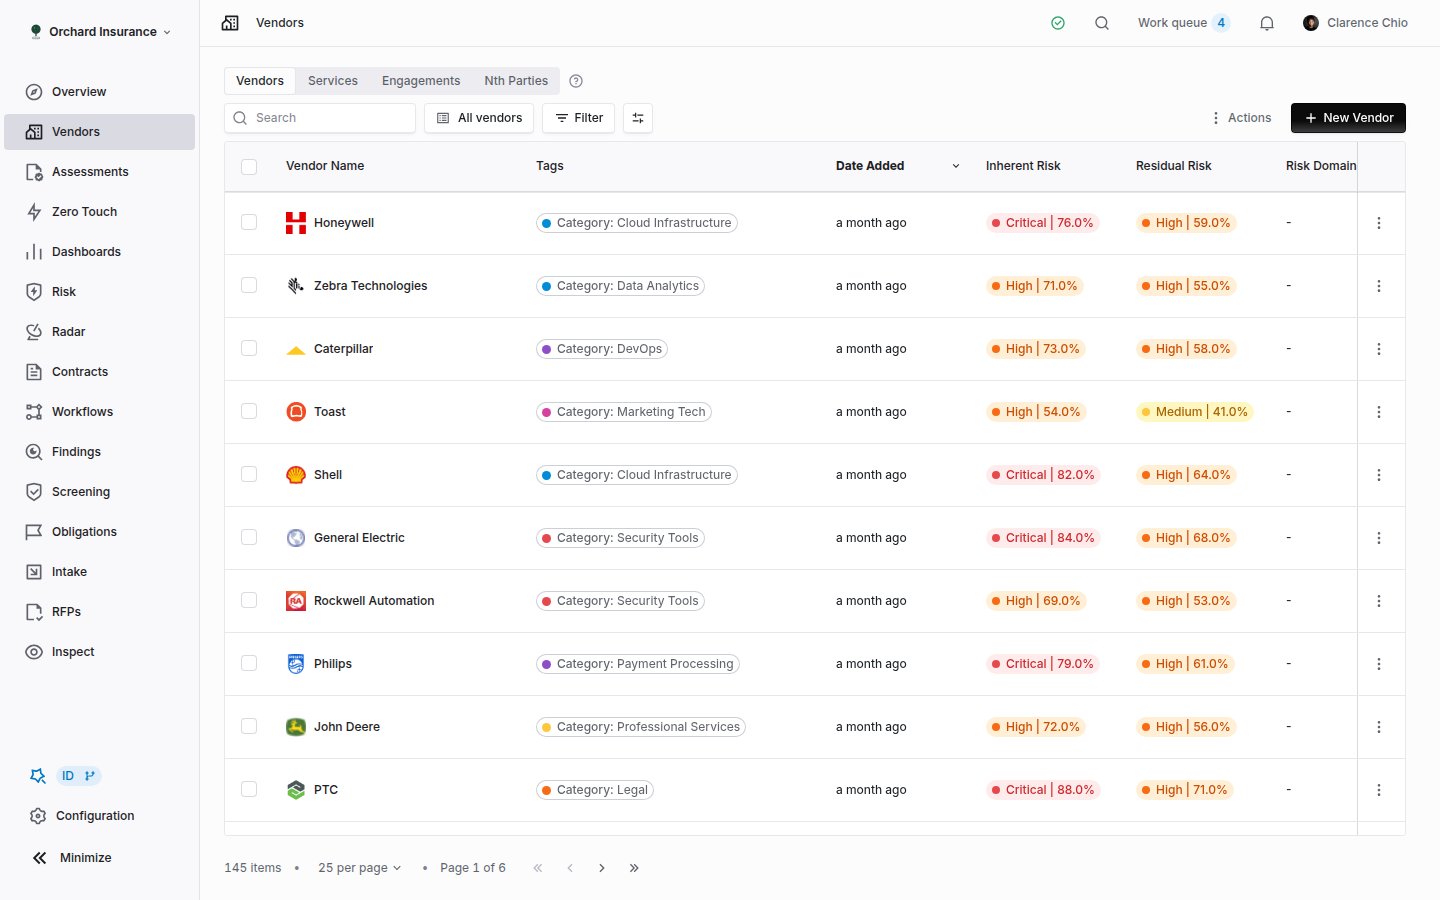
The Vendors list. The view switcher sits above the table; search, filters and the Actions menu sit in the toolbar.
Reading the vendor list
Columns
Search, filters and saved views
The search box matches on vendor name. The filter button opens the unified filter builder, where the fields are grouped: Dates (Created Date, Next Assessment Date, Last Assessed), Documents (Document Types, Document Count, Uploaded Date), Assessments (Assessment Count, Status, Outcome, Assignee, Zero Touch, Has Open Issue, and more), Contracts (Auto Renewal, Contract Count), plus Tags, Status, Tier, the three people fields, Website, the inherent and residual risk levels and scores, Risk Domains, and Archived. Filters, sort, search and column layout can be saved as a view. All vendors is the built-in view. Use New view to save the current state, choose Personal, Shared or Organization under View access, and switch between views with Change view. Views are also where you get a stable link:/vendors/view/<id> opens the list with that view applied.
Row and bulk actions
Each row has a menu with New Assessment and Archive. Select several rows and a floating bar appears with Vendor actions: Tags, Assign relationship owner, Assign risk analyst, Update status, Add to case, Create assessments, Schedule next assessment, and Archive. Organizations with Zero Touch Assessments also get a bulk launch here.The Actions menu
The Actions menu in the toolbar holds the portfolio-level tools:Creating a vendor
Click + New Vendor at the top right of the list. The first step is a picker that searches as you type.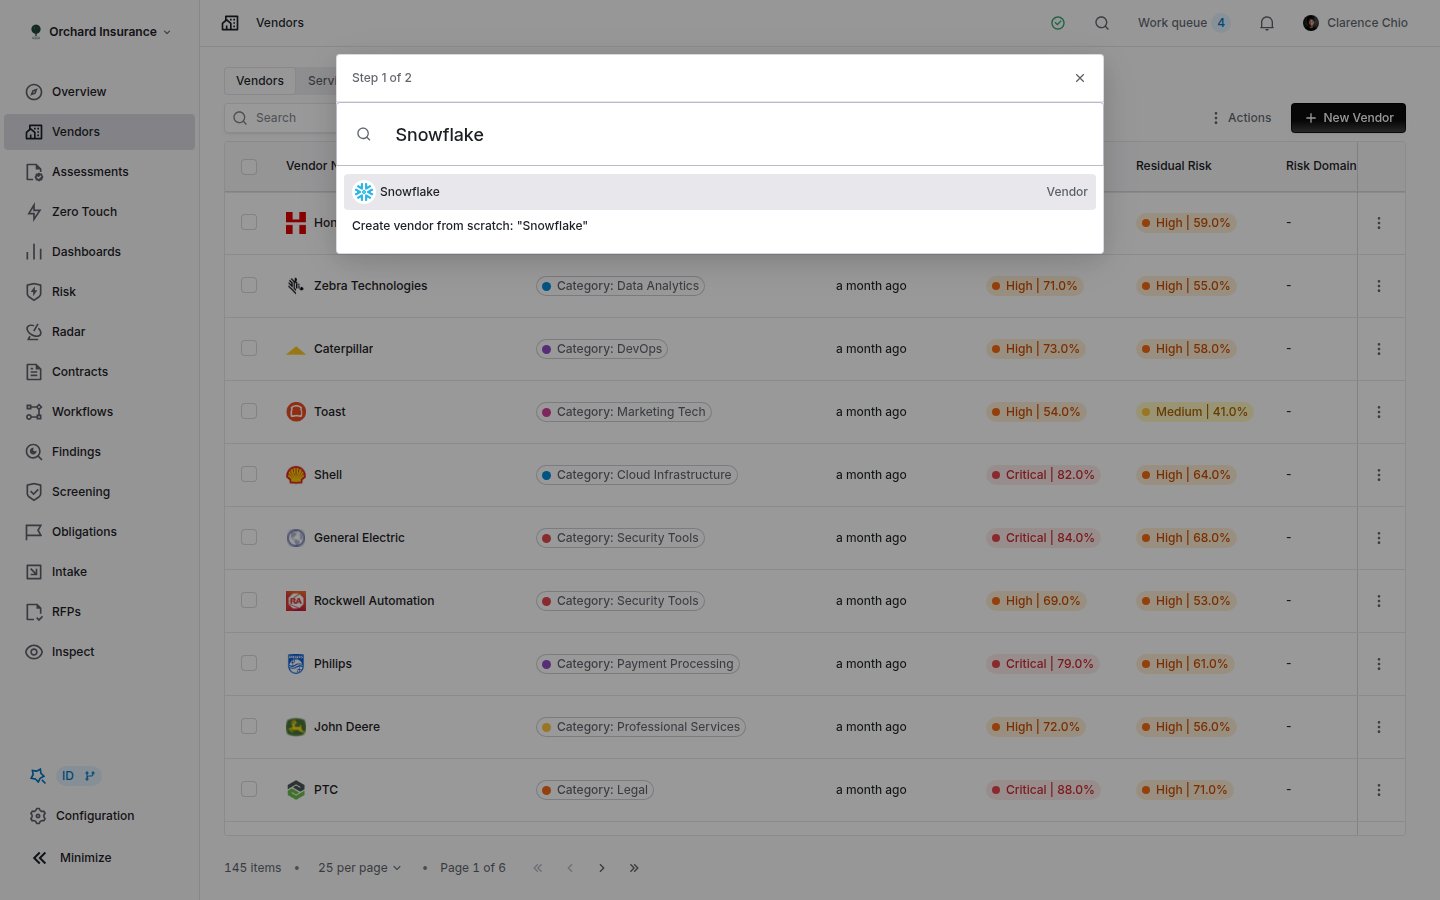
The New Vendor picker. A vendor already in your workspace is offered first. Below it is the option to create the name from scratch, or, in workspaces with the directory picker, the matching directory entry.
The vendor page
Open a vendor and you land on Overview. The header carries the name (editable inline), an Archived badge if the vendor is archived, a Coverbase AI button, a Vendor changes button when something is waiting for review, and an Actions menu with Build report, Export as Excel, Merge vendor and Archive.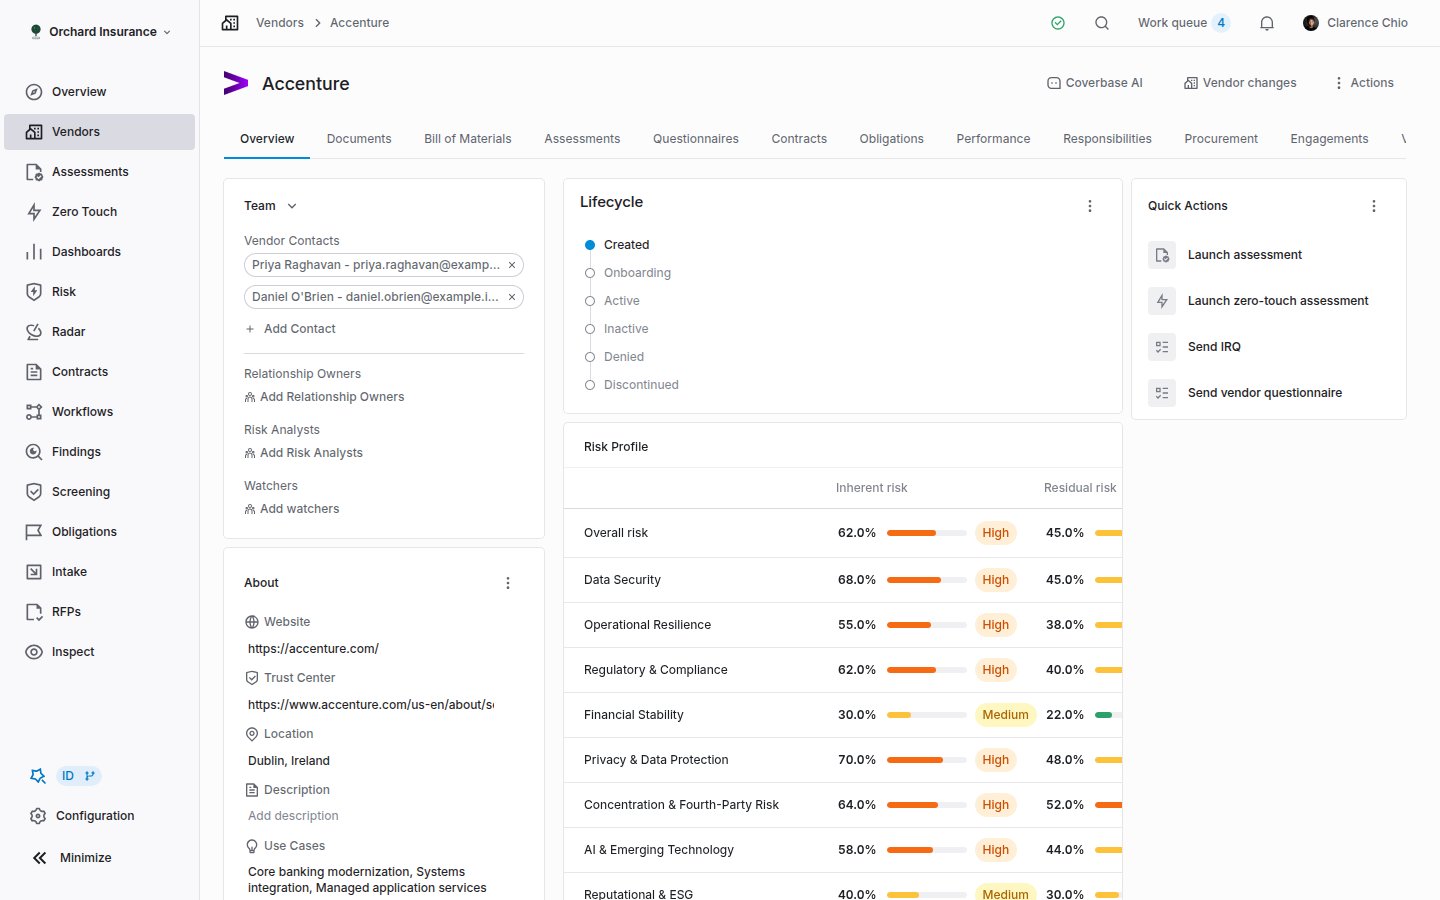
A vendor's Overview tab. The sidebar holds Team, About, Properties, Services and Tags; the main column holds the rearrangeable cards.
Sidebar cards
Main cards
The main column is a card grid you can rearrange; what appears depends on your modules and your role. Lifecycle shows the status and moves it. Quick actions holds Launch assessment, Send IRQ, Send vendor questionnaire, Create new engagement and Upload contract, plus a Needs Attention list of recent IRQs and Radar alerts. Risk Profile shows overall risk and a row per risk domain; Inherent risk shows the current level and the IRQs sent, with New IRQ to send another. Recommendation, Assessments, Documents, Engagements, Contracts, Tasks (open findings, soonest due first), Radar and Notes each summarize their tab.Tabs
Team and owners
The Team card names four kinds of people:People who do not have an account
A relationship owner is often a business owner who will never log in. When you open the Relationship Owners or Add watchers picker and the person is not there, choose Add directory contact. This creates a person who can be named on records and receives email about them, but cannot sign in. The email address must belong to your organization: on one of your declared email domains, or matching a person your identity provider syncs to Coverbase. Directory contacts always receive email for the notifications addressed to them, because they have no settings page to opt in from. Risk Analysts is different: an analyst does the work and needs to sign in, so that picker creates a real user and needs the user create permission.The notification this sends
Assigning someone as a relationship owner sends Relationship owner assigned: an in-app notification by default, and an email if the person has turned that on in their settings. It reads “name assigned you as relationship owner for vendor” with a link to the page. The full catalog is in Email and notifications.Statuses and lifecycle
A vendor has one lifecycle status. The Lifecycle card on Overview shows the current stage; Set status in its menu moves it, and Configure lifecycle takes an admin to the status configuration. On the list, Update status in the bulk bar moves several vendors at once. Every organization starts with these six:Services and engagements
A vendor sells you things; a service is one of those things. An engagement is a piece of work with that vendor that has a start, an end and a status.Services
Add one from the Services card in the sidebar (Add Service, then a Service Name and Service Description), from the Sheet 2: Service intake tab of the bulk template, or by promoting a vendor into a service during a merge. Click a service to open its own page at/vendors/<vendor>/service/<service>. It has the same shape as the vendor page: an About Service card, a team card, properties, tags and locations in the sidebar; Lifecycle, Risk Profile, Inherent risk, Risks, Assessments, Documents and Notes in the main column; and Overview, Activity, Notes, Properties, Performance and Bill of Materials tabs.
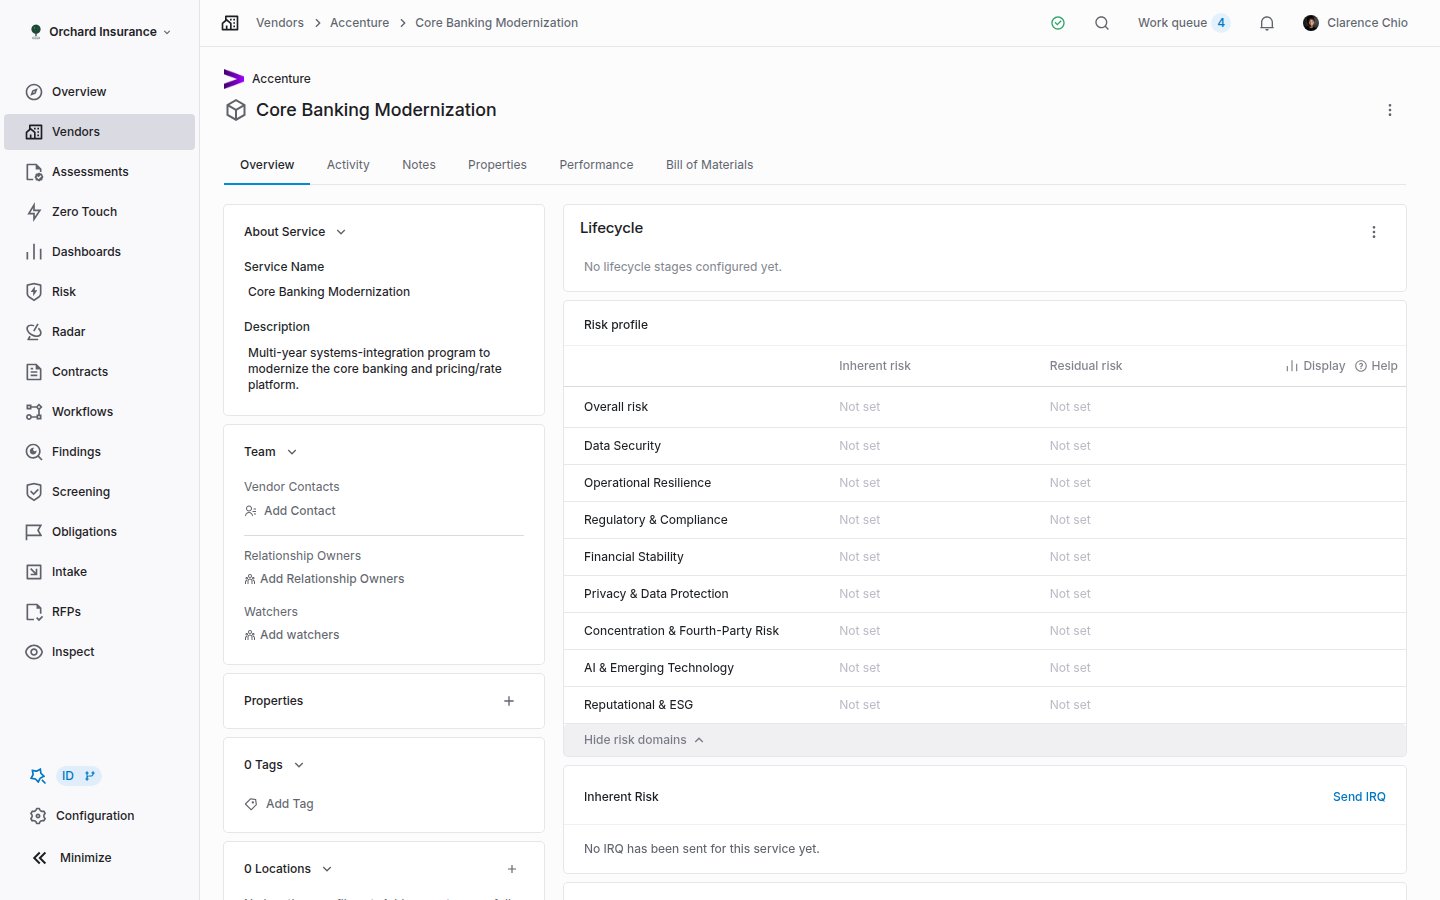
A service page. The service carries its own inherent risk, assessments and documents, separate from the vendor's.
Engagements
Create one from Quick actions → Create new engagement on the Overview tab, from New Engagement on the Engagements tab, or from the Engagements view of the list. The form asks for a name (the placeholder suggests 2026 Annual Review), a status, a Start Date and an End Date. An engagement’s page lives at/vendors/<vendor>/engagement/<engagement>. The About Engagement card is where you link the vendor’s Services and Contracts to it, so a renewal or a project points at the exact products and agreements it covers. Engagement Term holds the dates. The main column has its own Lifecycle, Risk Profile and Inherent risk cards, so an engagement can carry an IRQ of its own. Tabs are Overview, Activity and Notes. Engagements have their own statuses under Configuration, separate from vendor statuses, and are archived from their page or from the row menu on the Engagements view.
Nth parties and subprocessors
An nth party is a company your vendor depends on: its cloud host, its payment processor, its support tooling. Coverbase keeps shared research on these dependencies, assembled from published subprocessor lists, SOC reports and the directory. Your organization keeps its own record of them on each vendor, and the shared research feeds that record as suggestions.On the vendor
Open the Properties tab and find Subprocessors / fourth parties.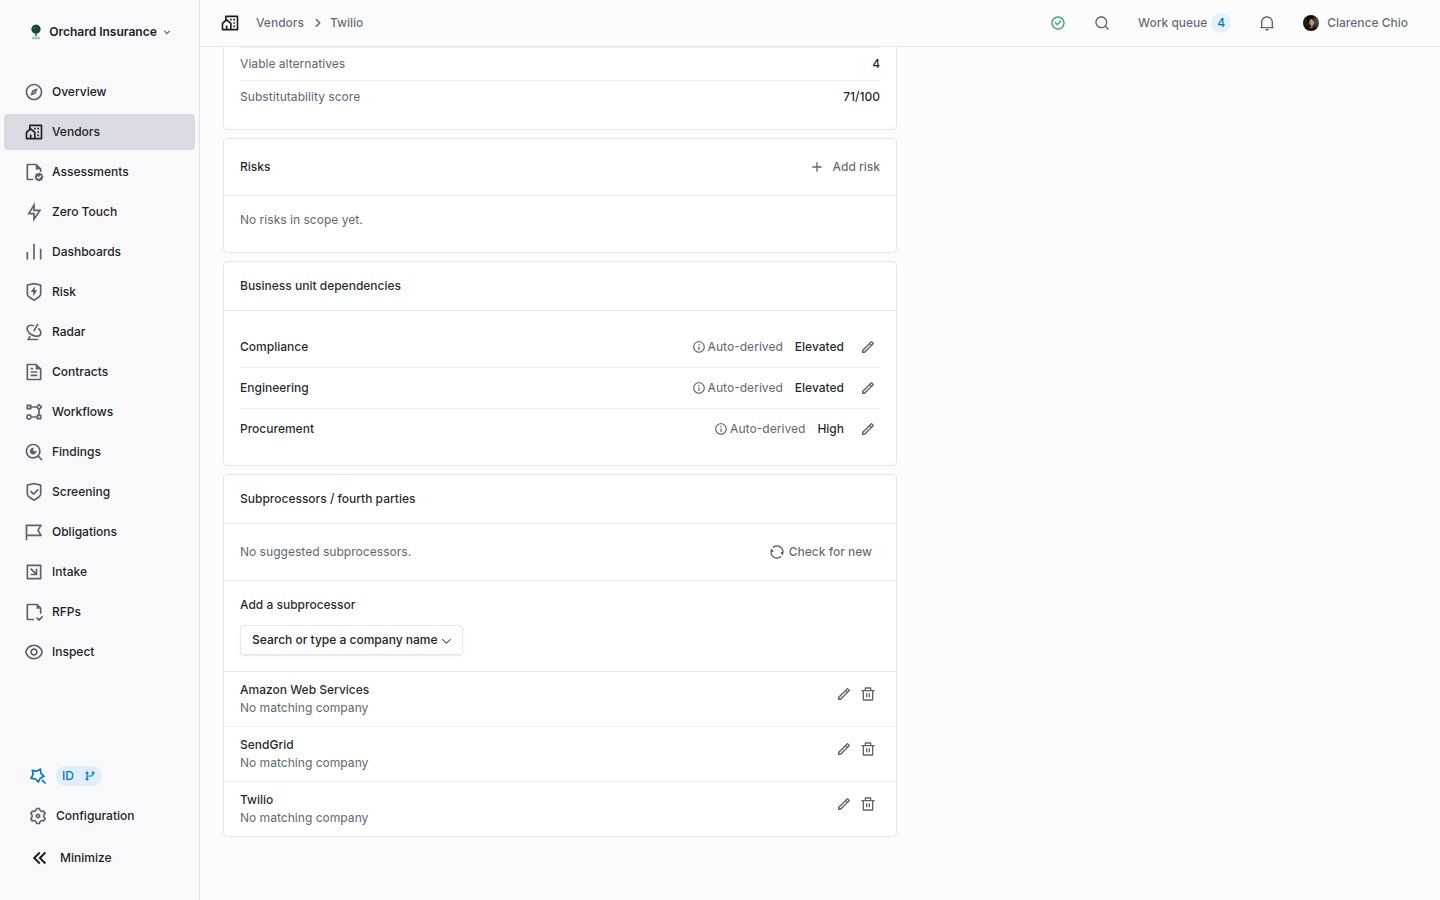
The Subprocessors / fourth parties card on the Properties tab, below Business unit dependencies. Suggestions appear at the top when Coverbase has any; the accepted list sits under Add a subprocessor.
Suggestions, with or without review
The Suggested Subprocessors panel lists what the shared research knows that your record does not: a new dependency, a change to one you have (Updated), or one that has ended (Dependency ended). Check for new runs the comparison for this vendor on demand; it also runs when a vendor first gains its directory entry and nightly for every vendor. Accept or reject rows singly, or Accept all / Reject all. Rejecting is durable: the suggestion does not come back. Whether suggestions wait for you at all is an organization setting under Settings → Subprocessors, When Coverbase Finds a New Subprocessor:The Nth Parties view
Back on the list page, switch to Nth Parties. The table has Nth Party Name, Website, Inherent Risk Level, Description, Tags and Vendors columns; the row menu lists which of your vendors depend on it. The relationship graph sits beside the table. Clicking a row highlights it in the graph; clicking a vendor node filters the table to that vendor’s nth parties, and clicking an nth-party node filters it to that one. Reset view and filters clears it. The graph opens full screen at/vendors/nth-party-graph (search the command palette for Nth Party Graph), where Export as SVG saves it.
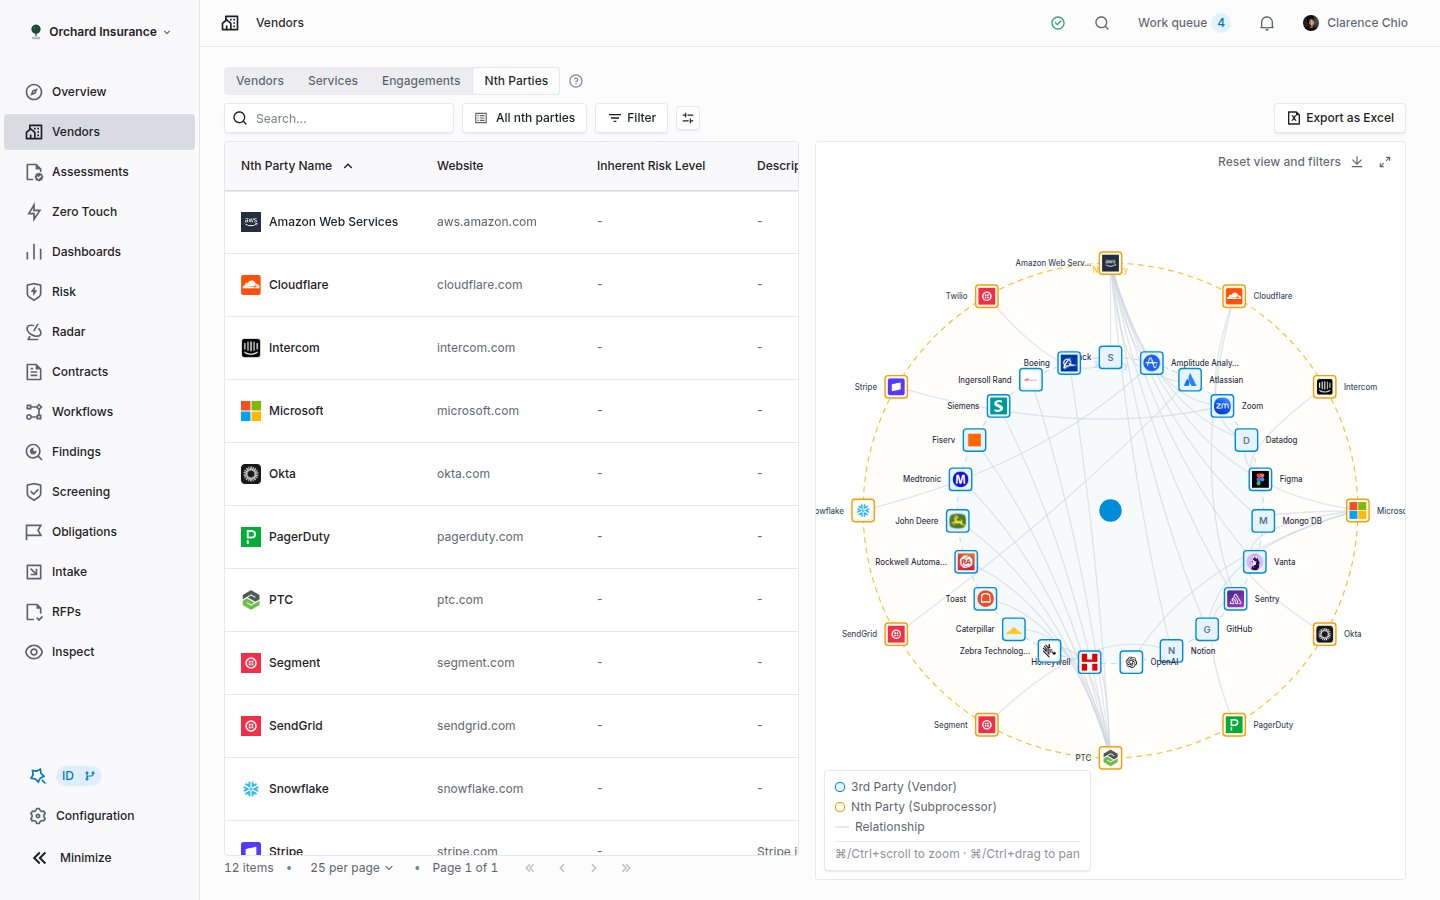
The Nth Parties view: the table on the left, the relationship graph on the right.