A step-by-step walkthrough of the full assessment lifecycle, from getting the vendor into Coverbase to exporting the final report.
For AI agents: a documentation index is available at https://docs.coverbase.com/llms.txt. This page is also available in markdown by appending .md to the URL.
This guide is part of the User Guides collection. It follows one vendor through the whole assessment lifecycle, screen by screen. For the shorter version, see the Assessment quick reference. For the wider analyst workflow (Radar, contracts, obligations), see the Analyst and reviewer guide.
The vendor name, website, and a security contact email address.
Any evidence you already hold: SOC 2 report, policies, pen test results, certificates of insurance.
The vendor’s Trust Center URL if they publish one. Adding it to the vendor record lets Coverbase pull documents straight from the trust center later, saving a round trip.
An Assessment Plan that matches the depth of review you need. Plans bundle the control sets, questionnaires, and collection method, so choosing the right one is most of the setup.
Permission to create vendors and assessments. If a button described here is missing, check your role with an administrator.
Inherent risk is the risk a vendor introduces based on what they do: the data they touch, the systems they connect to, the scope of the engagement. It is established before any evidence is reviewed.Residual risk is what remains once their controls, certifications, and documentation have been evaluated. The assessment is what moves you from one to the other.Both scores can sit on the vendor and on its individual services. Where a vendor’s score comes from covers which an assessment writes to.
Assessment Plan
An Assessment Plan is a reusable template defining what an assessment evaluates. Plans are managed centrally, so most users pick one rather than building an assessment up field by field.
An assessment attaches to a vendor record, so the vendor has to exist first. There are two ways to get one in.
The Intake module: the standard path. A requester submits the vendor through a portal, answers a short set of questions, and Coverbase produces an inherent risk score as a by-product. You end up with a vendor record and a risk profile in one pass.
Manual creation: the New Vendor wizard in the dashboard. Faster if you only need the record, but it does not establish inherent risk on its own.
If the vendor is already in Coverbase. Check whether it already carries an inherent risk score. If it does, you need neither path. Skip straight to Part 2 and create the assessment. Re-running intake on a vendor that already has a current risk profile duplicates work.
Intake determines how much risk a vendor introduces before anyone looks at their documentation. It answers two questions: what is the use case, and what is the scope?Why this is the better path. The inherent risk result drives which control sets apply and how deep the assessment goes. A consulting vendor with no system access should not be assessed like a core processor, and intake is what tells Coverbase the difference.Intake is completed by the requester (the business owner asking for the vendor) through a portal separate from the main dashboard. It runs in three steps: Select Vendor, Additional Information, Review Questionnaires.
You need your organization’s intake link. Opening the intake path without it returns “Unable to identify intake portal. Please use the link provided by your organization.” Find the link under Intake → Request new vendor.
1
Name the vendor and describe the use case
Enter the vendor name, or use Help Me Choose if you are still comparing options, then pick the use cases that apply. Coverbase generates these suggestions for the specific vendor, and you can add your own in the custom answer field.Below, Pre-Qualification runs a quick analysis and checks whether you are about to duplicate a vendor you already have. If it finds a match it says so and offers Not my vendor if it has guessed wrong. It also surfaces existing vendors in good standing that might already cover the use case, along with their current use cases, services, and tags.
1 Use cases tailor the questions that follow. 2 Pre-Qualification catches duplicates before you onboard.
Worth pausing here. If Coverbase says the vendor is already onboarded, or that an approved vendor already covers the need, that is usually the end of the request. The same check tells you whether you can skip intake entirely.
2
Scope it to services, if relevant
Select Services or Product Lines is optional. Choose the specific services you will be evaluating, or add one with + New Service. Scoping here keeps the assessment focused on what you are buying.The Confirm section follows, where you can check the details Coverbase gathered and attach any supporting documents you already hold: email threads, proposals, SOWs.
Optional scoping, with the Confirm section beneath it.
3
Answer the clarification questions
Step 2 is headed Additional Information. Coverbase asks roughly four questions, generated for this vendor. They cover only what cannot be determined from public sources: whether personal data is involved, the size of the spend, whether you are in a regulated industry, and how deeply the vendor will integrate.Each has a few preset answers plus a free-text option if none fits.
Clarification questions, generated for this vendor and limited to what public sources cannot answer.
4
Review the autofilled questionnaire
Step 3 is headed Review Questionnaires. Rather than making the requester complete a long inherent risk questionnaire, Coverbase fills it in, often twenty or more responses, and tells you which ones need a human.Three tabs across the top split the work: all responses, the ones still needing an answer, and the ones flagged for review. Work the flagged ones first.Every response carries:
A confidence badge: green High confidence where the evidence was clear, amber Review this response where it was not.
Reasoning: why Coverbase chose that answer, with links to the sources it used. Expand it with Read more.
Answered / Reviewed checkboxes: track your way through the list.
Select supporting documents: optionally attach evidence to a response.
1 Tabs split answered from flagged. 2 Amber means low confidence, so read these. 3 Reasoning shows the sources behind the answer.
Human in the loop. Autofilled answers are a starting point. Anything flagged for review is flagged because Coverbase is not confident, and the Reasoning usually says what was missing.
5
Submit
When every questionnaire reads All done, the panel switches to Ready to Submit. A summary of the vendor and any uploaded documents sits on the right so you can check it before you submit.
1 Submit when ready. 2 Responses cannot be edited afterwards, so review first.
A risk analyst reviews the submission before it becomes an assessment, and can edit responses, ask the requester for clarification, or accept it and launch the assessment. At that point the vendor exists, carries an inherent risk score, and is ready for Part 2.
Path 2 (alternative): creating the vendor manually
Use this when you only need the record: a vendor being logged for administrative reasons, a supplier inherited from elsewhere, or a case where you already know the risk profile and will set it yourself.
The trade-off. Manual creation does not produce an inherent risk score. Until one is set, the assessment has nothing to calibrate its depth against, and the risk-domain view will have gaps. If you want that calibration, use Path 1 instead.
1
Open the Vendors page and click New Vendor
Go to Vendors in the left-hand navigation. The page has four tabs (Vendors, Services, Engagements, and Nth Parties), and you want the default Vendors tab. Click + New Vendor at the top right. A three-step modal opens.
The + New Vendor button sits at the top right of the Vendors page.
2
Search for the vendor (step 1 of 3)
The search field reads Select from existing vendors or create new…. Start typing and Coverbase Entity Intelligence matches against its own database, labelling each result as a Vendor or a Product. Selecting a match pre-fills the details.If there is no match, choose Create vendor from scratch: "{your vendor}". Click it or press Enter.
Selecting a match pre-fills the vendor. The arrow marks the create-from-scratch option, used when nothing matches.
3
Fill in the details (step 2 of 3)
This step is headed Modify Vendor Details. If Entity Intelligence had data, most fields are already populated. Otherwise click AI Autofill to have Coverbase search the web, then correct anything it got wrong.
1 AI Autofill populates the record from public sources. Only Vendor Name is required.
Only Vendor Name is required, but the rest save work later:
Website, Description, HQ Location, Use Cases: context the AI draws on during assessment.
Security Contact Email: used when Coverbase contacts the vendor.
Trust Center URL: enables Retrieve from Trust Center in Part 3.
Services: you can then assess a single service rather than the whole vendor, which keeps scope tight.
Vendor Contacts: these pre-fill every document request and follow-up you send.
Tags: tags can drive which control sets apply, so if you tag by tier, do it now.
Risk Analysts, Relationship Owners, Watchers: ownership and notification.
Step 3 is headed Fill in additional fields and shows whatever custom fields your organization has defined: contract amounts, audit dates, department, SLA, and so on. None are mandatory. Click Create Vendor and you land on the Vendor Overview page.
Custom fields vary by organization. Create Vendor finishes the wizard.
Abandoning the wizard. Closing part-way through prompts “Discard changes?” with Keep editing and Close and discard. Discarding leaves no partial vendor behind.
Simpler than it looks. Assessment setup is a single dialog. Control sets and questionnaires are not chosen assessment by assessment. They come from the Assessment Plan you select.
1
Open the Assessments page and click New Assessment
Go to Assessments and click + New Assessment at the top right. The list shows when each assessment was last updated, its outcome, score, status, auto-review progress, and both risk figures. It is sorted by Last updated, newest first.If your organization has Zero Touch Assessments turned on, Launch zero-touch assessment sits beside New Assessment. It starts a lighter review that never contacts the vendor, and those runs are listed under Zero Touch, not here. See the Zero Touch Assessment guide.
If the list looks empty, clear the filters or switch back to All assessments. Filters you add persist between visits.
2
Add the vendors and any services
Click + Add vendor… and pick the vendor, then optionally narrow to specific services. You can add more than one vendor, and each gets its own assessment from the same plan, which is the efficient way to start a batch of annual reviews. With more than one vendor the button reads Create Assessments. A batch of ten or more may be given lower priority and run during off-peak hours.
1 Add as many vendors as you need. 2 The plan summary tells you what you are about to run.
3
Choose the Assessment Plan
This single choice determines what the assessment evaluates. The dropdown lists your saved plans. If an administrator has set a default plan, it is preselected and marked Default; otherwise the dropdown starts on None. Selecting a plan shows a summary beneath it: how many control sets and questionnaires it carries, whether documents are collected manually, automatically, or not at all, whether it targets residual or inherent risk, and who reviews it.Read that summary before you continue; it is the fastest way to catch a plan that is heavier or lighter than the vendor warrants. Configure opens Assessment Settings, where plans are built and changed.
Leaving the plan on None creates an assessment with no control sets attached, which is rarely what you want. The assessment then shows “This assessment has no control sets or questionnaires configured” until you add one.
1 Configure opens Assessment Settings, where plans live. 2 Plans are built and named by your team.
Choosing a plan. Plans built on your own control sets usually produce fewer and more relevant issues than a broad third-party questionnaire, which can run to several hundred expectations. Start with your own and add breadth only where you need it.
4
Check the name, then create
Expand Customize assessment name. Names are generated from a template rather than typed by hand (the default produces something like “2026 Acme initial”), and a live preview shows the result as you edit. Leave it alone unless you have a reason to change it. Consistent names keep a long list of assessments searchable later.Click Create Assessment (or Create Assessments for a batch). A single assessment opens straight away; a batch returns you to the list.
1 Expand to see the template. 2 Live example. 3 The template itself.
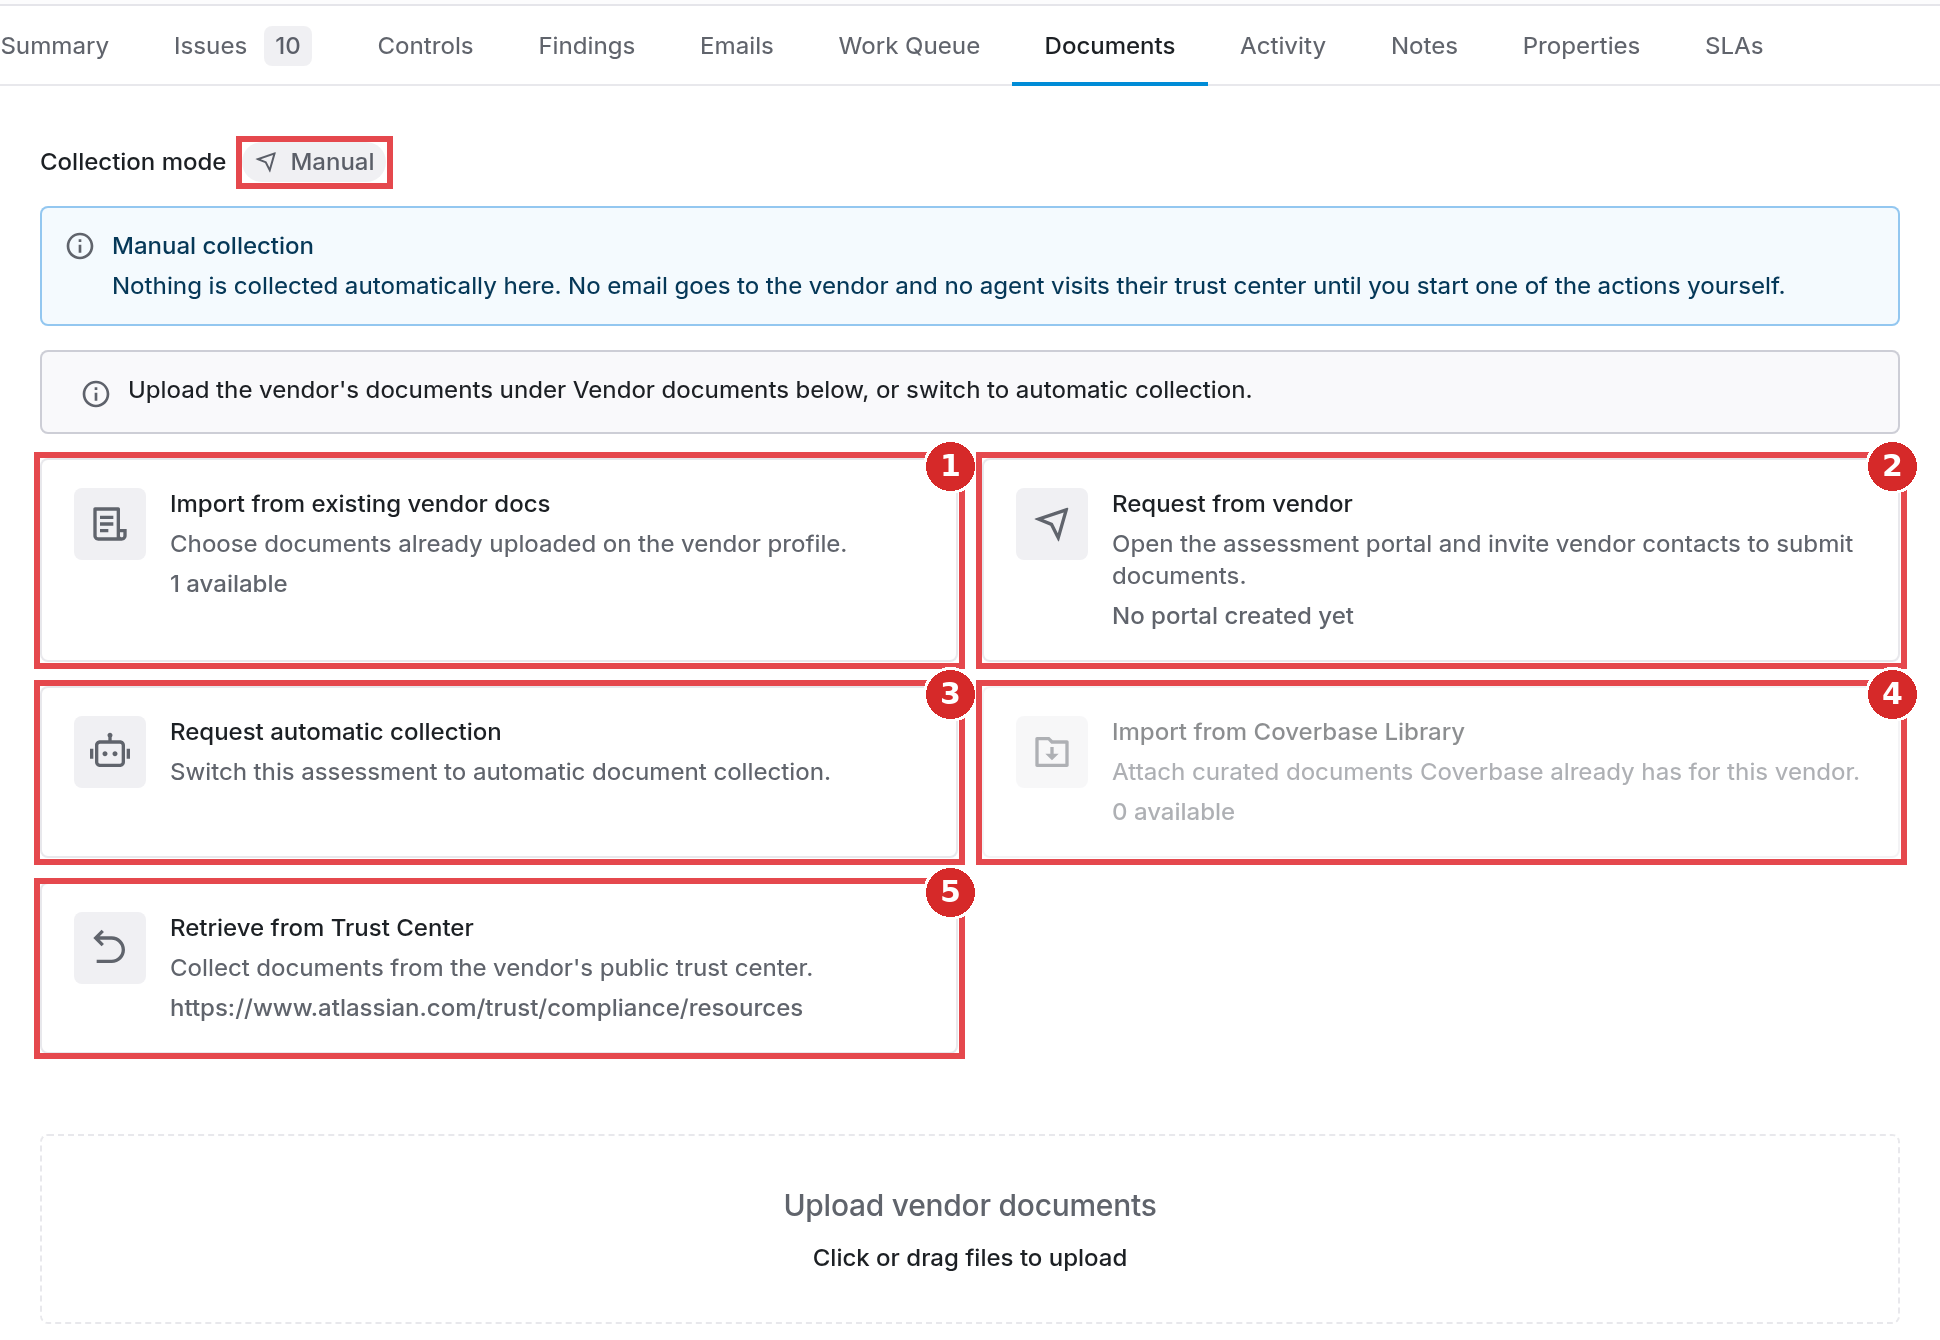
Open the Documents tab. A Collection mode badge shows whether this assessment is collecting manually or automatically. In manual mode nothing is collected until you start it, and five routes are offered. They combine freely, and each card tells you how much is available before you click. In automatic mode the cards are replaced by the collection’s progress through its stages, with Pause and How collection works beside it and Switch to manual in its actions menu.
1 Existing vendor docs. 2 Request from vendor. 3 Switch to automatic. 4 Coverbase Library. 5 Trust Center. The badge shows the current collection mode.
Import from existing vendor docs: anything already on the vendor profile. Fastest route for a reassessment.
Request from vendor: manages the assessment portal, and shows the portal’s current status so you can see where the vendor has got to.
Request automatic collection: switches this assessment to automatic collection.
Import from Coverbase Library: documents Coverbase collected for this vendor itself, by requesting them from the vendor and retrieving what the vendor publishes on its trust center. Check the count; for well-known vendors it is often substantial. Nothing your organization uploads is ever part of this library. See Document library.
Retrieve from Trust Center: pulls from the vendor’s public trust center. Only available with a Trust Center URL on the vendor record.
Below the cards, Upload vendor documents takes files you hold yourself.In manual mode, documents alone do not start the analysis. Once at least one is attached, the left panel reads “ready to analyze” and offers Start Assessment. A vendor submitting the portal starts it for you, and automatic collection starts it once the documents are ready.A sixth route needs no collection at all: where a control set allows it, the AI researches the public web while evaluating a control. That evidence is filtered on publisher accountability before it can be cited, and every accepted page carries its grade and its age. See Evidence quality and source credibility.
1
If you are using the portal, send the request
The vendor gets a branded portal with a due date, your message, and a checklist of what you need: questionnaires and document requests, with required items marked. They cannot submit until the required parts are done, and progress is visible to both sides.When they submit, their responses are finalized, their documents are attached to the assessment, and the analysis starts. No handoff needed.If the vendor has uploaded documents but not submitted, the Documents tab says so and offers Submit Portal, which finalizes the portal on their behalf. Reopening the portal is the only way back.
1 Upload area. 2 Each section the vendor must complete; Submit stays disabled until required items are done.
2
Wait for analysis
Analysis typically takes 20 to 30 minutes depending on document volume. A long SOC 2 report takes longer than a certificate of insurance. You do not need to keep the tab open.The left panel tracks the assessment through your organization’s lifecycle stages. By default these are Collecting Documents, Analyzing Controls, and Review Results; any stages your administrator has added appear in order alongside them. A plan whose control sets need no documents skips Collecting Documents. The panel also tells you what it is waiting for, which at the start is at least one document, with a shortcut such as Go to documents or Start Assessment.
1 The stage tracker. This workspace has added a Quality Control stage of its own. 2 A shortcut to whatever the assessment needs next.
Current stage, what it is waiting for, and a shortcut into the work. Once results are ready it also offers an Export menu. Below that, Details holds the assignee, inherent risk, risk target, and services, followed by cards for the Plan the assessment came from, its Control Sets, its Questionnaires, and custom Properties.The Actions menu at the top right of the page holds Rerun, Clone, Cancel run, Export, and Archive.
Once results are in, eleven tabs run across the top. Most of the time you need the first two, Summary and Issues. The rest carry supporting detail and the audit trail: Controls, Findings, Emails, Work Queue, Documents, Activity, Notes, Properties, and SLAs.
Once an outcome or a recommendation has been recorded, Recommendation sits at the top: the human conclusion. It appears in exports, so write it properly rather than leaving it thin.Then a band showing the Score as a percentage with a compliance band, how many domain reviews are complete, and Complete Assessment.Then the risk domain table: Overall Vendor Risk plus a row per domain, each with inherent risk, residual risk, and the assigned reviewer. Domains vary by plan; a broad plan can produce nine or more, covering things like AI & Emerging Technology, Operational Resilience, Concentration & Fourth-Party Risk, and Reputational & ESG alongside the familiar Data Security and Privacy.Rows reading “Not set” against residual risk have not been reviewed yet. Those are your gaps.
1 Recommendation. 2 Score, review progress, and completion. 3 Risk by domain. 'Not set' means not yet reviewed.
Vendor Score (Service Score on a service-scoped assessment): inherent and residual risk.
If any follow-ups exist, a bar summarizes them (how many await a response, how many are still drafts) alongside Send follow-ups. Once a round is out, that button becomes Manage sent follow-ups, and an actions menu beside it holds Configure portal, Import responses, and Download workbook. The workbook and import options are there for vendors who would rather work in a spreadsheet than the portal.
1
Orient yourself in the list
Three toggles switch the view (all results, issues only, and open follow-ups), each with a count. Group by defaults to Control Section, so results arrive clustered by control set and section, with the reviewers for that section shown on the group header.Each row shows the control reference, the expectation in short form, status chips such as Missing document or Awaiting, any linked findings, the weight, and the result.
1 Switch between all results and issues. 2 Grouping. 3 Status chips, weight, and result on every row.
2
Handle the straightforward ones in bulk
Select rows, or Select all, and an action bar appears with everything you can do at once. Resolve closes open issues as Mark as mitigated or Accept risk. Add Finding, Create follow-ups (the count comes along, so you can draft dozens in one sweep), Delete follow-ups, Preserve, and Draft new email sit beside it, and the menu at the end holds Mark as not an issue. A selection of resolved issues offers Reopen issue instead.Bulk-drafting follow-ups for every missing-document issue takes one action rather than a hundred.
1 The bulk action bar appears once anything is selected. The arrow marks the row checkboxes.
3
Open an individual result
Click a row to open it. A status banner sits at the top with the actions available for that state. An open issue reads Issue found and offers Draft follow-up, Add Finding, Not an issue, and a Resolve menu (Mark as mitigated when the vendor has fixed it, Accept risk to keep it on record without further action). A result that is not an issue offers Mark as issue instead. Once a follow-up is out, the banner shows its status, Awaiting response and then Response received, and a resolved issue offers Reopen issue.The left column shows the control: the Expectation (what must be true), the Question as it is put to the vendor, the Guidance for judging evidence, which Control Set it came from, and its Weight.Beneath it, Evaluation gives the score and compliance band, and a bulleted analysis explaining the verdict. Each claim carries an Evidence reference you can click through to. Four controls sit above it: Correct the AI to adjust the guidance and rerun the analysis, Rerun to evaluate this control again as it stands, Preserve to pin a result so later runs do not overwrite it, and Edit.
1 Correct the AI, Rerun, Preserve, Edit. 2 Actions available for this state.
4
Follow the citation to the source
The right column holds Evidence, Follow-up, Findings, and Activity, with prev/next controls so you can work straight through the list. Each piece of evidence names its source document and page, quotes the passage, and shows a preview of the page with the passage highlighted.
1 The cited passage, highlighted in the source document. 2 Step through results without returning to the list.
Why the citation matters. When an examiner asks why a control passed, the answer is the quoted passage from a named document on a specific page.
Follow-ups are drafted individually and sent together, so the vendor gets one consolidated request rather than a trickle of emails.
1
Draft the follow-up
From a result, draft a follow-up question. AI Autofill writes a first pass that references what the evidence already showed and asks only for the gap, which is usually better than starting from scratch. Use control question and response reuses the original control wording instead.Under Required document types you can name what the vendor should attach, so the request is specific rather than “please send evidence”.Saving creates a draft. Nothing reaches the vendor until the drafts are included in a follow-up questionnaire sent through the portal.
1 AI Autofill drafts the question. 2 Name the documents you need. 3 Save creates a draft, it does not send.
2
Send them
Back on the Issues tab, the bar shows how many drafts are waiting. Send follow-ups opens a dialog where you choose which drafts go out, set an optional portal due date and instructions, and decide whether to email the vendor. Sending reopens the assessment portal (or creates one) with a questionnaire built from your questions. Configure portal controls what the vendor sees; Manage sent follow-ups tracks what is already out and resends the notification.
1 Manage what has been sent. The workbook and import options sit in Actions beside it. 2 How many follow-ups are out, and how many are still drafts.
3
Let the reanalysis run
When the vendor submits, only the controls selected for follow-up, and any controls that depend on their answers, are analyzed again against the new evidence. Everything else is left alone.A result that has come back reads Response received, and the analysis is rewritten to account for what the vendor said, often moving from Not Compliant to Fully Compliant where the gap was documentation rather than practice.If the vendor’s follow-up answer differs from the response the analysis used, the control shows both and asks you to Resolve response conflict: accept the follow-up as the corrected response, keep the previous one, or choose a different response. The control is rerun with your choice, and anything other than accepting the follow-up needs a reason. To keep the current response on many controls at once, select them on the Issues tab and use Keep current response.
1 Response received. 2 The score after reanalysis. 3 Preserved pins this result against future runs.
Follow-up versus rerun. A follow-up reanalyzes only the affected controls. If you have changed the plan or control sets, or want everything re-evaluated from scratch, use Rerun from the assessment Actions menu instead.
Each risk domain can carry its own reviewer, which is what lets several teams work one assessment: InfoSec on the security domains, Legal on the contractual ones, Compliance on regulatory. The Summary tab reports progress as a count of completed reviews.A reviewer opens their domain with Start review. Domains show Not started until someone does, and their residual risk stays “Not set”.
1 Start review. 2 'Not set' until reviewed. 3 Reviewer per domain. 4 Complete Assessment, next to the review count.
Who can complete, and when.Complete Assessment becomes available once the assessment reaches Review Results, and is grayed out while an analysis run is still in progress. It does not wait for the domain reviews. When your organization restricts completion, only the vendor’s risk analysts and administrators can complete an assessment, and the button warns them when they are about to override reviews that are still open.
Reviewers are set per domain or control set and can be changed until that domain’s review is complete.
Reviewers are notified when results are ready for them.
Risk analysts and administrators can resend reminders.
Restrict assessment completion to risk analysts and admins, in Assessment Settings, stops anyone else from completing assessments.
If your organization has added its own stages after Review Results, such as a quality control pass, move the assessment into them with Set status in the stage card’s menu. Complete Assessment stays available in those stages.
When the issues have been worked and the reviews returned, click Complete Assessment on the Summary tab.
Completion sits alongside the score and review progress.
The dialog asks for four things:
Action: approve, reject, or whichever outcomes your organization uses.
Vendor Status: where this leaves the vendor in its lifecycle, for example Active. A service-scoped assessment asks for Service Status instead.
Next Vendor Reassessment Date: set for you based on risk tier and the date you completed, typically a year out. Change it if this vendor needs watching sooner.
Recommendation: the written conclusion that appears in exports.
Risk Scoring Changes expands to show how this assessment moved the vendor’s scores, which is worth a look before you confirm. If issues are still open, a checkbox at the bottom accepts the risk on all of them as you complete.
1 The next reassessment date is set automatically. 2 Outcome and vendor status. 3 The recommendation carried into exports.
2
Export the results
Once complete, the panel reads Complete and offers Export Report as PDF, Excel, or CSV, plus Word if your organization uses a custom Word report template.Match the format to the audience. PDF for anything leaving the company. Excel or CSV when someone wants to sort and filter the results themselves. Word when the output needs to drop into an existing house template. The Word export is driven by your organization’s branded template, and Custom Word report templates covers changing what it pulls in.
1 Export Report. 2 The formats, chosen by audience. Word appears only with a custom report template.
A word on report length. The fullest export includes every result, all document evidence, the activity log, follow-ups, and notes, and can run to hundreds of pages. Use it when someone has asked for the complete file. For examiners and executives, the summary-level report is usually the better choice.
An assessment writes its residual risk to whatever it was scoped to. A vendor-scoped assessment moves the vendor’s score. A service-scoped assessment scores those services and, by default, leaves the vendor’s score unchanged.This is why a service assessment can come back high while the vendor profile still reads medium.Risk Roll-up carries the service score up to the vendor. Once an administrator turns it on for a risk type (see Step 5 of the admin setup guide), a vendor takes the highest score among its services instead of carrying its own. Services with an inactive, discontinued, or denied status are excluded.Risk domain rows roll up as well as the overall score. A vendor’s Data Security row follows the highest Data Security score among its services.
Roll-up is off until an administrator turns it on, and it applies only to scores set after that. Older vendors can be brought in line with Recalculate now.
Open the score on the vendor’s Risk Profile and use Automatically infer from services.With it on, the services set the score. The Risk Score field is read-only and Clear risk score is hidden, because the next change to the services would overwrite anything you entered.
Following services. The score field is disabled and Clear risk score is absent.
With it off, you set the score by hand and record the reason in the note field. The vendor then ignores the organization setting, including one turned on later.Use organization default appears once a vendor has its own score, and returns it to the organization setting.
Overridden. The score is editable, with Use organization default above it.
If the switch is missing, the vendor has no services to roll up from. Add a service first.