How to build an automation from scratch in Coverbase: pick a trigger, narrow it with conditions, configure the action it takes, test it, switch it on, and then read the runs and the work queue items it produces.
For AI agents: a documentation index is available at https://docs.coverbase.com/llms.txt. This page is also available in markdown by appending .md to the URL.
This guide is part of the User Guides collection. It covers the Workflows area: the list, the editor, the runs page, and the work queue items an automation raises. For the ready-made automations you can apply instead of building one, see Workflow templates. For the same engine seen from the API, see Workflow engine and Triggering workflows from external systems.
Workflows is an optional module. If you do not see Workflows in the left navigation, ask your Coverbase representative to turn it on.
A workflow is one or more automations drawn on a canvas. Each automation reads as a sentence: When something happens, If these conditions hold, Then do this. The thing that happens is a change to a record in your workspace (a vendor created, a contract’s dates edited, a work queue item completed). The thing it does is write another record, send something, or hand a task to a person.The mistake people make most often is switching a workflow on before it is finished. A workflow you create by hand starts Enabled, so the first automation you save is live as soon as you save it. Turn the switch off while you build, test against one record, then turn it back on.
Open Workflows in the left navigation. Each workflow is a card with a status badge, an Enabled switch, a preview of its shape, its name and description, and an Edit button. The badge reads Enabled, Disabled or Archived. Search matches names and descriptions. Two buttons sit above the cards: Browse templates opens the library, and New workflow creates an empty one.
The workflows list. Each card carries the Enabled switch, so you can stop a workflow without opening it.
Two tabs run across the top of the page: Workflows and Workflow Runs. The second one is where you read what your automations did.
Click New workflow. Coverbase creates a workflow called “New workflow” and opens the editor. The right pane shows the workflow’s settings: click the name to rename it, and click Add description to say what it is for.
2
Switch it off while you build
Turn the Enabled switch in the right pane off. A hand-built workflow arrives enabled, and an enabled automation fires on the next matching event.
3
Choose how it starts
Under Trigger, pick Event-driven (the default: “Runs when a domain event happens, like a vendor being created or an assessment changing status”) or Direct (“Someone runs this workflow from the UI or API”). Most workflows are event-driven. Choose Direct only when a person or an external system will start it on purpose.
4
Add the first automation
Click Add automation at the top right of the canvas, or the button in the empty state. The right pane switches to the automation form.
If a template already does most of what you want, apply it and edit the copy instead. Applying a template lands you in the same editor, with the steps drawn and the workflow switched off. See Workflow templates.
The editor has two panes. The canvas on the left draws each automation as a node. The inspector on the right shows the workflow’s settings, or the automation you are editing.
The editor. Nodes are automations, arrows are the events that link them, and the right pane edits whatever is selected.
A node shows the automation’s name, the action it takes, and a count of its conditions. An automation with no parent is an entrypoint and gets a heavier outline. A node spawned from the canvas and not yet saved carries a Draft badge. Click a node to open it in the inspector. Drag it to move it; Clean Up Layout in the top left toolbar rearranges every node automatically, next to the zoom and Fit view controls.
An arrow from one automation to another means the second one listens for an event the first one causes. The label on the arrow is the child’s own trigger (for example Assessment Created on the arrow into a step that reacts to the assessment a parent step created). Clicking an arrow opens the child’s trigger field. Hover an arrow and click the × to remove the connection; the dialog explains that the child still exists but will no longer fire from the parent’s events.To add a child, hover a node and click the + to its right, or drag from the + onto an empty spot to place the child there, or drag it onto another node to connect the two. A child does not have to follow the parent immediately; it fires when its trigger event happens, whoever caused it.
An automation whose trigger no upstream automation can cause shows a badge reading Trigger can’t be resolved from upstream. The link is drawn, but nothing on the canvas will ever fire it. Change the trigger, or connect it to an automation whose action produces that event.
Open an automation and click the actions menu next to its name. Color paints a strip on the node so a branch stands out; Delete removes the automation. The root of a direct workflow cannot be deleted.
The automation form has three sections. Name the automation at the top; the name is what you will read on the canvas and on the runs page.
An automation open in the inspector: When an assessment is created, Then create a work queue item, with the Reads row, the title placeholder, the instructions and the assignee underneath.
Click Select trigger…. The menu groups events by record (Vendor, Assessment, Contract, Finding, and so on) and each record offers its events. Search across the whole menu with Search triggers….
Supplier Tax Registration, Supplier Diversity Record
Updated
Supplier Update Request
Submitted
Supplier Legal Entity Assignment
Assigned, Rejected
Workflow Run
Updated, Completed, Failed, Deleted
Service Now Record
Created, Updated, Deleted
Service Now Sync
Completed
There is no recurring schedule trigger. To run something at a time rather than on an event, see Running a workflow yourself below.Narrowing an Updated trigger. Every Updated event fires on any edit, including a typo fix. When the trigger is an Updated event, the trigger card gains a second line: and any of these fields change: with a field picker underneath. Add the fields that matter (status, assignee_id, renewal_date) and switch any to all if every listed field must change in the same edit. Leave it empty to fire on every update.
Conditions are optional. Click the + next to If to add one. Each condition starts with a target (the record the condition reads) and a variant. When you have more than one, a toggle chooses Match all or Match any.
Filter is the one you will use most. It opens the same Add filter menu as the list pages, so any field you can filter a list by, including custom fields, is a field a workflow can branch on. The field names and operators are documented in the field reference.Items complete is the gate for human approval: it holds until all or any work items related to this automation, for this vendor, or created during this workflow run are complete. How to compose that into all-of, any-of and sequential approvals is in Reviews, approvals and gates.Most targets only appear when the trigger can reach their record. A Filter target is always offered, but a filter on a record the trigger cannot reach (a contract filter on a Vendor Created trigger) is flagged when you save, and the form will not save until you change it.
Click Select action…. Actions are grouped by the record they touch, and the label reads as verb plus record: Create work queue item, Update vendor, Send email.
Create, Update, Create one per issue, Send custom ServiceNow request, Upload documents to ServiceNow (only with the ServiceNow integration connected)
Under the action picker, a Reads: row lists the records the action needs. A pill marked Not provided by the selected trigger means the trigger cannot supply that record, and the form will not save: “This automation reads resources the selected triggers don’t provide.” Change the trigger or the action.The configuration below the divider depends on the action. A create or update action shows the record’s fields; leave a field empty and the action does not touch it. Send email asks for an email template and To, Cc and Bcc addresses. Send webhook picks the event type and the target webhooks (see Webhooks). Run workflow picks another workflow and either runs it immediately or schedules it for a time, such as seven days after the triggering event.
Any text field in an action accepts a placeholder that is filled in when the automation runs. Click Insert variable next to the field, or type the token by hand.
One answer from the triggering questionnaire response
The menu only offers variables the trigger provides. Fields that take a person (an assignee, an owner) offer a reference instead of a token: Vendor relationship owner, Vendor risk analyst, Assessment assignee, Contract owner and similar, resolved on the record that fired the trigger.
A placeholder with nothing behind it skips the whole action. {{contract:renewal_date}} on a contract with no renewal date does not render as blank; the step is recorded as Skipped and nothing is written. Put optional values in a field you can leave empty, not in a title.
Click Create (or Save). Fields that fail validation are highlighted. If the save would let automations trigger each other in a circle, a Possible loop detected warning lists the steps in the cycle. Save anyway if a condition breaks the loop in practice; otherwise change the trigger. Leaving the form with unsaved changes asks you to confirm, and a draft node spawned from the canvas is deleted if you cancel without saving.
The most common action is Create work queue item: a task on a named person’s queue, tied to a vendor.
Field
What it does
Type
The kind of task, which decides where the item deep-links to (an assessment review, a contract review, an intake request review, and so on).
Title, Description
What the assignee sees in their queue. Both accept placeholders.
Instructions
Markdown shown when the item is opened. Write the steps to complete the task here.
Assignee
A person, or a reference such as Vendor relationship owner. If this resolves to nobody, the item is not created and the step is Skipped.
Vendor
Leave empty to use the vendor behind the triggering event. If no vendor can be resolved, the step is Skipped.
Due date or Due in days
Set one, not both. Due in days counts from when the automation runs.
Creating the item sends the assignee a Work queue item assigned email, which is on by default and can be turned off per person under email notifications. Completing the item raises a Work Queue Item Completed event, which is how a later automation waits for a human.
Add a condition that matches a single record: a vendor tag only one vendor carries, or a name filter. Every automation writes real records against live vendors.
2
Switch it on and cause the trigger
Turn Enabled on. Make the change the trigger listens for (edit the test vendor, create the test contract). If enabling reports Possible loop detected, read the listed steps before choosing Enable anyway.
3
Read the run
Open the workflow’s History tab. A run appears within a few seconds with one step per automation that fired. Open it to see what each step wrote, or why it skipped.
4
Widen it
Remove the test condition, save, and leave the switch on. Changes save as you make them; there is no version history, so a saved edit applies to the next event.
A workflow whose Trigger is Direct has a play button next to the Editor and History tabs. Switching an existing workflow to Direct adds a root automation called Workflow run whose trigger reads Running the workflow; every other automation hangs off it. Its default action is a placeholder you are expected to change.Click the play button to open Run workflow. Fill in the record the run should act on (a vendor, contract, procurement or service) and click Run workflow, or Schedule for later… and pick a time under Run at. Either way you land on the History tab. A scheduled run sits in a Scheduled section above the runs with Fires at, a Pending badge and Triggered by (Direct run, or the workflow whose Run workflow action scheduled it). The row’s menu offers Cancel scheduled run. A schedule whose workflow is disabled or archived by the time it fires is dropped.External systems start the same run through the API. See Triggering workflows from external systems.
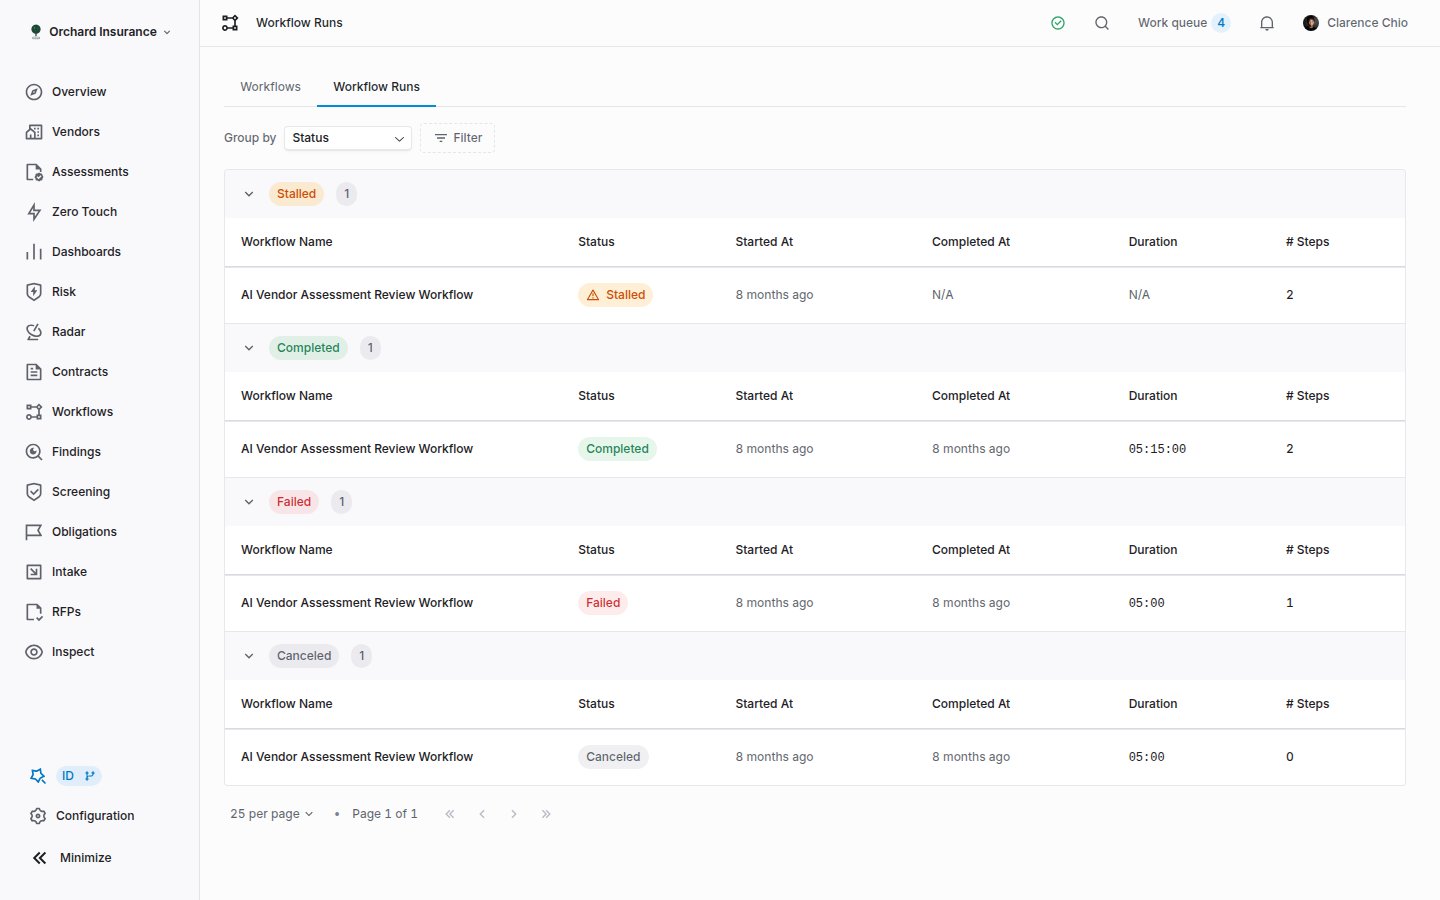
Workflow Runs (the second tab under Workflows) lists every run in the workspace, grouped by workflow by default. Switch the grouping to Status to see everything that failed in one place, or filter by Status. Each workflow’s own History tab shows the same table for that workflow only.
Workflow Runs grouped by status. Stalled is a run that has been In Progress for over fifteen minutes without progress.
Status
What it means
In Progress
The run has started and no automation has marked it finished.
Completed
An automation in the run used the Update workflow run action to set the status to completed.
Failed
The loop breaker stopped the run, or an automation set the status to failed.
Canceled
The run was stopped.
Stalled
In Progress with no update for fifteen minutes. The badge’s tooltip says the run “could be missing an automation to mark the workflow complete”.
A run finishes only when you tell it to. A workflow with no Update workflow run step stays In Progress after its last automation fires and shows as Stalled a quarter of an hour later. That is cosmetic for a one-step workflow, but if you want a clean Completed, add a final automation whose action is Update workflow run with Status set to completed.
Columns are Workflow Name, Status, Started At, Completed At, Duration and # Steps. Click a row to open the run.
The run page shows the status card on the left and a read-only copy of the workflow’s diagram on the right. The status card is a timeline, newest step first and Started at the bottom. Each step names its action and shows its Input (the record the trigger supplied) and Output (the records it wrote, as links). A step that did not write anything carries a badge:
Badge
What happened
Skipped
The action ran but had nothing to do: a placeholder or assignee resolved to nothing, no vendor could be found, no active webhook was subscribed, or the update contained no changes. The message under the badge says which.
Failed
The action errored. The message is the error. A failed step does not by itself change the run’s status.
An automation whose conditions did not match writes no step at all.
A run with a skipped step. The message under the badge explains why nothing was written.
Loops. If automations keep triggering each other, Coverbase stops the run and marks it Failed. The run page opens with an Automation loop detected callout that lists the chain (each automation linked to the editor, with “ran 3 times” where it repeated) and marks the step where it stopped with Loop stopped here. The breaker trips when a chain of automations is sixteen deep, when the same automation fires three times in one chain, or when the same record is changed twice by the same automation. Fix the trigger or add a condition, then cause the trigger again.There is no retry button on a run. To run the automation again, cause its trigger again: edit the record, or press the play button on a direct workflow.
A work queue item lands in two places. The assignee sees it in the Work queue button in the top bar, which shows a count and lists My Work Queue. Selecting an item opens a panel with the title, description, instructions and a Mark as complete button, with Back and Next to move through the queue. Completing it stamps the time and the person, and fires the Work Queue Item Completed event that a waiting automation listens for.Administrators also get See All, which opens the Work Queue Items page for the whole workspace. Its Items tab is a table with an Add filter menu and search; the Activity tab is the change log across every item.
Work Queue Items. Expanding a row shows the instructions and the conditions that created it.
Column
What it shows
Vendor
The vendor the item is tied to.
Title, Description
What the automation wrote, with placeholders filled in.
Status
Pending, Completed or Canceled.
Assignee
The person whose queue it sits on.
Due Date
The due date the automation set, as a badge.
Completed At, Created
When it was closed and when it was raised.
Click a row to expand it. The panel shows the Instructions and, for an item a workflow raised, “Work queue item created as a result of the following conditions being met” with the conditions listed. The row’s menu offers Mark as complete, Mark as incomplete (on a completed item), Mark as canceled and Archive. Cancel an item that is no longer needed rather than completing it, so nobody is credited with work they did not do; a canceled item cannot be reopened.Reassignment and routing to a group instead of a person are covered in Assignment, delegation and out of office.
See the workflows list, the editor and the runs pages
Anyone with read access to workflows
Create a workflow, apply a template, edit automations, switch Enabled on or off
A role with the workflow create and update permissions
Delete (archive) a workflow
A role with the workflow archive permission
Complete or reopen a work queue item
Its assignee, or an administrator
Cancel or archive a work queue item, open the Work Queue Items page
Administrators
How roles are assigned is in Permissions and roles. A template only appears in the library when your role can read the records its trigger uses; the rule is spelled out in Workflow templates.
The workflow is Disabled, the automation is still a Draft, or its conditions did not match. Check the switch on the card, save the automation, and compare its conditions with the record.
A step is Skipped with “no assignee resolved”
The assignee reference (for example Vendor relationship owner) points at a field that is empty on this vendor. Fill in the owner, or assign a named person.
A step is Skipped with “not vendor-resolvable”
The trigger’s record has no vendor behind it (an obligation typed in by hand, an ad hoc screen). The action needs one to file the item against.
A step is Skipped and mentions a variable
A placeholder in the action’s text had no value on this record. Remove it or move it to an optional field.
Not provided by the selected trigger on an action, and the form will not save
The action reads a record the trigger cannot reach. Change one of them.
Trigger can’t be resolved from upstream on a node
The node is connected to a parent whose action never causes the node’s trigger. Reconnect it or change the trigger.
Possible loop detected when saving or enabling
Two or more automations can trigger each other in a circle. Add a condition that breaks the circle, or confirm if you know a runtime condition already does.
A run is Stalled
Nothing has updated it for fifteen minutes. If the last automation has already fired, the workflow is missing an Update workflow run step; the work it did is not affected.
A run is Failed with Automation loop detected
The loop breaker stopped a chain that kept re-triggering. Follow the links in the callout to the automations involved.
An Updated trigger fires on every edit
No watched fields are set. Add the fields that matter under “and any of these fields change:”.
A scheduled run vanished from Scheduled without running
The workflow was disabled or archived before the time came, so the schedule was dropped.
The templates library hides a shelf you expected
Your workspace lacks the module or your role cannot read its records. See Workflow templates.