

For AI agents: a documentation index is available at https://docs.coverbase.com/llms.txt. This page is also available in markdown by appending .md to the URL.
This guide is part of the User Guides collection. It starts where a finding already exists. For turning an assessment issue into a finding, see Work the issues and Dispositioning issues. For what the module is, see Findings Manager.
Findings is an optional module. If you do not see Findings in the left navigation, ask your Coverbase representative to turn it on.
Where findings live
Click Findings in the left navigation. The page has three tabs across the top:
Configuration for the module is on a separate page. Open the Actions menu on the Findings page and choose Findings Settings, or find Findings Settings on the Configuration page. Only people who can edit organization settings see it.
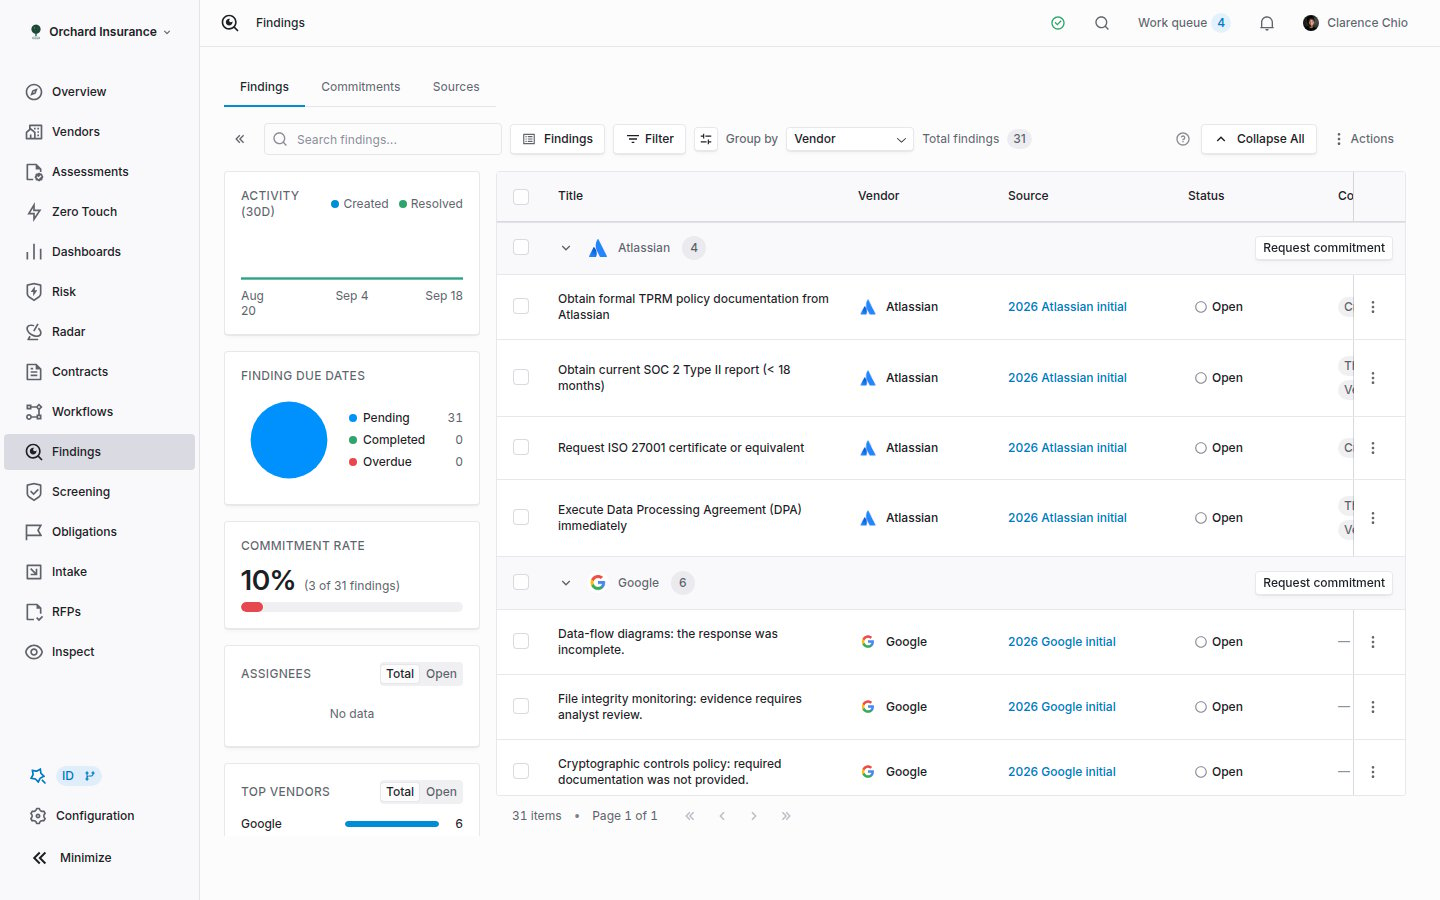
The Findings tab, grouped by vendor, with the insight cards on the left.
How a finding gets raised
Every finding records a source. The Source column on the list names it, and the finding page links back to it.
A vendor is required only on the manual path. A finding raised from an assessment inherits the assessment’s vendor.
Bulk create findings in the Actions menu does two jobs at once: the Documents tab creates findings from accepted extraction candidates, and the Assessments tab lists an assessment’s open issues that do not yet have a finding, so you can create one per issue in a single pass with AI autofill all findings.
Reading the list
The list is grouped, and a page is a page of groups. Group by offers Vendor, Control Set, Assignee and Risk Level. The column that matches the grouping is hidden automatically, since the group header already shows it.
Your custom fields on findings appear as extra columns. Use the display options button next to the filter to show, hide, reorder and pin columns, and Expand All / Collapse All to open or close every group.
Filters cover Vendor, Status, Due Date, Created Date, Updated Date, Assignee, Created By, Source Type, Source document, Risk Level, Control Set and Commitment Count. The search box matches titles. Save a filter, sort and column layout as a view from the view selector; the built-in view is Findings, showing everything.
The insight cards on the left summarize the whole dataset, not the current page: created versus resolved over 30 days, due dates split into pending, completed and overdue, the share of findings with a commitment, and leaderboards for assignees, vendors and control sets. Hide them with the arrow button next to the search box.
Acting on several findings
Tick rows, or the checkbox on a group header, and a bar appears with Change Stage, Change Assignee and Archive. Shift-click selects a range. Moving several findings into a resolution status asks you to confirm, because it also resolves their connected assessment issues (see Statuses). Each row also has its own menu: View details, View commitments, Request commitment and Archive. Archiving is not reversible from the UI.The finding record
Click a row to open/findings/<id>/overview.
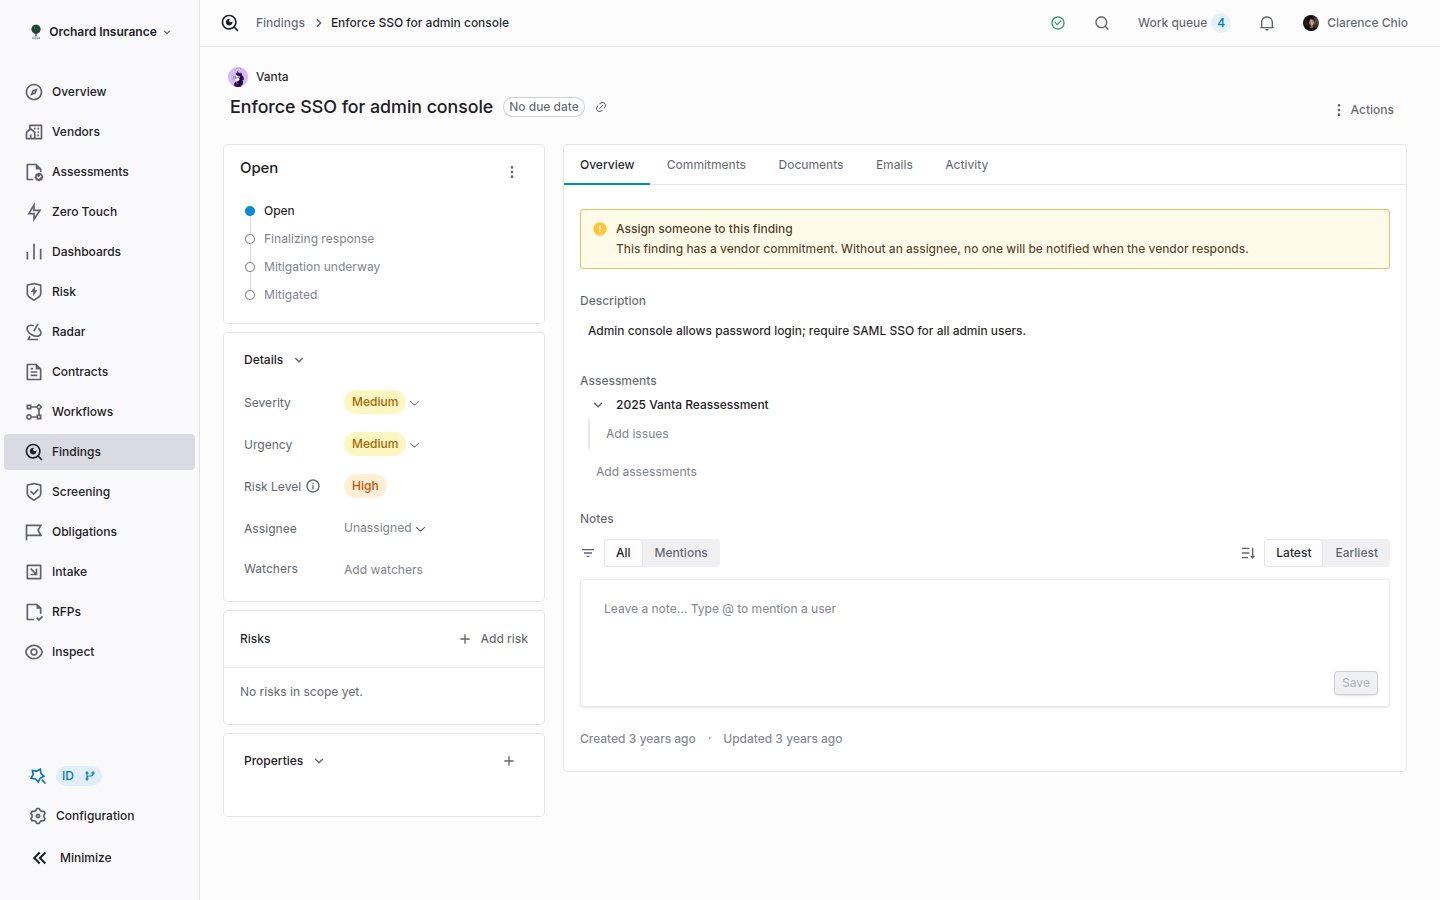
A finding record: status card and details on the left, Overview tab on the right.
- The status card. The current status with the path before and after it. Pick a new status here.
- Details. Severity, Urgency and Risk Level (or just Risk Level, depending on your settings), Assignee, Watchers (people or departments) and External ID. The External ID row appears when your organization imports findings from another system, and it must be unique.
- Risks. Risk register entries tied to this finding, with a link to add one.
- Properties. Your custom fields, with Add Custom Field for admins.
Statuses
Every organization starts with seven finding statuses. Open is the default a new finding lands in. The other six are set by the commitment workflow, so keep their meaning even if you restyle them or add your own under Configuration, then Statuses.
Three of them resolve the finding: Mitigated, Compensating control and Risk accepted. Moving into one of these while the source assessment is still running also resolves the connected issues. Coverbase asks first: “Mark finding as Mitigated? 2 connected issues on the ongoing assessment will also be marked as resolved.” Compensating control is different: it marks the issues no longer an issue, because the gap was never open. Issues on a completed assessment are annotated, not changed.
A finding stops counting as overdue once its status is in the Completed or Canceled group, whichever status that is.
Severity, urgency, risk and due dates
What you see in the Details card depends on Findings settings:- Matrix mode. You pick Severity and Urgency, and the Risk Level is read from your organization’s matrix. It cannot be set directly.
- Risk-direct mode. You pick the Risk Level yourself.
- Neither. No level fields appear.
Commitments
A commitment lives under a finding and is negotiated with the vendor through a portal. One finding can carry several, for example one per remediation step.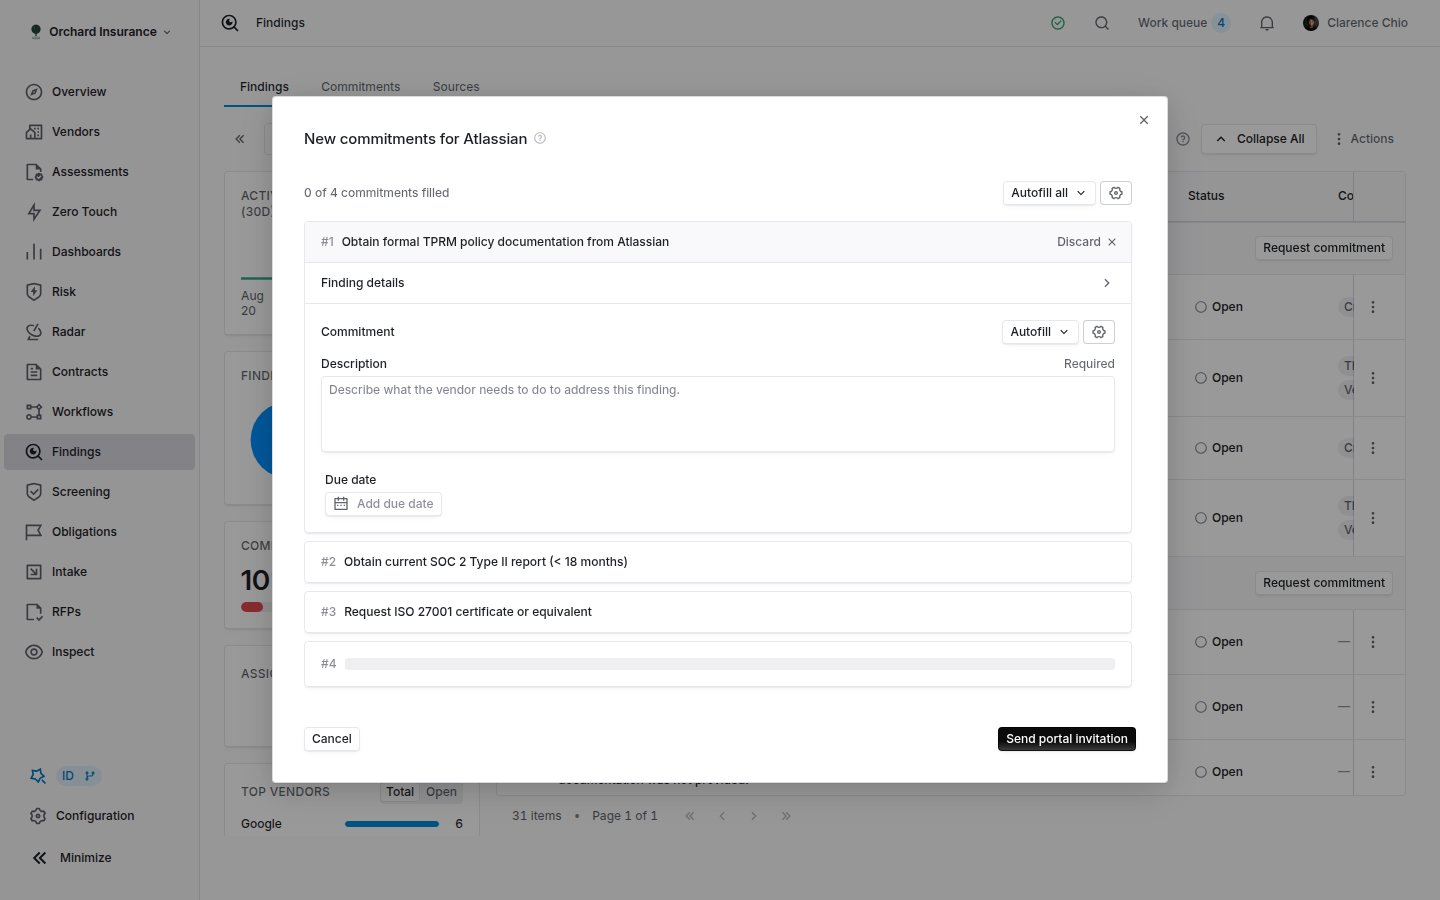
Requesting commitments for several findings on one vendor.
Requesting one
1
Pick the findings
On the Findings tab, group by vendor and click Request commitment on the vendor’s group header. The group enters selection mode with the eligible findings pre-ticked. Adjust the ticks and click Continue. For a single finding, use Request commitment from the row menu instead, or New commitment on the finding’s Commitments tab.
2
Write the terms
The dialog opens as New commitments for <vendor>, one form per finding. Each needs a description of what the vendor must do and a due date. AI autofill drafts the description from the finding; Use finding description copies it verbatim. A finding that already has an open commitment offers Existing commitment so you update it rather than create a duplicate. Discard drops a finding from the request.
3
Send the portal invitation
Click Send portal invitation. The next step sends the vendor a portal link by email. Skip invitation creates the commitments without emailing, which is right when you will send the link yourself or the vendor already has it.
Commitment statuses
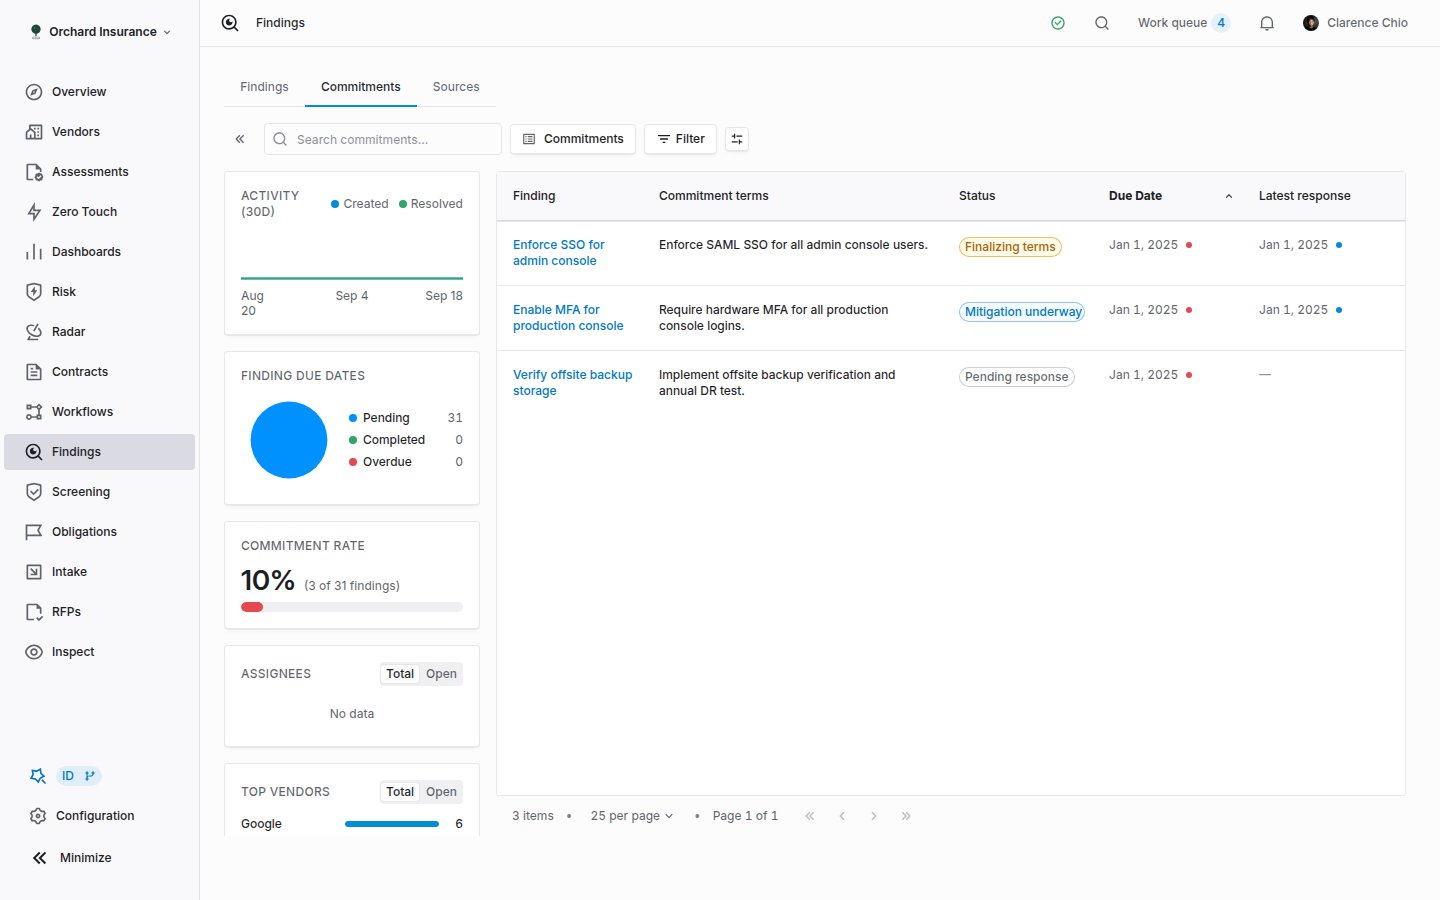
The Commitments tab. Every commitment across every finding, with its status, due date, the latest vendor response, and how long it has been waiting.
Overdue is not a status. The due date badge turns red on its own, except on Closed and Declined commitments.
A vendor can answer in the portal with Accepted, Proposed changes (a different date or wording), Compensating Control (an existing control already covers it), Declined, or later Commitment Completed with evidence. The Commitments tab lists Latest response, Awaiting since and Response due so you can see who the ball is with.
Working a commitment
Click a commitment on the Commitments tab, or on a finding’s Commitments tab, to open the Commitment Details drawer. The left side shows the status card with guidance and the actions for that state, the parent finding and its source, the Assignee, and the Commitment Terms with their due date. The right side has Responses (the vendor’s rounds and the portal URL), Documents, Notes and Activity.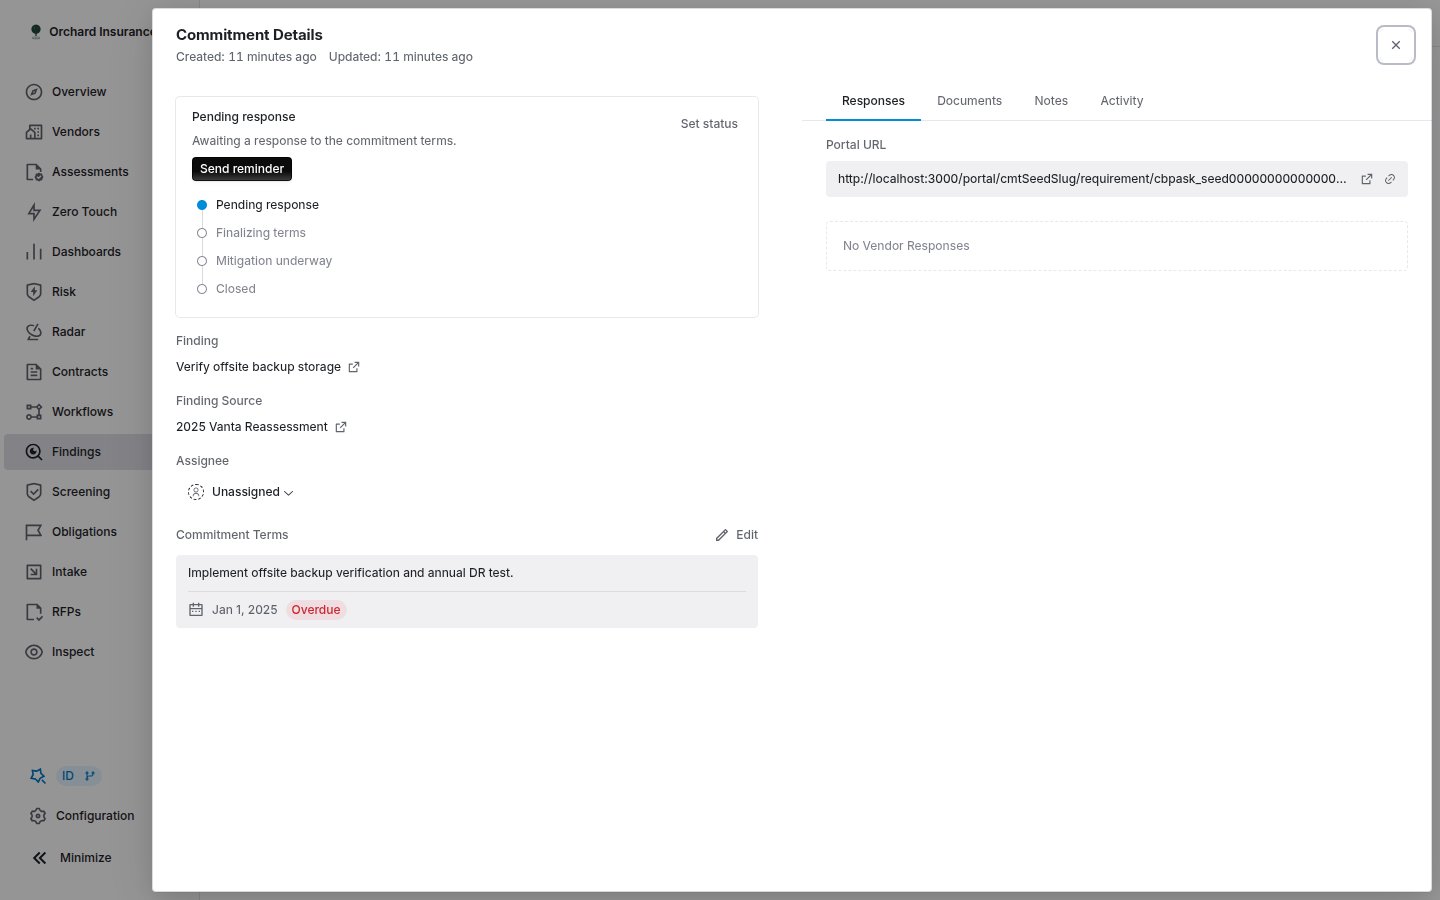
The Commitment Details drawer during a completion review.
When a vendor submits completion evidence or claims a compensating control, an AI Review card appears on the Responses tab with a suggestion, a confidence level and the reasoning. Accept and close and Send back to vendor apply it; Re-run review tries again. Whether a review applies itself without you is a setting (see below).
The status picker at the top of the status card is an override. It changes the status and nothing else: no email, no portal change. Use the actions above when the vendor is involved.
How commitments set the finding status
Every commitment change re-derives the parent finding’s status from all of its open commitments:Emails and notifications
Internal notifications go to the finding’s assignee and to anyone named in a user-type custom field on the finding. Each person turns them on or off in their own notification settings; the defaults are in the notification catalog.
Vendor-facing email is separate: the portal invitation when you send a request, Commitment updated when you change the terms or extend a due date, and Commitment reminder when you click Send reminder. Coverbase also sends vendors automatic reminders on open commitments; see Vendor-facing email.
Where findings show up elsewhere
- Assessments. The assessment’s Findings tab and each issue’s Findings panel list the findings raised there. A finding can be attached to more than one assessment from its Overview tab.
- Vendors. Archiving a vendor archives its findings that have no active linked assessment.
- Risk register. The finding page’s risks card links register entries to the finding, and a finding can be raised from a risk.
- Dashboards. The chart library includes findings charts, and they are available in every workspace.
- Excel. Actions, then Download as Excel builds a consolidated findings report, optionally with the current filters and column visibility.
- API and integrations. The Findings API lists, creates and status-syncs findings for GRC round-trips; finding and commitment changes emit webhook events; and the MCP server answers questions about findings.
Findings settings
Open Actions, then Findings Settings. Everything on this page applies to the whole organization, and only people who can edit organization settings can change it.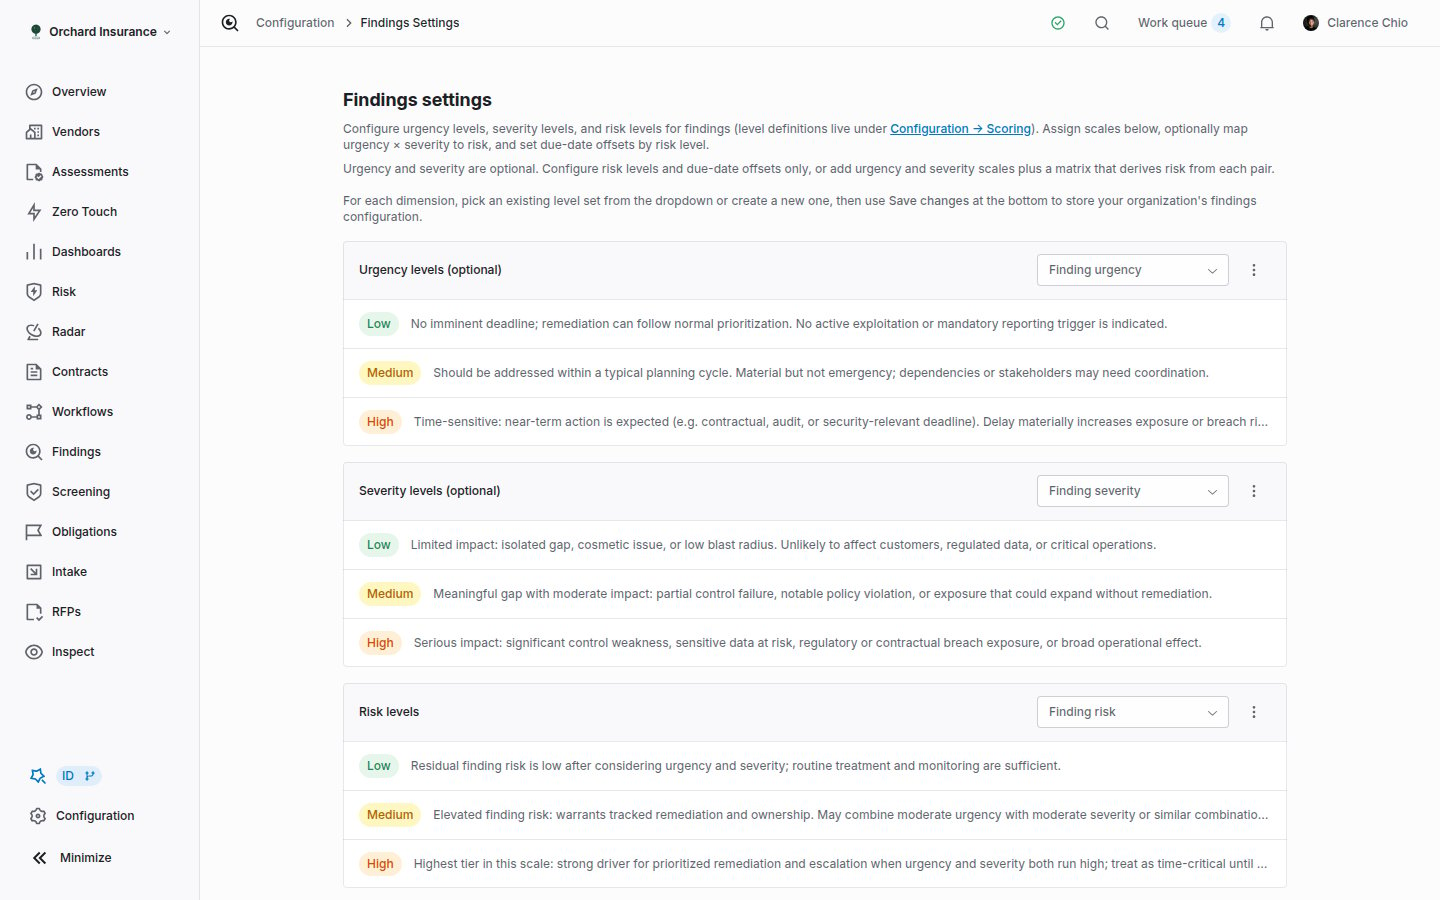
Findings settings: the three scales, the risk matrix, and due-date offsets.
1
Choose your scales
Risk levels is the one that matters; Urgency levels and Severity levels are optional. Pick an existing level set or create one. Configure all three for matrix mode, only risk for risk-direct mode, or none. Two out of three is rejected on save.
2
Fill the risk matrix
With all three scales set, the Risk matrix appears with a suggested mapping. Pick a risk level in the bar, then click or drag across cells. Every severity and urgency pair needs a value before you can save.
3
Set due dates by risk level
Under Due dates by risk level, enter days per level. Leave a level blank for no automatic due date.
4
Save
Click Save changes. Leaving the page with unsaved edits prompts you.
- Response window. Days a vendor has to respond after a commitment is sent. It drives the Response due column and the overdue-response state. Leave it empty to track waiting time without a deadline. A portal can override it.
- AI Review. Auto-Apply decides whether an AI review acts on its own: Suggest only keeps a person in the loop; the high, medium and any-confidence options let it close commitments and send revision requests without review. Review Instructions is text added to every review, for example the evidence you require before accepting a completion.
Permissions
Admins and Members create and edit findings and commitments. Siloed Members can only touch findings on vendors they own, watch or analyze. Archiving, exporting and creating are separate permissions in a custom role, and portal actions (sending a reminder, re-requesting, pushing back a completion) need the portal update permission. A grayed-out action shows a “no permission” tooltip. Details: Permissions and roles.Troubleshooting
Related
How to run an assessment
Where most findings come from: working the issues and promoting the real gaps.
Analyst and reviewer guide
Accept the risk, keep the follow-up open, or promote to a finding.
Email and notifications
Every email the platform sends, who receives it, and the defaults.
Findings API
List, create and status-sync findings from your GRC platform.