

Triage intake
Launch assessment
Review issues
Correct the AI
Follow up
Disposition and report
Watch Radar
Step 1: Triage new vendor requests
New requests arrive from business requesters already enriched with sanctions, financials, security posture, and a redundancy check against your existing portfolio. Most IRQ questions come pre-answered by the research agent.- Open the pending submission and scan the enrichment readout. A red flag on sanctions is a fuzzy match to investigate, and an unknown vendor with no public presence also flags red.
- Check the redundancy readout. If the vendor, or a comparable tool, already exists in your portfolio, this may be a new service on an existing record rather than a new onboarding.
- Review the auto-answered IRQ. A “limited information” flag means the AI could not confirm authoritatively, not that a problem exists. Click the reviewed checkbox on each answer you validate. Your name and timestamp are recorded.
- Answer anything flagged for manual input, usually the judgment questions your admin marked Required.
- If something is ambiguous, use Request Clarification to send a templated email back to the requester before approving.
- If the requester misidentified an existing vendor, approve the submission and use the vendor record merge function to consolidate it under the parent record.
- Accept to kick off onboarding. The right assessment plan attaches automatically based on tags and inherent risk.
- Pre-Qualification runs on the vendor name at step 1 and tells the requester if the vendor is already onboarded, or if an approved vendor already covers the use case. It is why some requests never reach you.
- The autofilled IRQ at step 3 arrives with a confidence badge per answer (green High confidence, amber Review this response) and the reasoning and sources behind each one. Work the amber ones first. Amber means Coverbase was not confident, and the reasoning usually names what was missing.
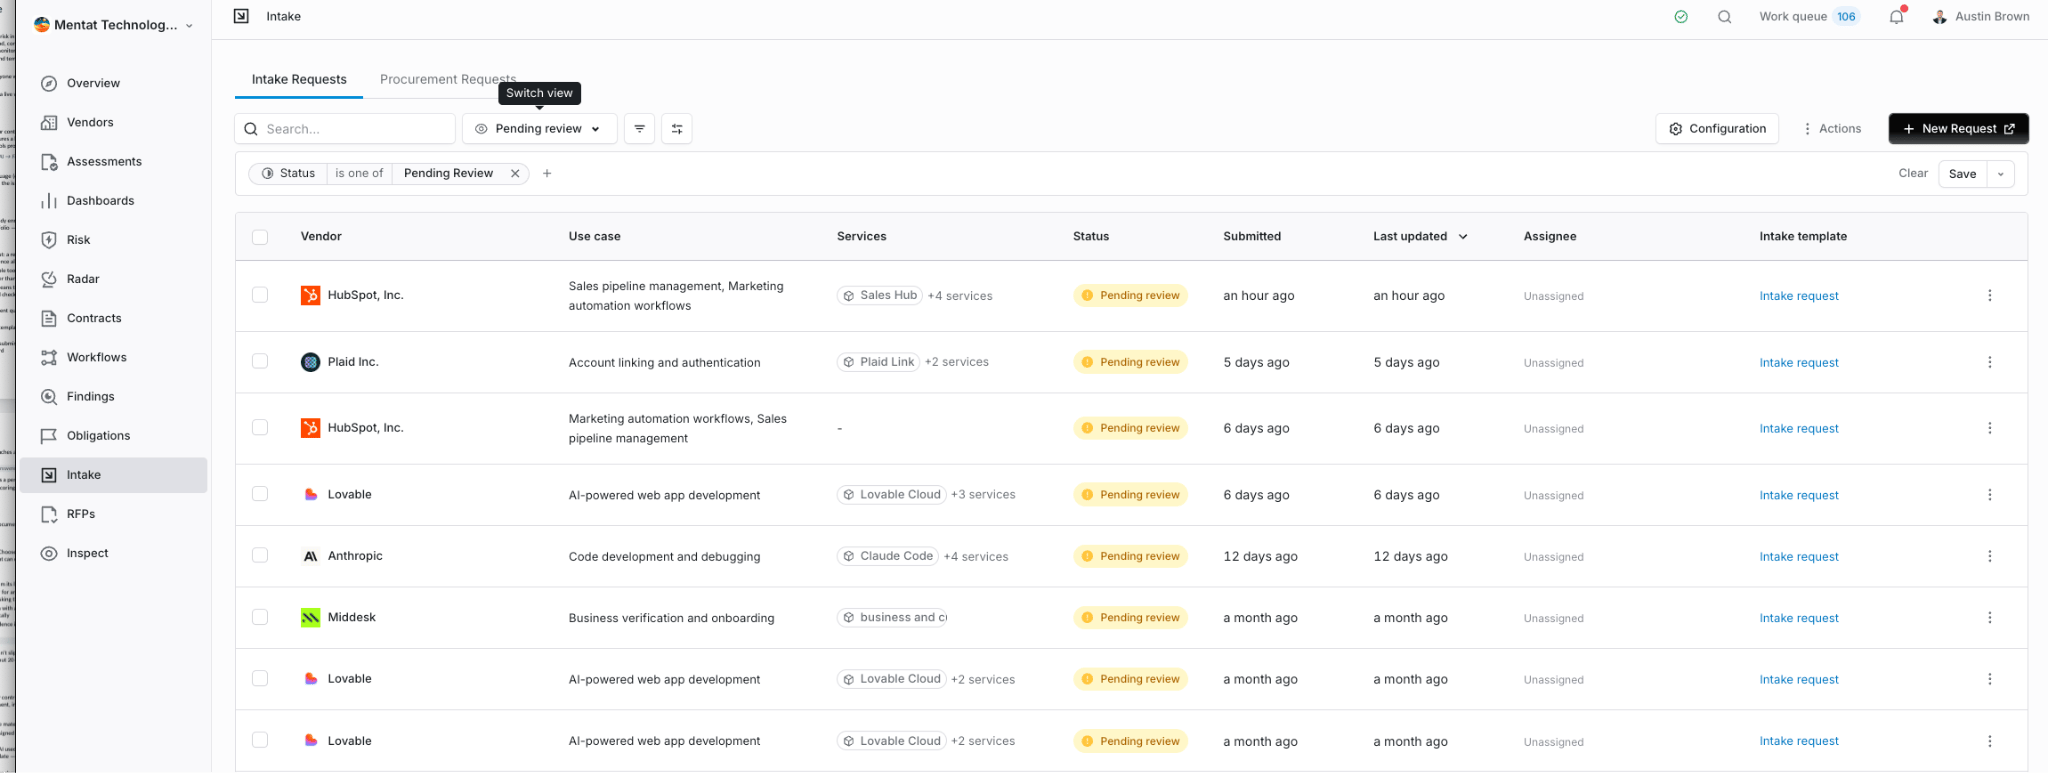
The intake queue. New requests arrive pre-enriched and pending review, each with its use case, services, and status.
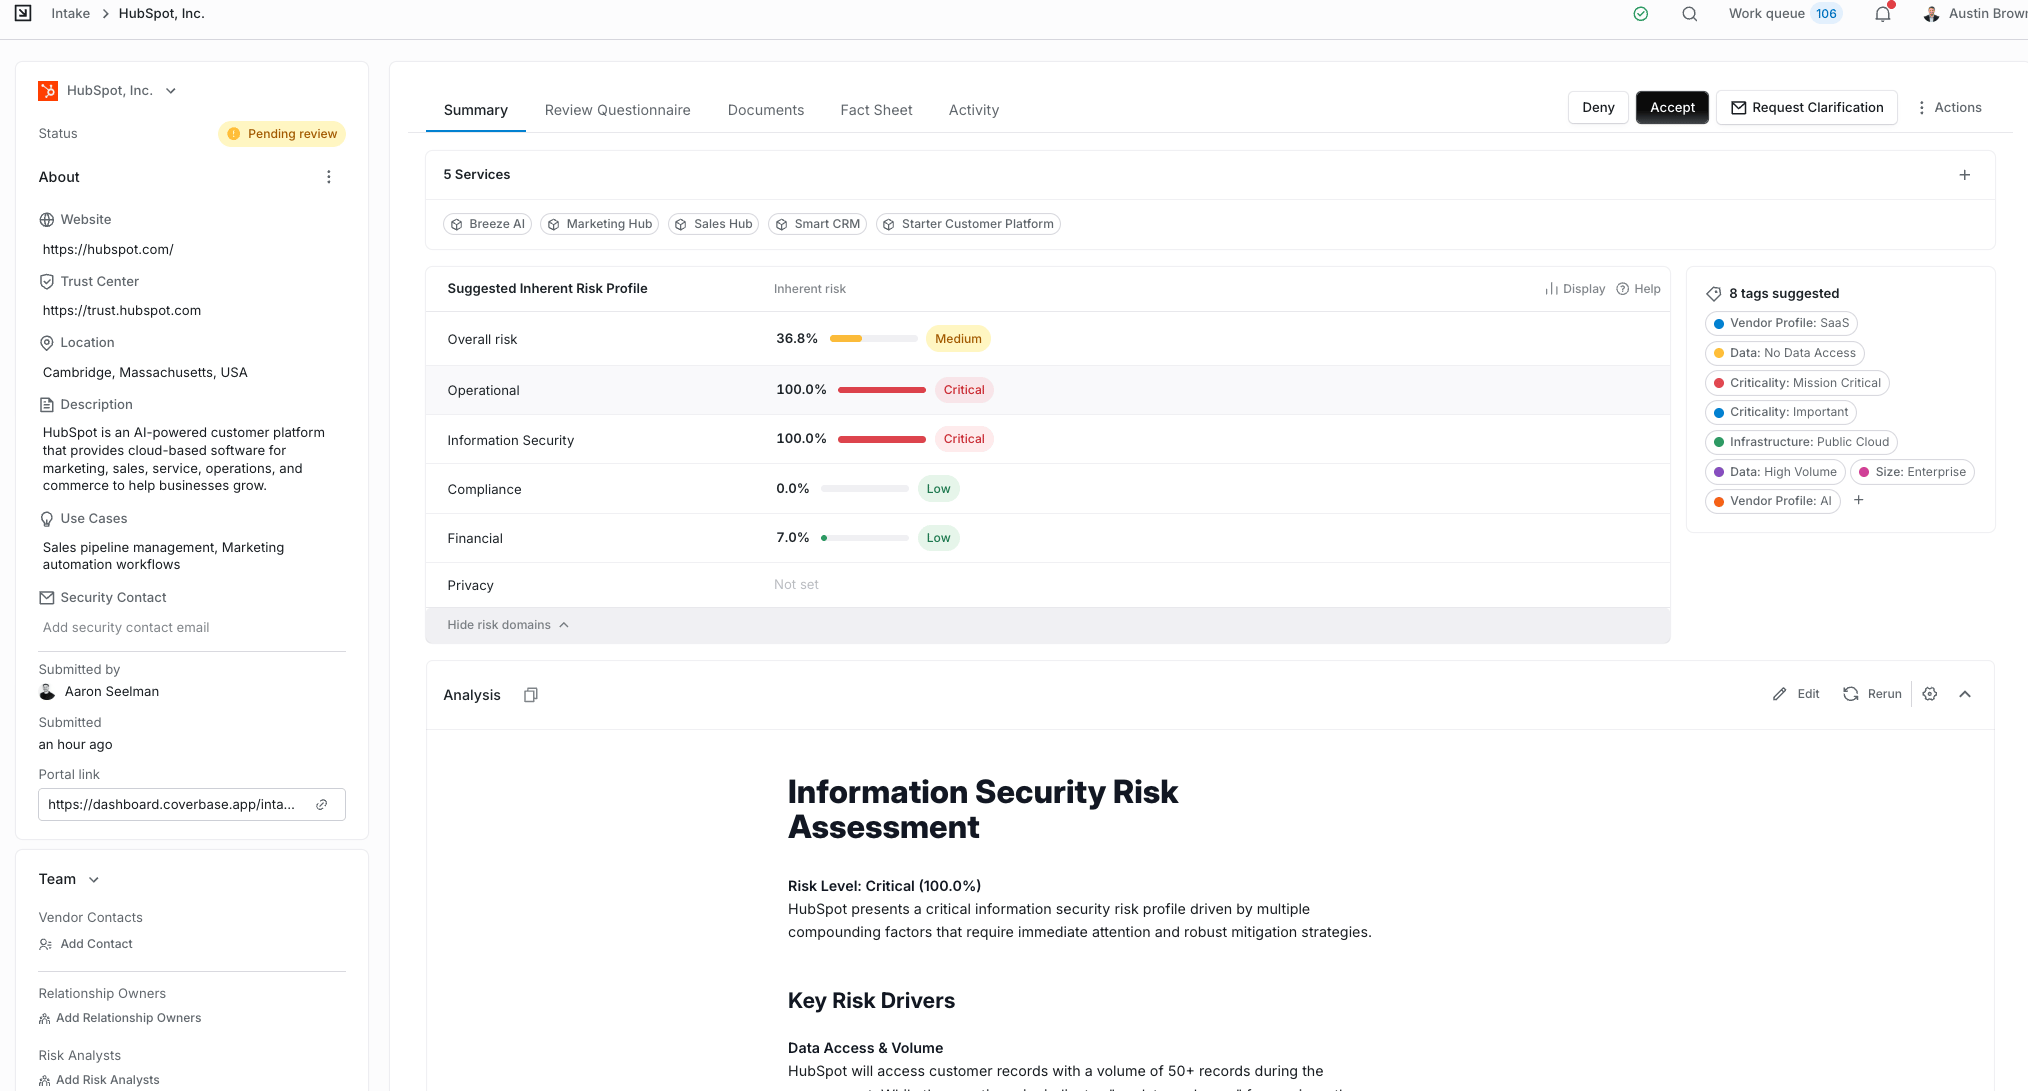
Inside a submission. The enrichment and redundancy readouts, plus the auto-answered IRQ you validate answer by answer.
Step 2: Launch an assessment
Launching an assessment opens the review. It attaches control sets, kicks off document collection, and runs the analysis.- Open the vendor record, then go to Assessments → New Assessment. Choose vendor-level or service-level scope. Multiple assessments can coexist, and one assessment can carry multiple control sets at once, like SIG core plus your own InfoSec set.
- Pick the Assessment Plan. Control sets and questionnaires are not chosen assessment by assessment; they come from the plan. Selecting one shows a summary: how many control sets and questionnaires, manual or automatic collection, whether it targets residual risk, and who reviews it. Read that summary to catch a plan that is heavier or lighter than the vendor warrants. Leaving it on None creates an assessment with no control sets attached.
- Add more than one vendor if you are starting a batch. Each gets its own assessment from the same plan, which is how annual reviews are best run. The button reads Create Assessments for that reason.
- Let evidence collection run. The Documents tab offers five routes that combine freely, each showing how much is available before you click: Import from existing vendor docs, Request from vendor (the portal, with its current status), Request automatic collection, Import from Coverbase Library (documents Coverbase collected itself, often substantial for well-known vendors), and Retrieve from Trust Center (needs a Trust Center URL on the vendor record). Below the cards, Upload vendor documents takes files you hold yourself. In automatic mode Coverbase pulls from its library first, then scrapes the vendor’s trust center for anything ungated (it form-fills access requests for gated documents), before falling back to asking the vendor.
- Where the vendor has to be engaged, send the portal invitation with a due date. Reminders and the pre-signed MNDA your admin configured go out automatically. The vendor cannot submit until the required items are done, and when they upload, analysis of the affected controls starts on its own.
- Analysis takes roughly 5 to 10 minutes on a small evidence set and 20 to 30 minutes when there is a lot to read. A long SOC 2 takes considerably longer than a certificate of insurance. Large control sets add to it, and a full SIG core is around 300 questions. You do not need to keep the tab open.
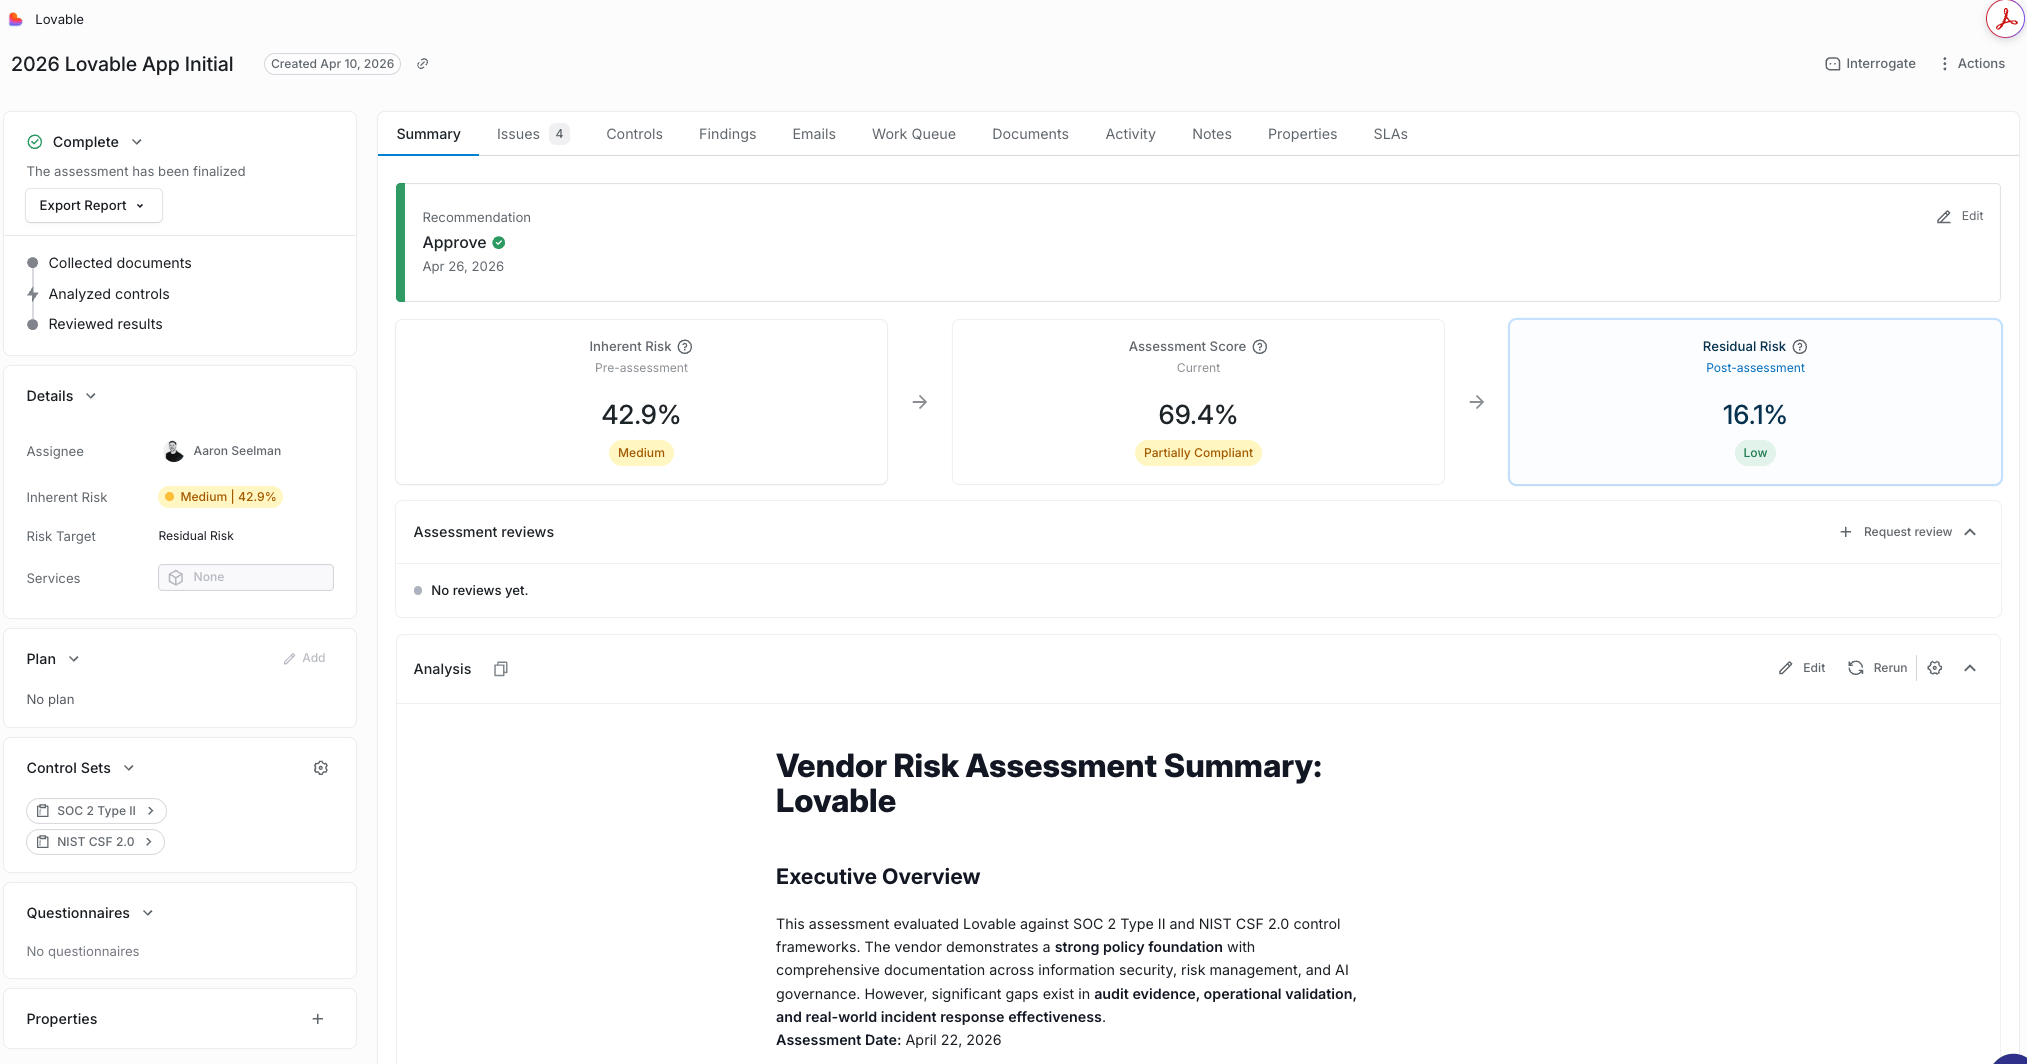
The assessment workspace. Control sets attached in the left rail, and the lifecycle (collected documents, then analyzed controls, then reviewed results) tracked as it runs.
Step 3: Review the results
The AI has measured every document against every control and raised issues where evidence is missing or contradicts the expectation. Work through the results in this order.- Start with the issues, not every result. The Issues tab opens filtered to the results raised as issues, so triage the material items first.
- Turn on Assigned to me to filter to your controls. Issues can be assigned per risk domain (InfoSec to InfoSec SMEs, and so on) or round-robin across the team.
- Open each issue. You see the expectation, the guidance the AI used, and the analysis citing the specific evidence. Click through to the source language to validate. Never take the summary on faith for a material item.
- Spot-check compliant controls too, especially early on. Passes show the same full evidence chain, plus web-sourced supporting articles, and this is how you catch false negatives while you build trust in the output.
- Where two control sets overlap, say SIG core and the out-of-box SOC 2 set raising the same gap twice, mark the duplicate as not an issue and tell your admin to drop the redundant set from future assessments.
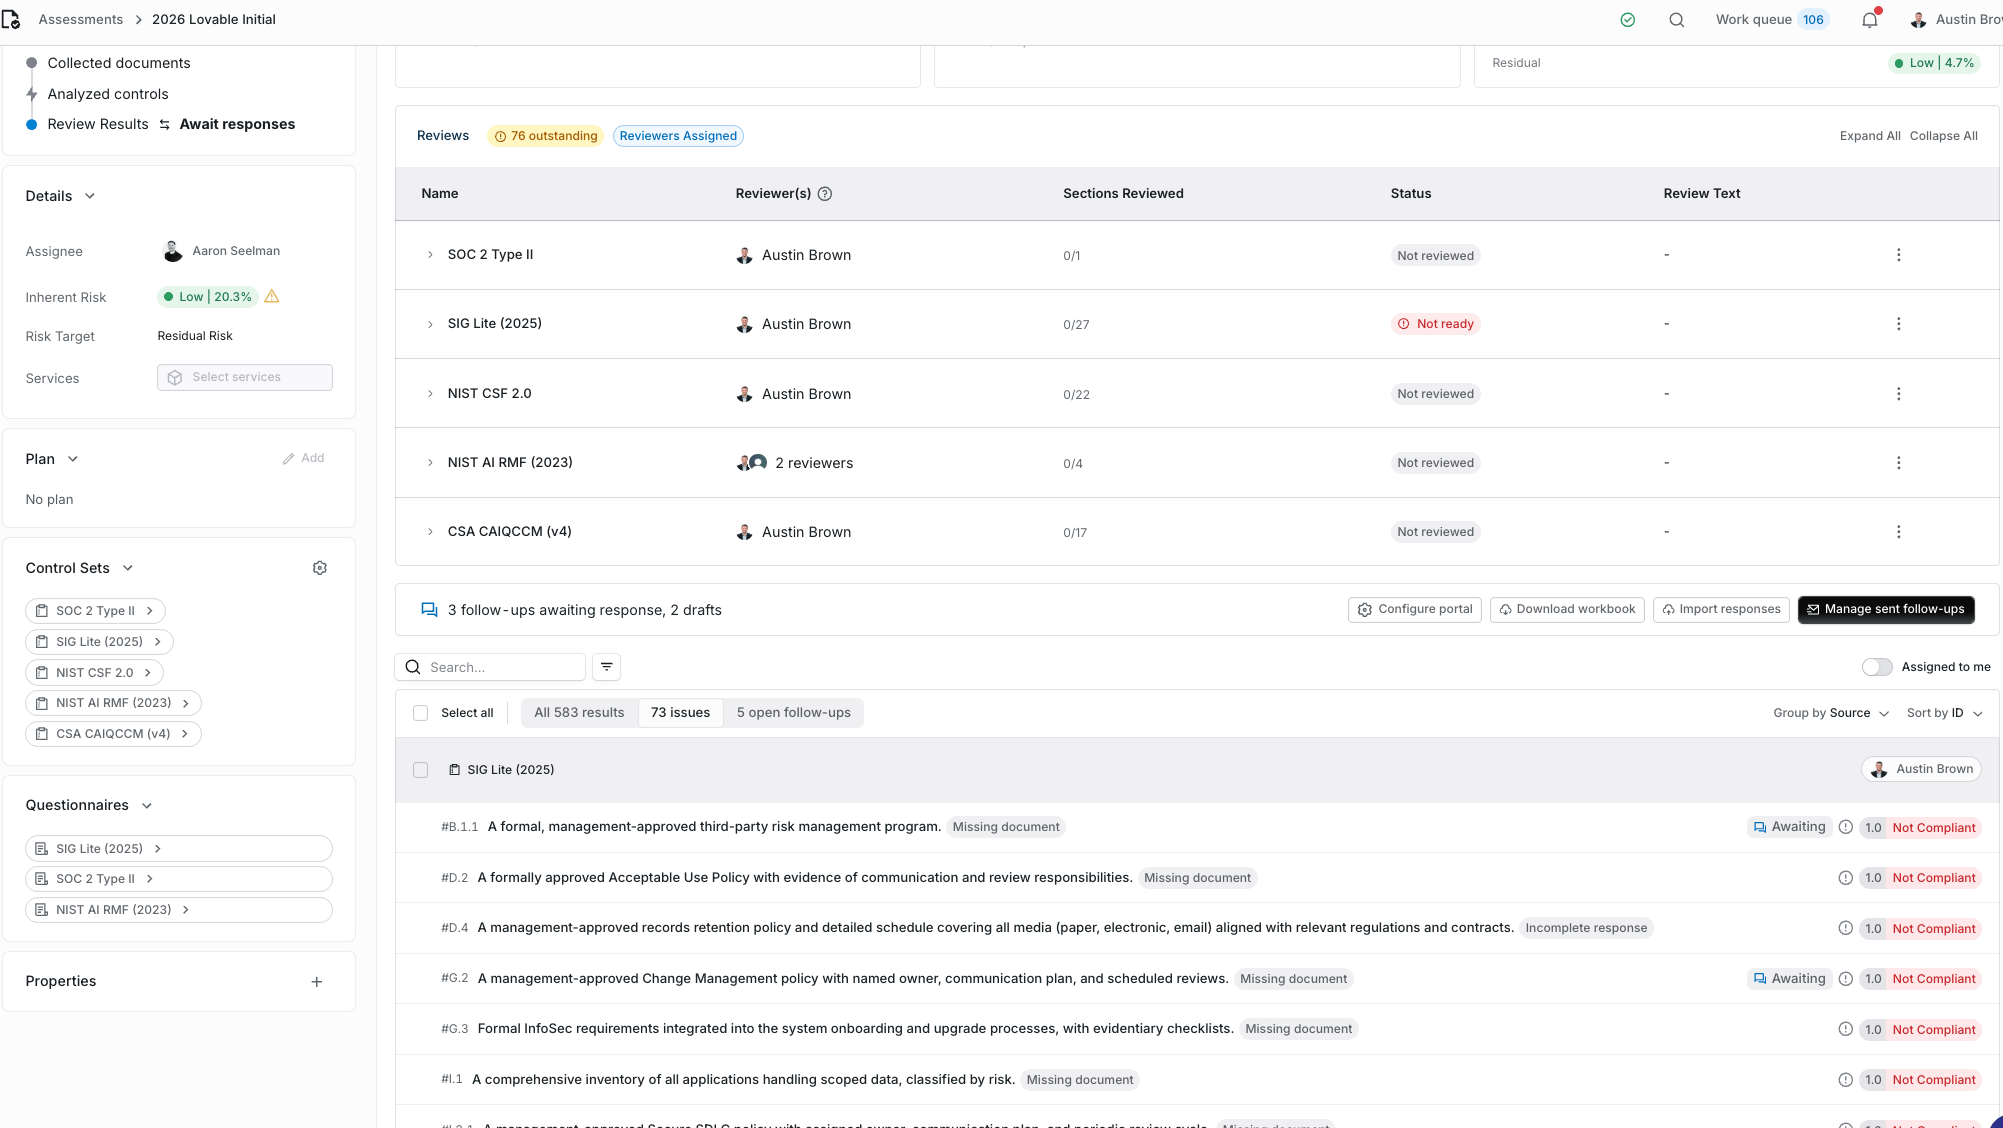
The review workspace. Results grouped by control set, with each issue's status, score, and reason (Missing document, Incomplete response, and so on).
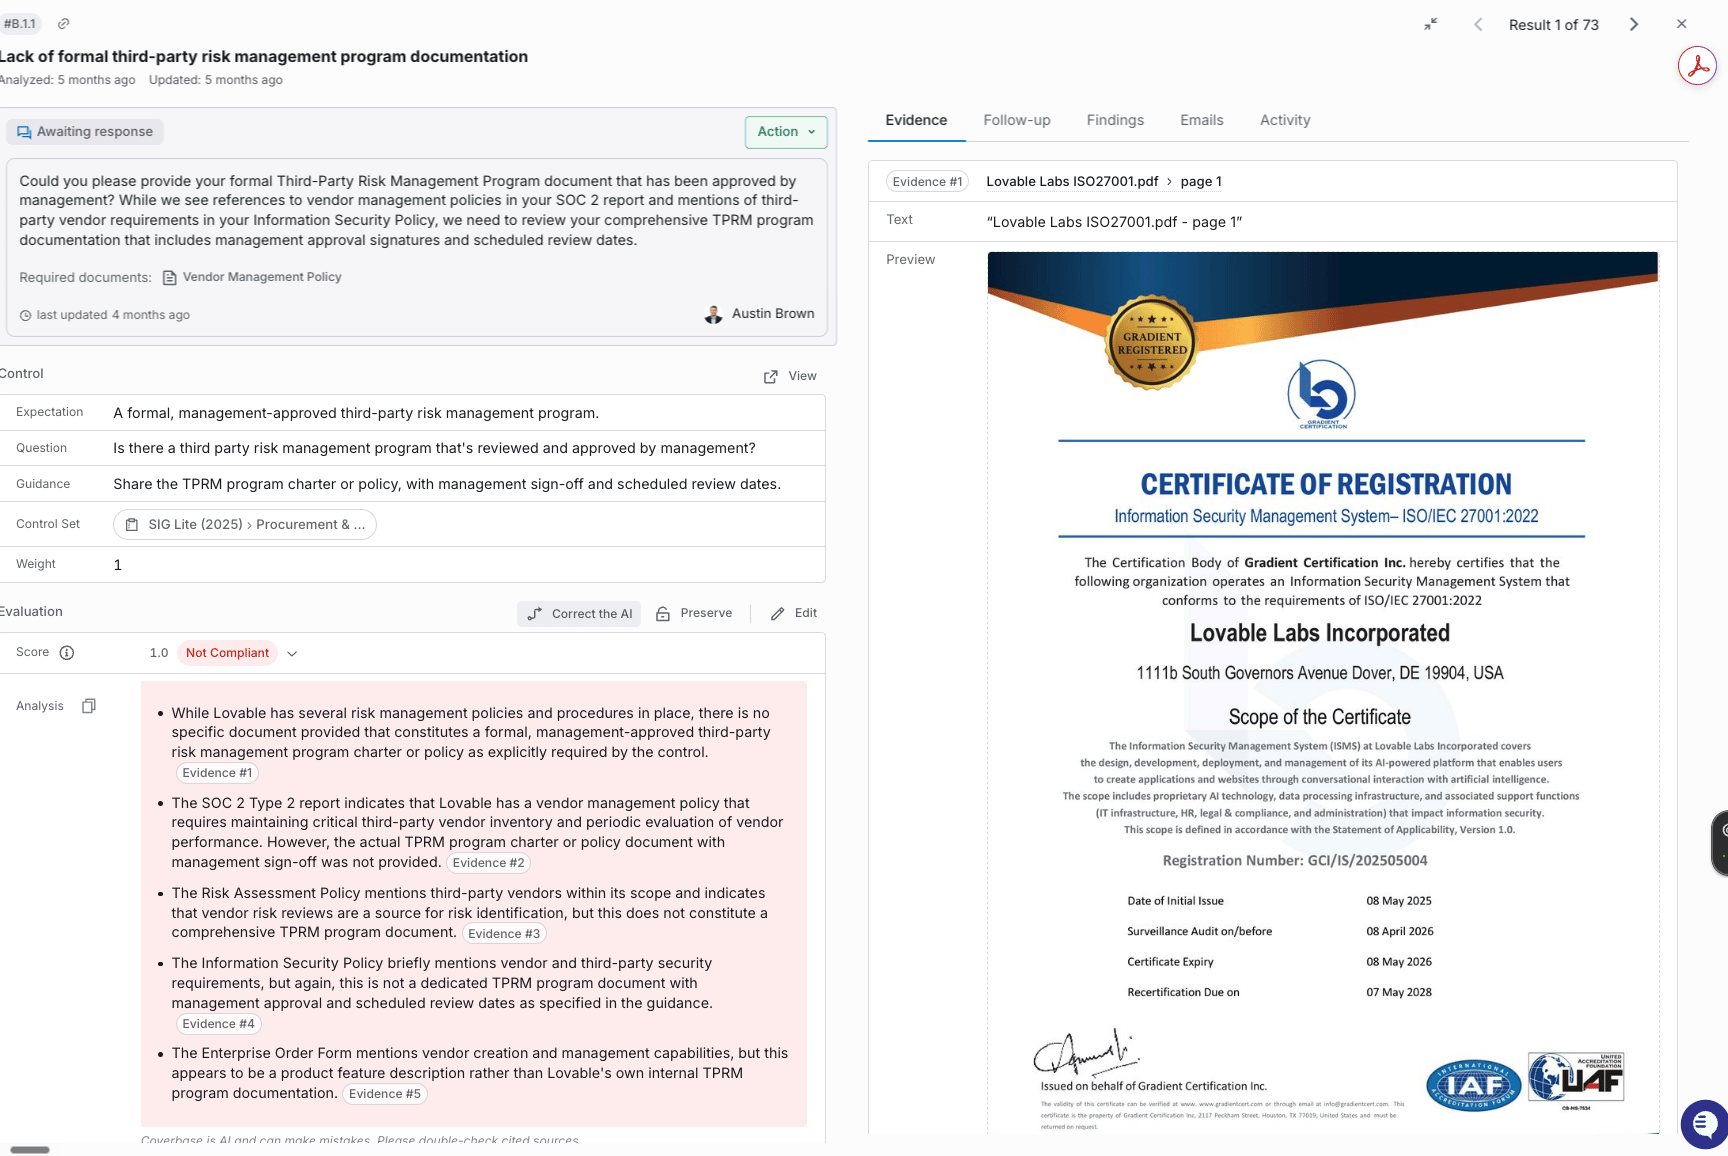
An issue in detail. The expectation, question, and guidance on the left; the AI's cited analysis and the actual source evidence on the right.
Step 4: Correct the AI
Correct the AI turns a wrong or noisy result into a permanent change. You edit the control’s guidance, rerun it on the spot, and if you accept, the change applies to every future assessment.- On the issue, choose Correct the AI.
- Write the missing condition into the guidance. Be specific.
- Rerun the control and confirm the result changes as expected.
- Accept to save globally, or discard.
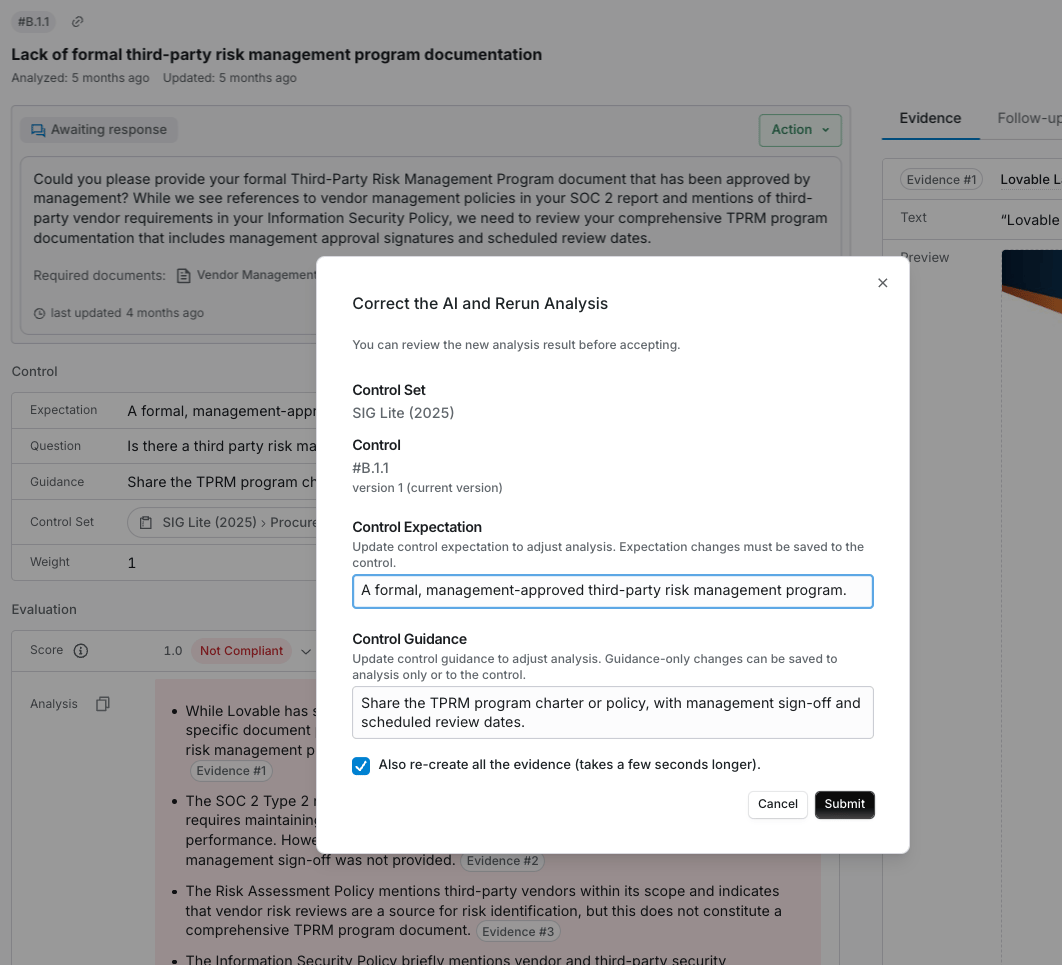
Correct the AI. Edit the guidance, rerun the control, and accept to make the fix permanent across all future assessments.
Real corrections from live reviews
Real corrections from live reviews
- A clean desk policy flagged for a SaaS vendor. Added “mark fully compliant if the vendor is not a professional services or contracting company with a physical on-site presence.” The rerun resolved to no issue.
- SOC 2 currency. Tightened the default 12-month window to 6 months on the control, and the draft vendor follow-up regenerated itself to reflect the new window.
- Employment contractual agreements. Added “accept an information security training attestation as sufficient evidence.” The issue resolved and saved for all future assessments.
Step 5: Follow up with the vendor
For genuine gaps, you send the vendor a contextualized question that references what they already submitted, through the portal.- On an issue, choose Draft Follow-up and use AI Autofill. It writes the question in context (“we reviewed your SOC 2 and it doesn’t address X”) rather than pasting raw control text, which vendors respond to far better.
- For volume, select all issues, then Create Follow-ups. AI Autofill runs across the batch. Set the portal due date and send in one step.
- Pick the email template and add any vendor-specific instructions. The internal requester is CC’d automatically.
- The vendor answers and uploads new evidence directly in the portal, and responses flow back onto the issues.
- Saving a follow-up creates a draft. It does not send. Follow-ups are drafted individually and sent together, so the vendor gets one consolidated request instead of a trickle of emails. The bar at the top of the Issues tab shows how many drafts are waiting, alongside Configure portal (what the vendor sees) and Manage sent follow-ups (what is already out).
- Name the evidence you want. Under Required document types, say what the vendor should attach, so the request is specific rather than “please send evidence”. Use control question and response reuses the original control wording if the autofilled version is not right.
- Some vendors prefer a spreadsheet. Download workbook and Import responses on the Issues tab let a vendor work offline and come back in.
- Reanalysis is narrow. When the vendor submits, only the controls selected for follow-up run again. A result that comes back reads Response received and its analysis is rewritten to account for what the vendor said, often moving from Not Compliant to Fully Compliant where the gap was documentation rather than practice. To re-evaluate everything from scratch, say after changing the plan or control sets, use the rerun option from the assessment Actions menu instead.
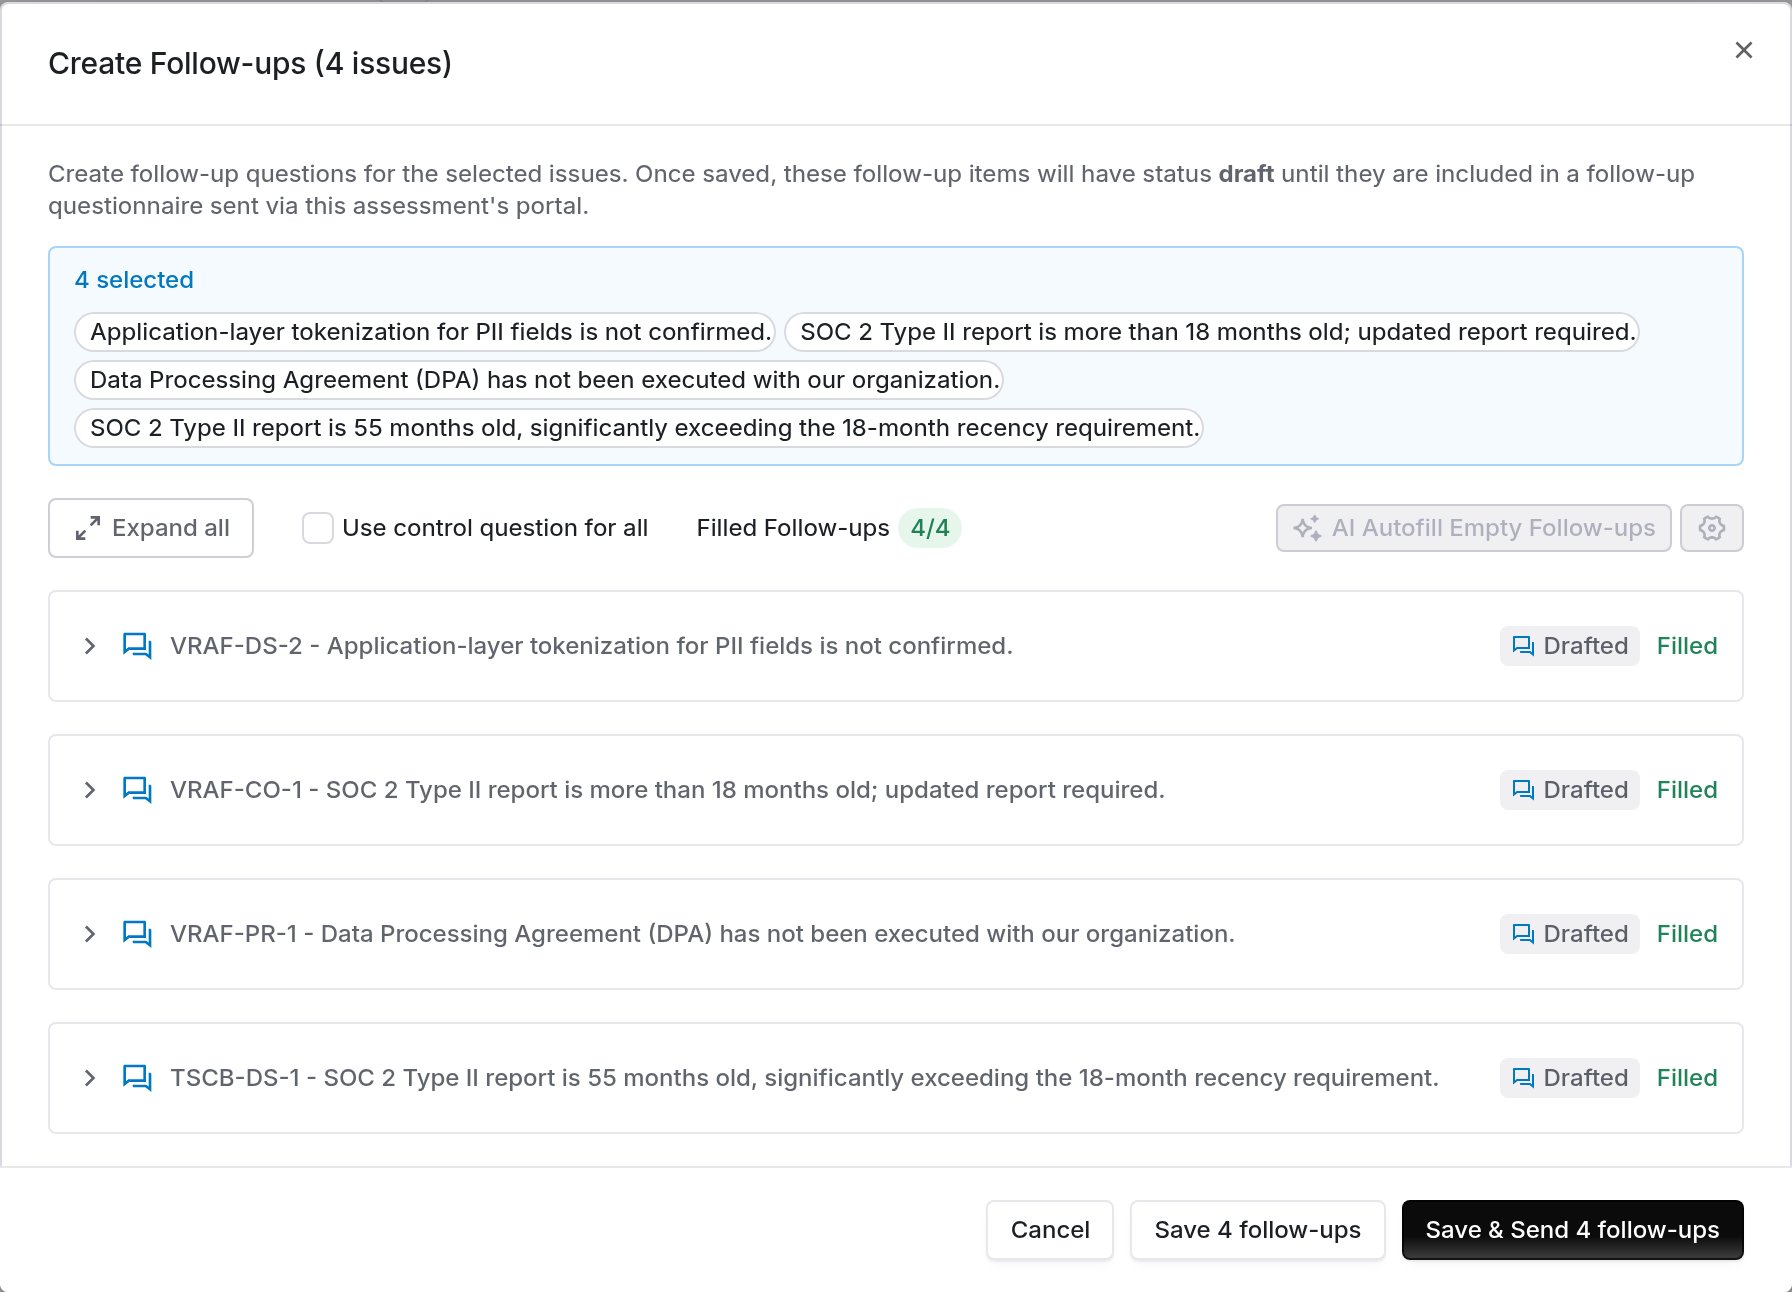
Create Follow-ups for the selected issues. AI Autofill drafts each question in the context of what the vendor already submitted.
Step 6: Reviews, disposition, and reporting
This closes the review. Domain reviewers sign off, every remaining issue gets a decision, the vendor gets a status and a reassessment date, and the record becomes a report.Domain reviews and quality control
Each risk domain can carry its own reviewer, which is what lets several teams work one assessment: InfoSec on the security domains, Legal on the contractual ones, Compliance on regulatory. The Summary tab reports progress as a count of completed reviews. A reviewer opens their domain with Start review. Until someone does, the domain shows Not started and its residual risk stays “Not set”.- Reviewers are set per domain or control set and can be changed at any time.
- Reviewers are notified when results are ready for them, and risk analysts and administrators can resend reminders.
- Your organization can optionally prevent anyone who is not a risk analyst or administrator from completing assessments.
Dispositioning issues
You have three dispositions per issue:Accept the risk
Keep the follow-up open
Promote to a finding
Completing and exporting
Click Complete Assessment on the Summary tab. The dialog asks for four things:- Action: approve, reject, or whichever outcomes your organization uses.
- Vendor Status: where this leaves the vendor in its lifecycle, for example Active. Custom statuses are supported.
- Next Vendor Reassessment Date: set for you from the risk tier and the completion date, typically a year out, and fully overridable if this vendor needs watching sooner. Anything unresolved converts to findings rather than getting deleted.
- Recommendation: the written conclusion that carries into exports, so write it properly rather than leaving it thin.
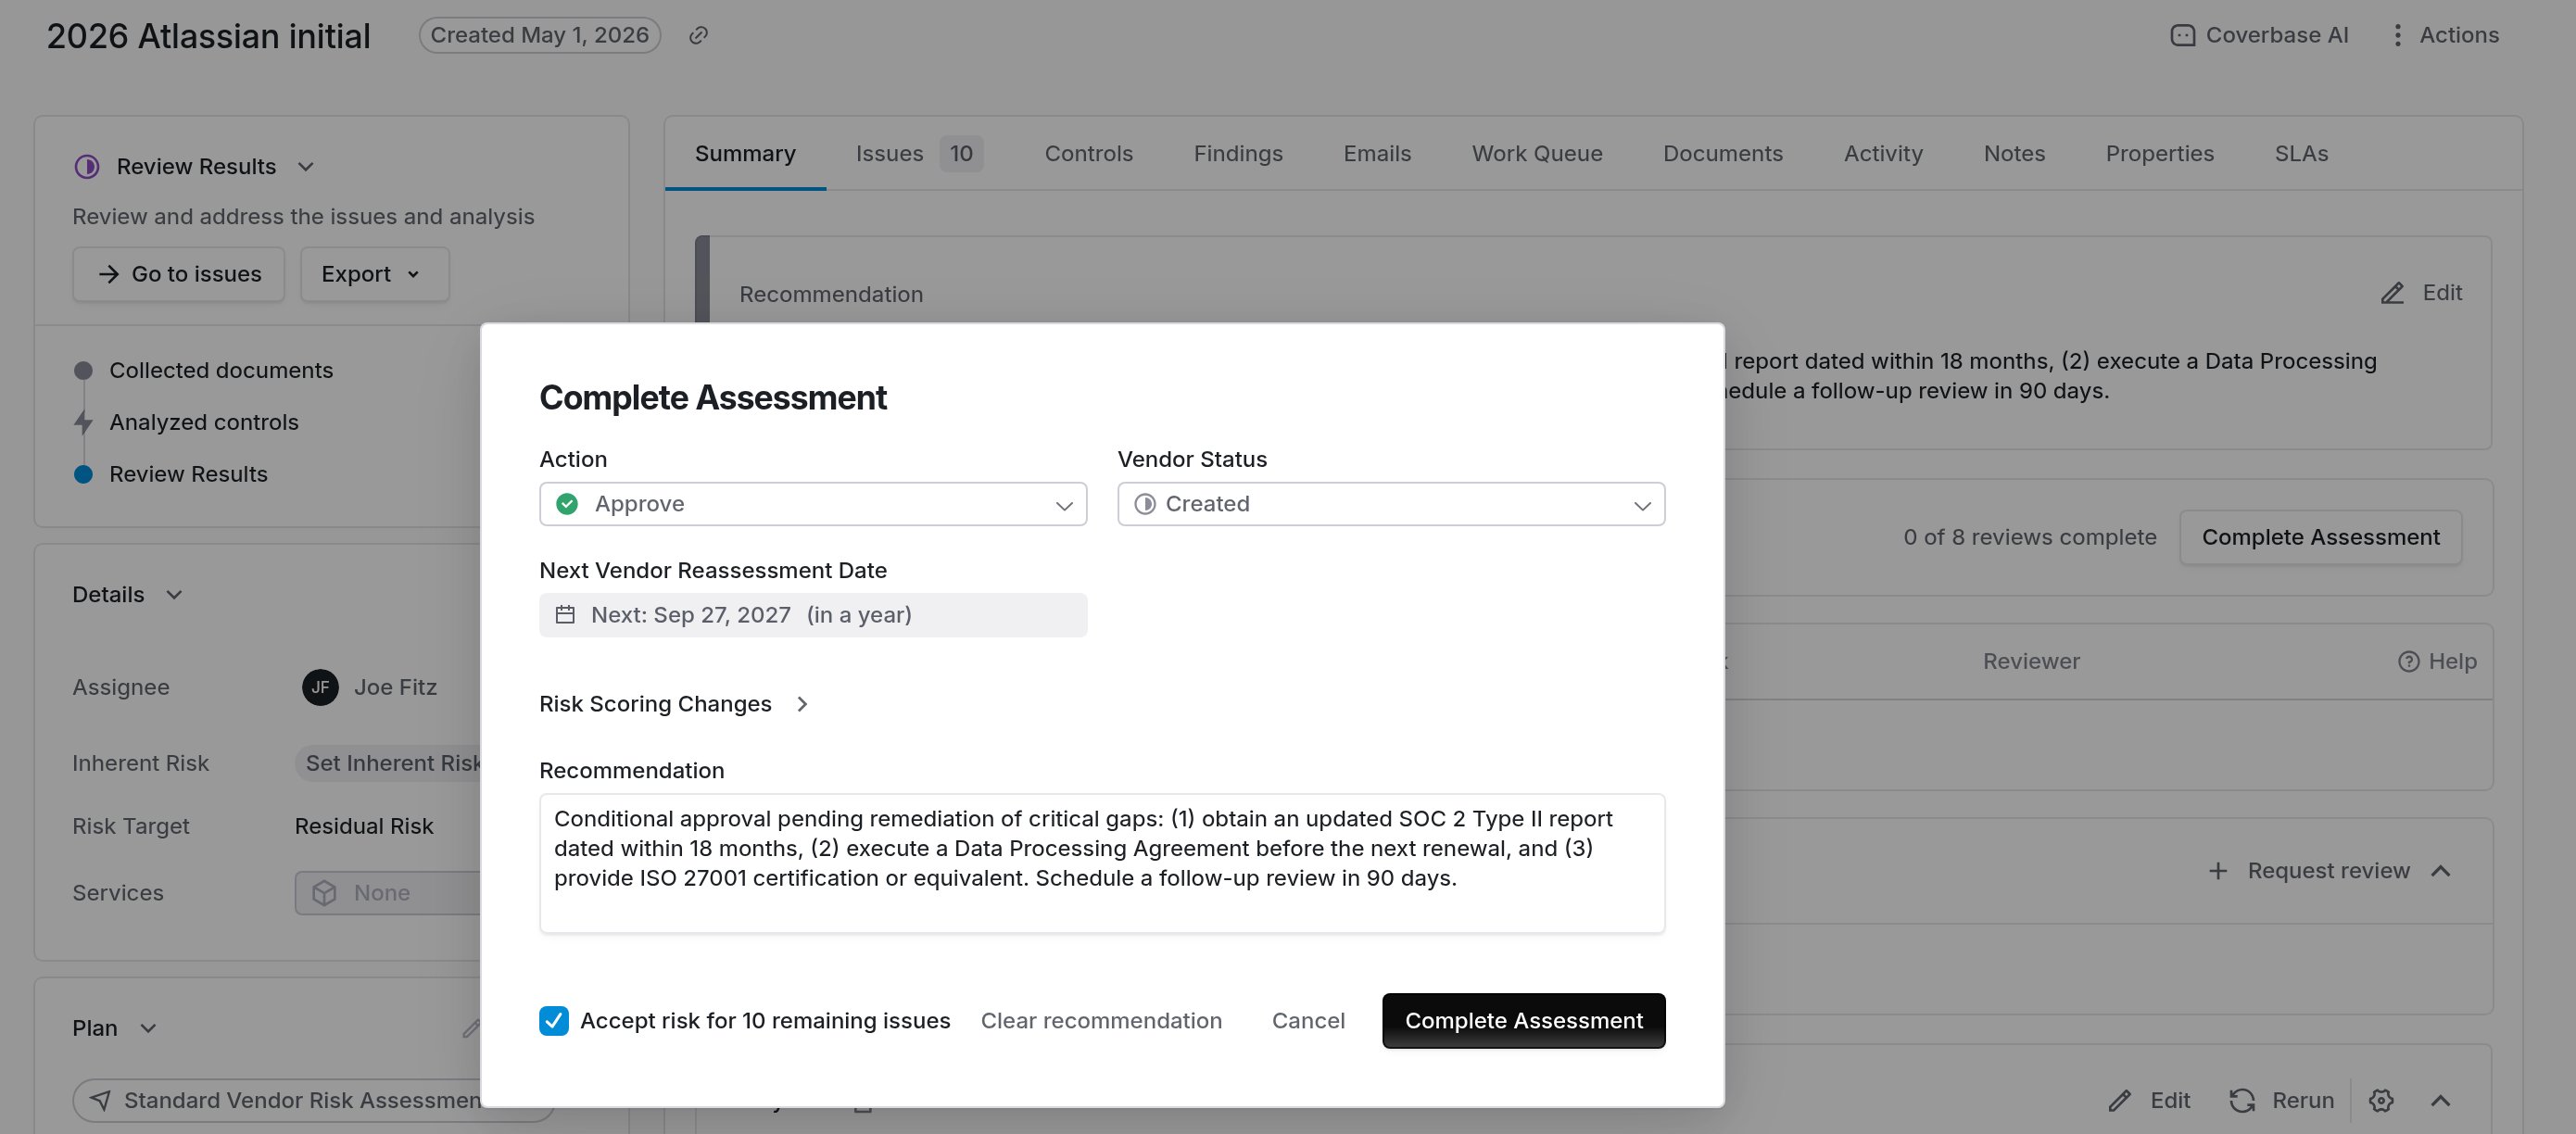
Complete Assessment. The outcome, the vendor's status, the next reassessment date and the recommendation, with a checkbox that accepts the risk on any issues still open.
Step 7: Contracts and clause reviews
The contracts module extracts key terms from MSAs, SOWs, and DPAs (value, effective date, term and renewal, indemnity, billing, data return) and compares vendor paper against your preferred language.- Upload the contract to the vendor’s Documents, setting the document type manually for MSAs, SOWs, and order forms.
- Open the Contracts module to review extracted terms and the clause inventory. You can also ask in natural language: “what does this agreement say about insurance?” queries across all of the vendor’s agreements at once.
- Run a clause review against your organization’s clause sets. The output shows deltas from your acceptable, fallback, and unacceptable tiers, by severity. Each clause that needs a decision comes with a suggested redline against your playbook, and when the agreement is a Word file the review can produce a redlined copy.
- Triage each flagged clause: no action, accepted risk, false positive, or create a finding. Triaging is the review, and it clears the flag list.
- Generate follow-up drafts for negotiation points, export the review to Excel, or assign it to legal in-platform.
Contract Guardian guide
Document Insights guide
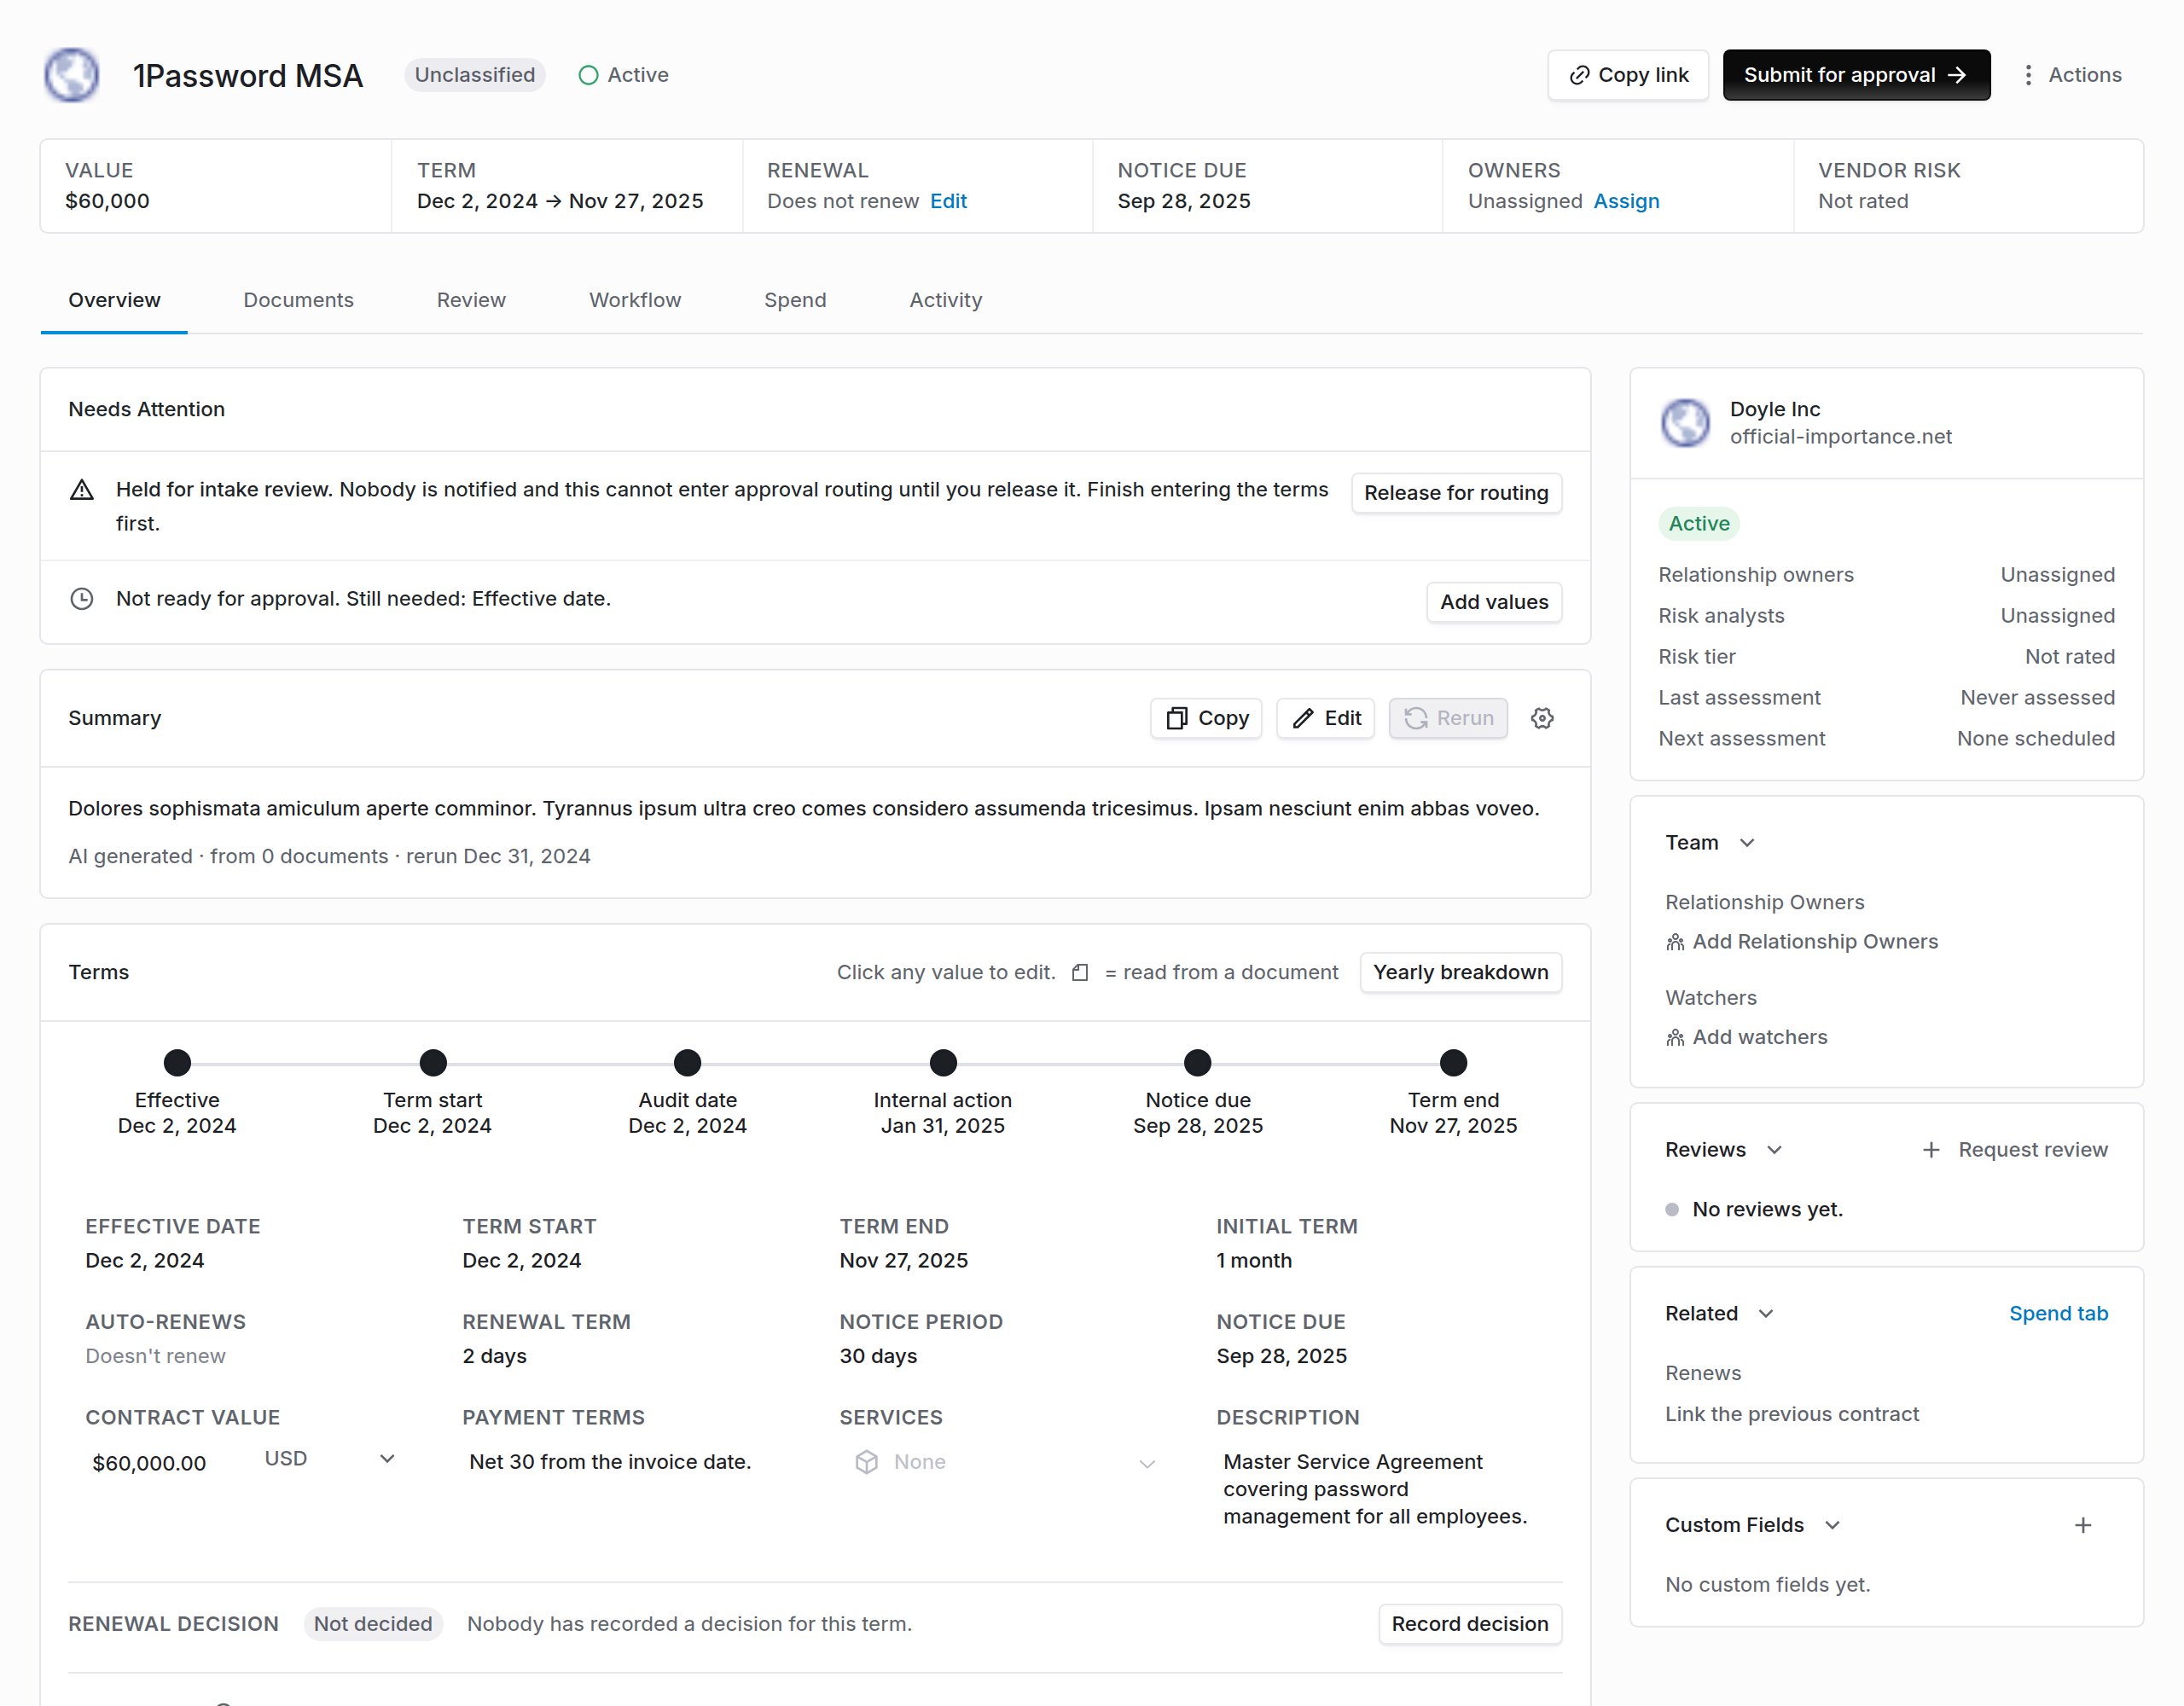
A contract record: the facts read from its documents, what needs attention, the AI summary, and the terms.
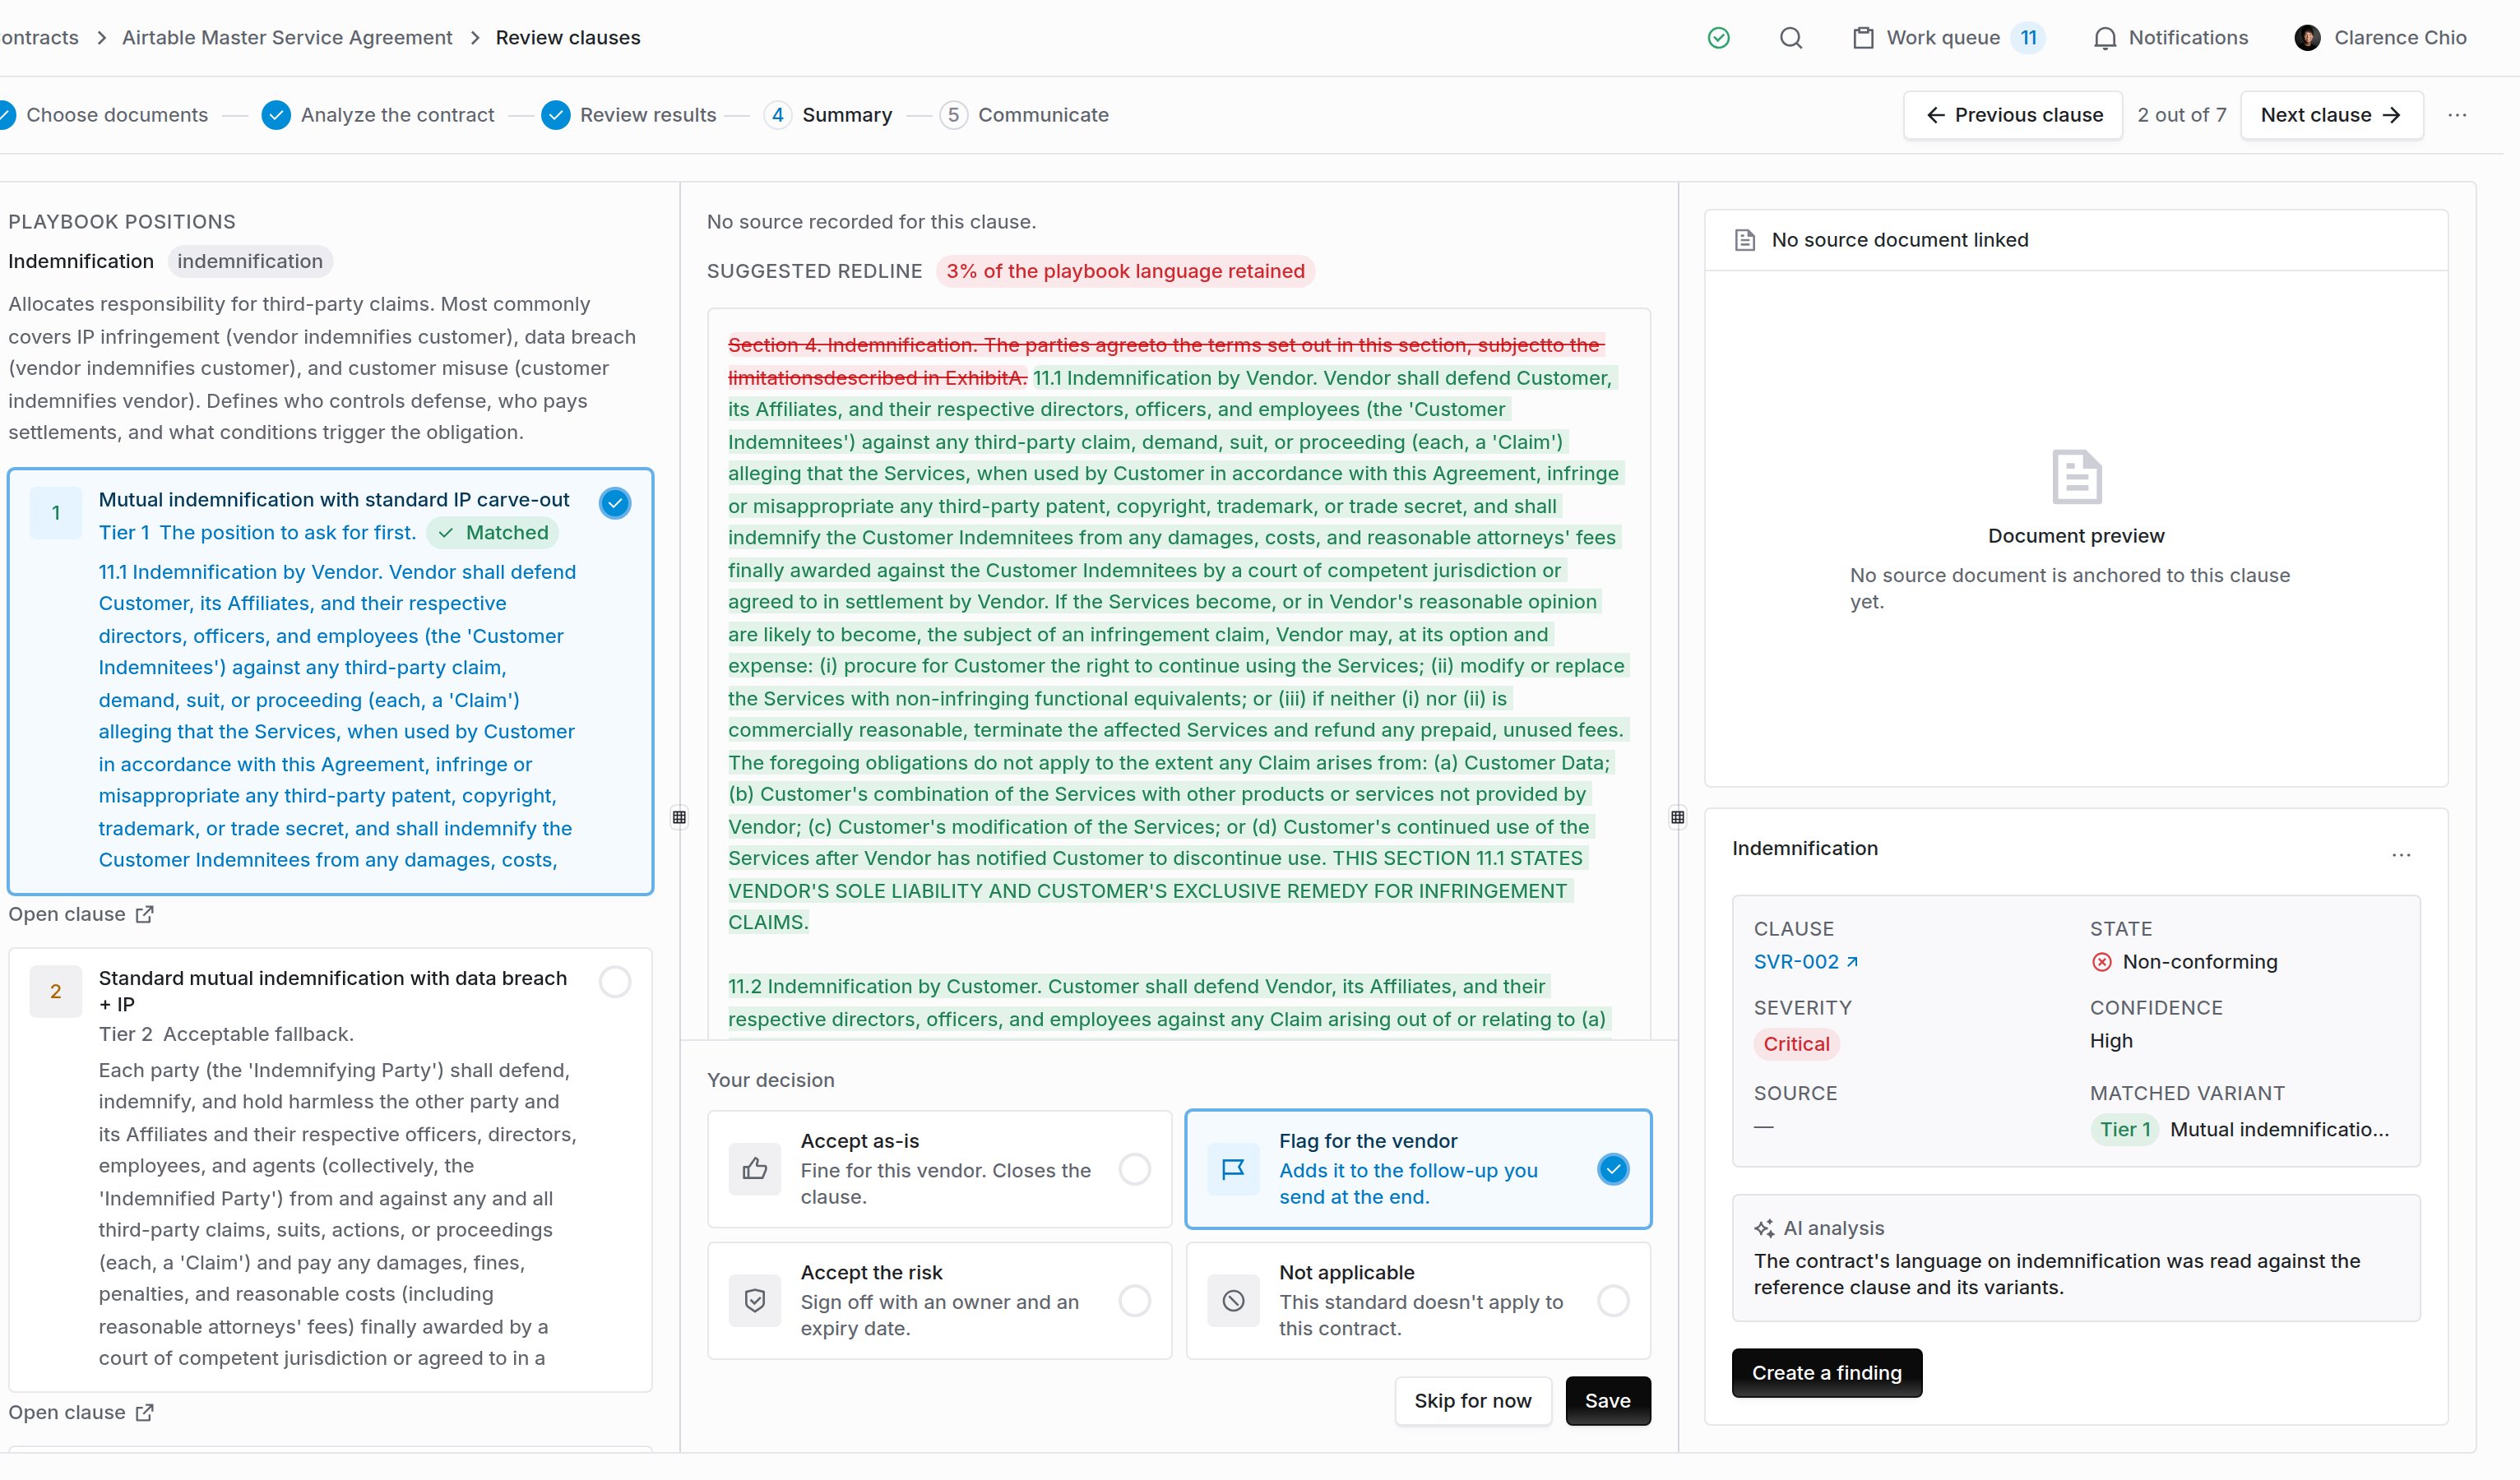
One flagged clause in review. Your playbook positions on the left, the suggested redline and your decision in the middle, and the clause's severity, matched variant and AI analysis on the right.
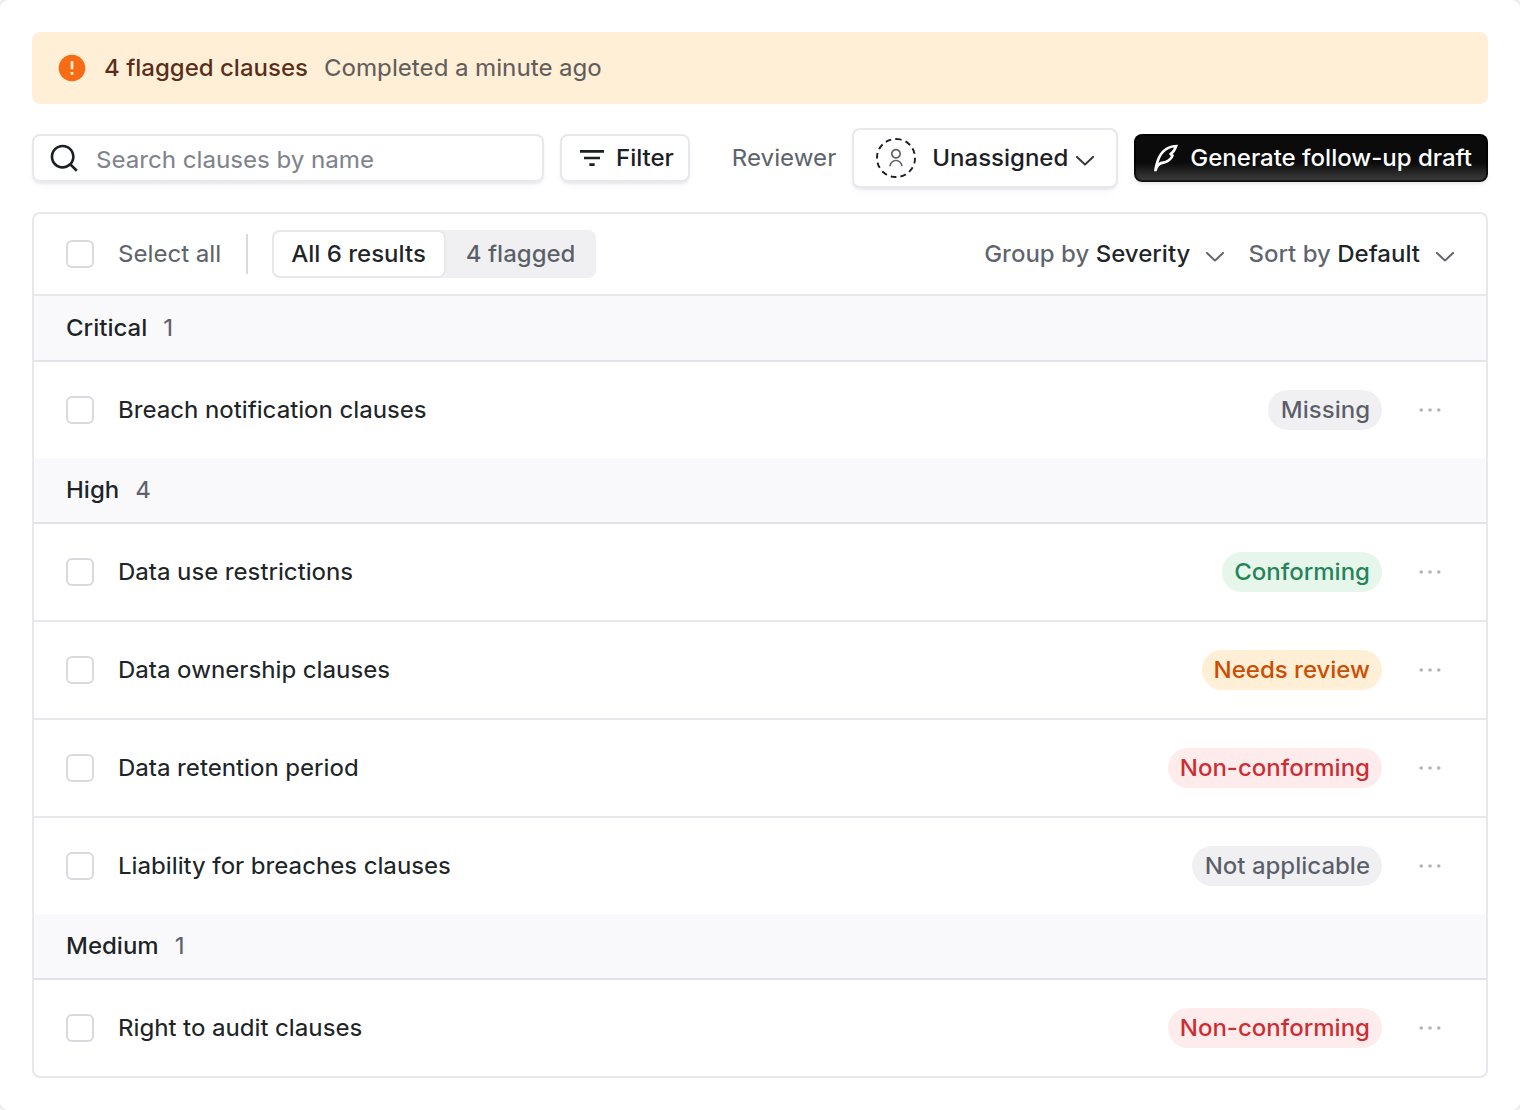
A clause review. Vendor language scored against your acceptable, fallback, and unacceptable tiers, by severity.
Step 8: Work Radar signals
Radar watches external sources for events touching your third and fourth parties, and turns each one your organization is exposed to into a signal. Your job is to decide which signals become work, and to keep the rest out of the program.- Open Radar. The Signals tab opens on All Signals; switch to the In Alert view for the signals in alert and awaiting review. Each signal shows the highest severity any detector assigned, the vendors involved, the detectors that fired, and when it was last alerted. One event is one signal, however many detectors hit it.
- Open a signal. The status card shows where it stands on the path from Open through Tracked and In alert to Closed, and the Vendors card lists which of your vendors were exposed, with View full exposure for the rest. The summary says what happened, and the timeline under it shows when it happened and when you were alerted. The Detectors tab lists each detector that fired, with its reasoning and confidence, Exposure lists every exposed vendor and why it matched, Sources holds the articles and advisories behind it, and Timeline shows the order things happened.
- Act on it from the Actions menu. Open case for anything that needs investigation or vendor outreach (a case is preliminary, not yet a confirmed problem). New finding when it is confirmed, with an owner and a due date. Start reassessment when the vendor’s risk picture has changed enough to re-run the plan. Acknowledge when you have seen it and nothing more is needed beyond a risk update: the signal is marked Triaged and Radar updates the vendor’s risk. Dismiss when no action is needed at all. If the signal is irrelevant, dismissing also lets you teach your detectors not to alert on events like it.
- Work the case. Send a vendor inquiry if you need their confirmation or remediation plan. Close it if the vendor is unaffected, or promote it to a finding once confirmed.
- Check the risk update. When the detectors that fired are set to update risk, acknowledging the signal, creating a finding, starting a reassessment, or closing a case as Resolved or Won’t fix raises the affected vendors’ residual risk. Review vendor risk profile updates opens with the new numbers. Adjust any of them, then Save and continue, or Continue to accept. Dismissing never moves risk, and neither does closing a case as False positive. How the size of the move is decided is on the Supplier Radar page.
- Dismiss what does not matter. Tick Also dismiss future similar alerts and the detectors that fired learn from it, so the next event like it stays quiet.
- If a detector keeps firing on non-actionable items, say so. Detector guidance and severity thresholds are quick admin fixes.
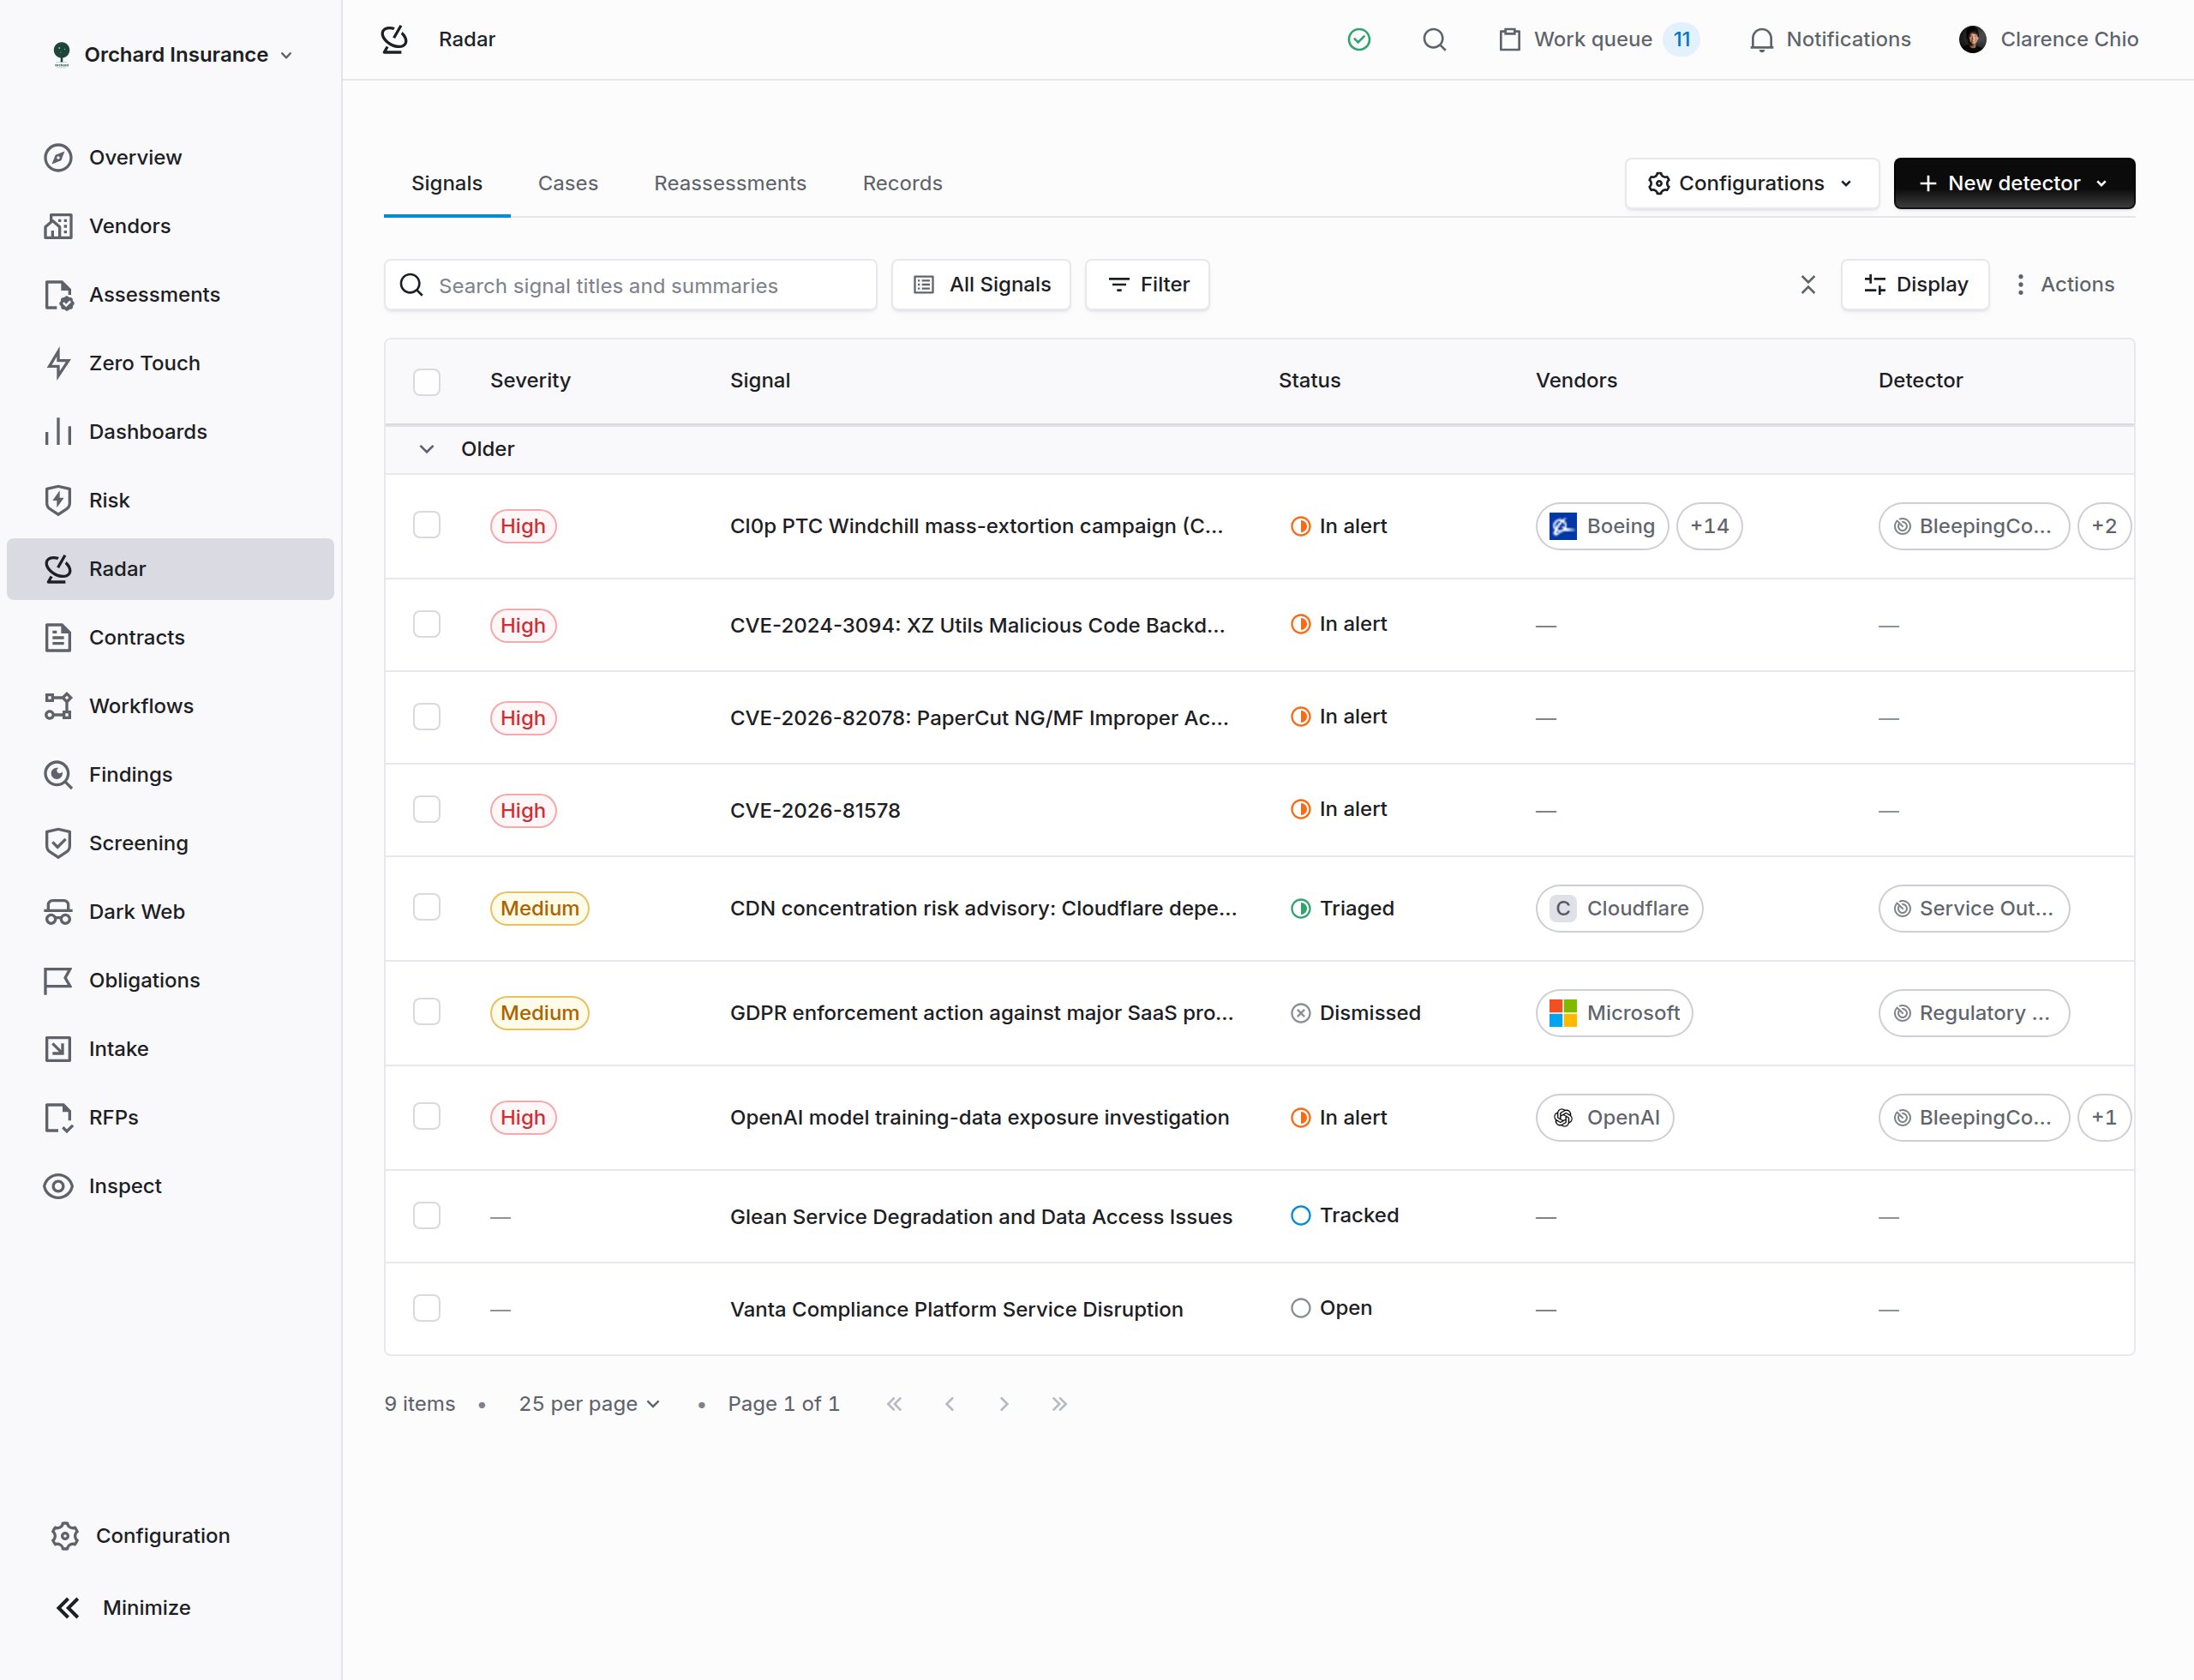
The Signals tab. One signal per event, with the highest severity any detector assigned, the vendors involved, and the detectors that fired.
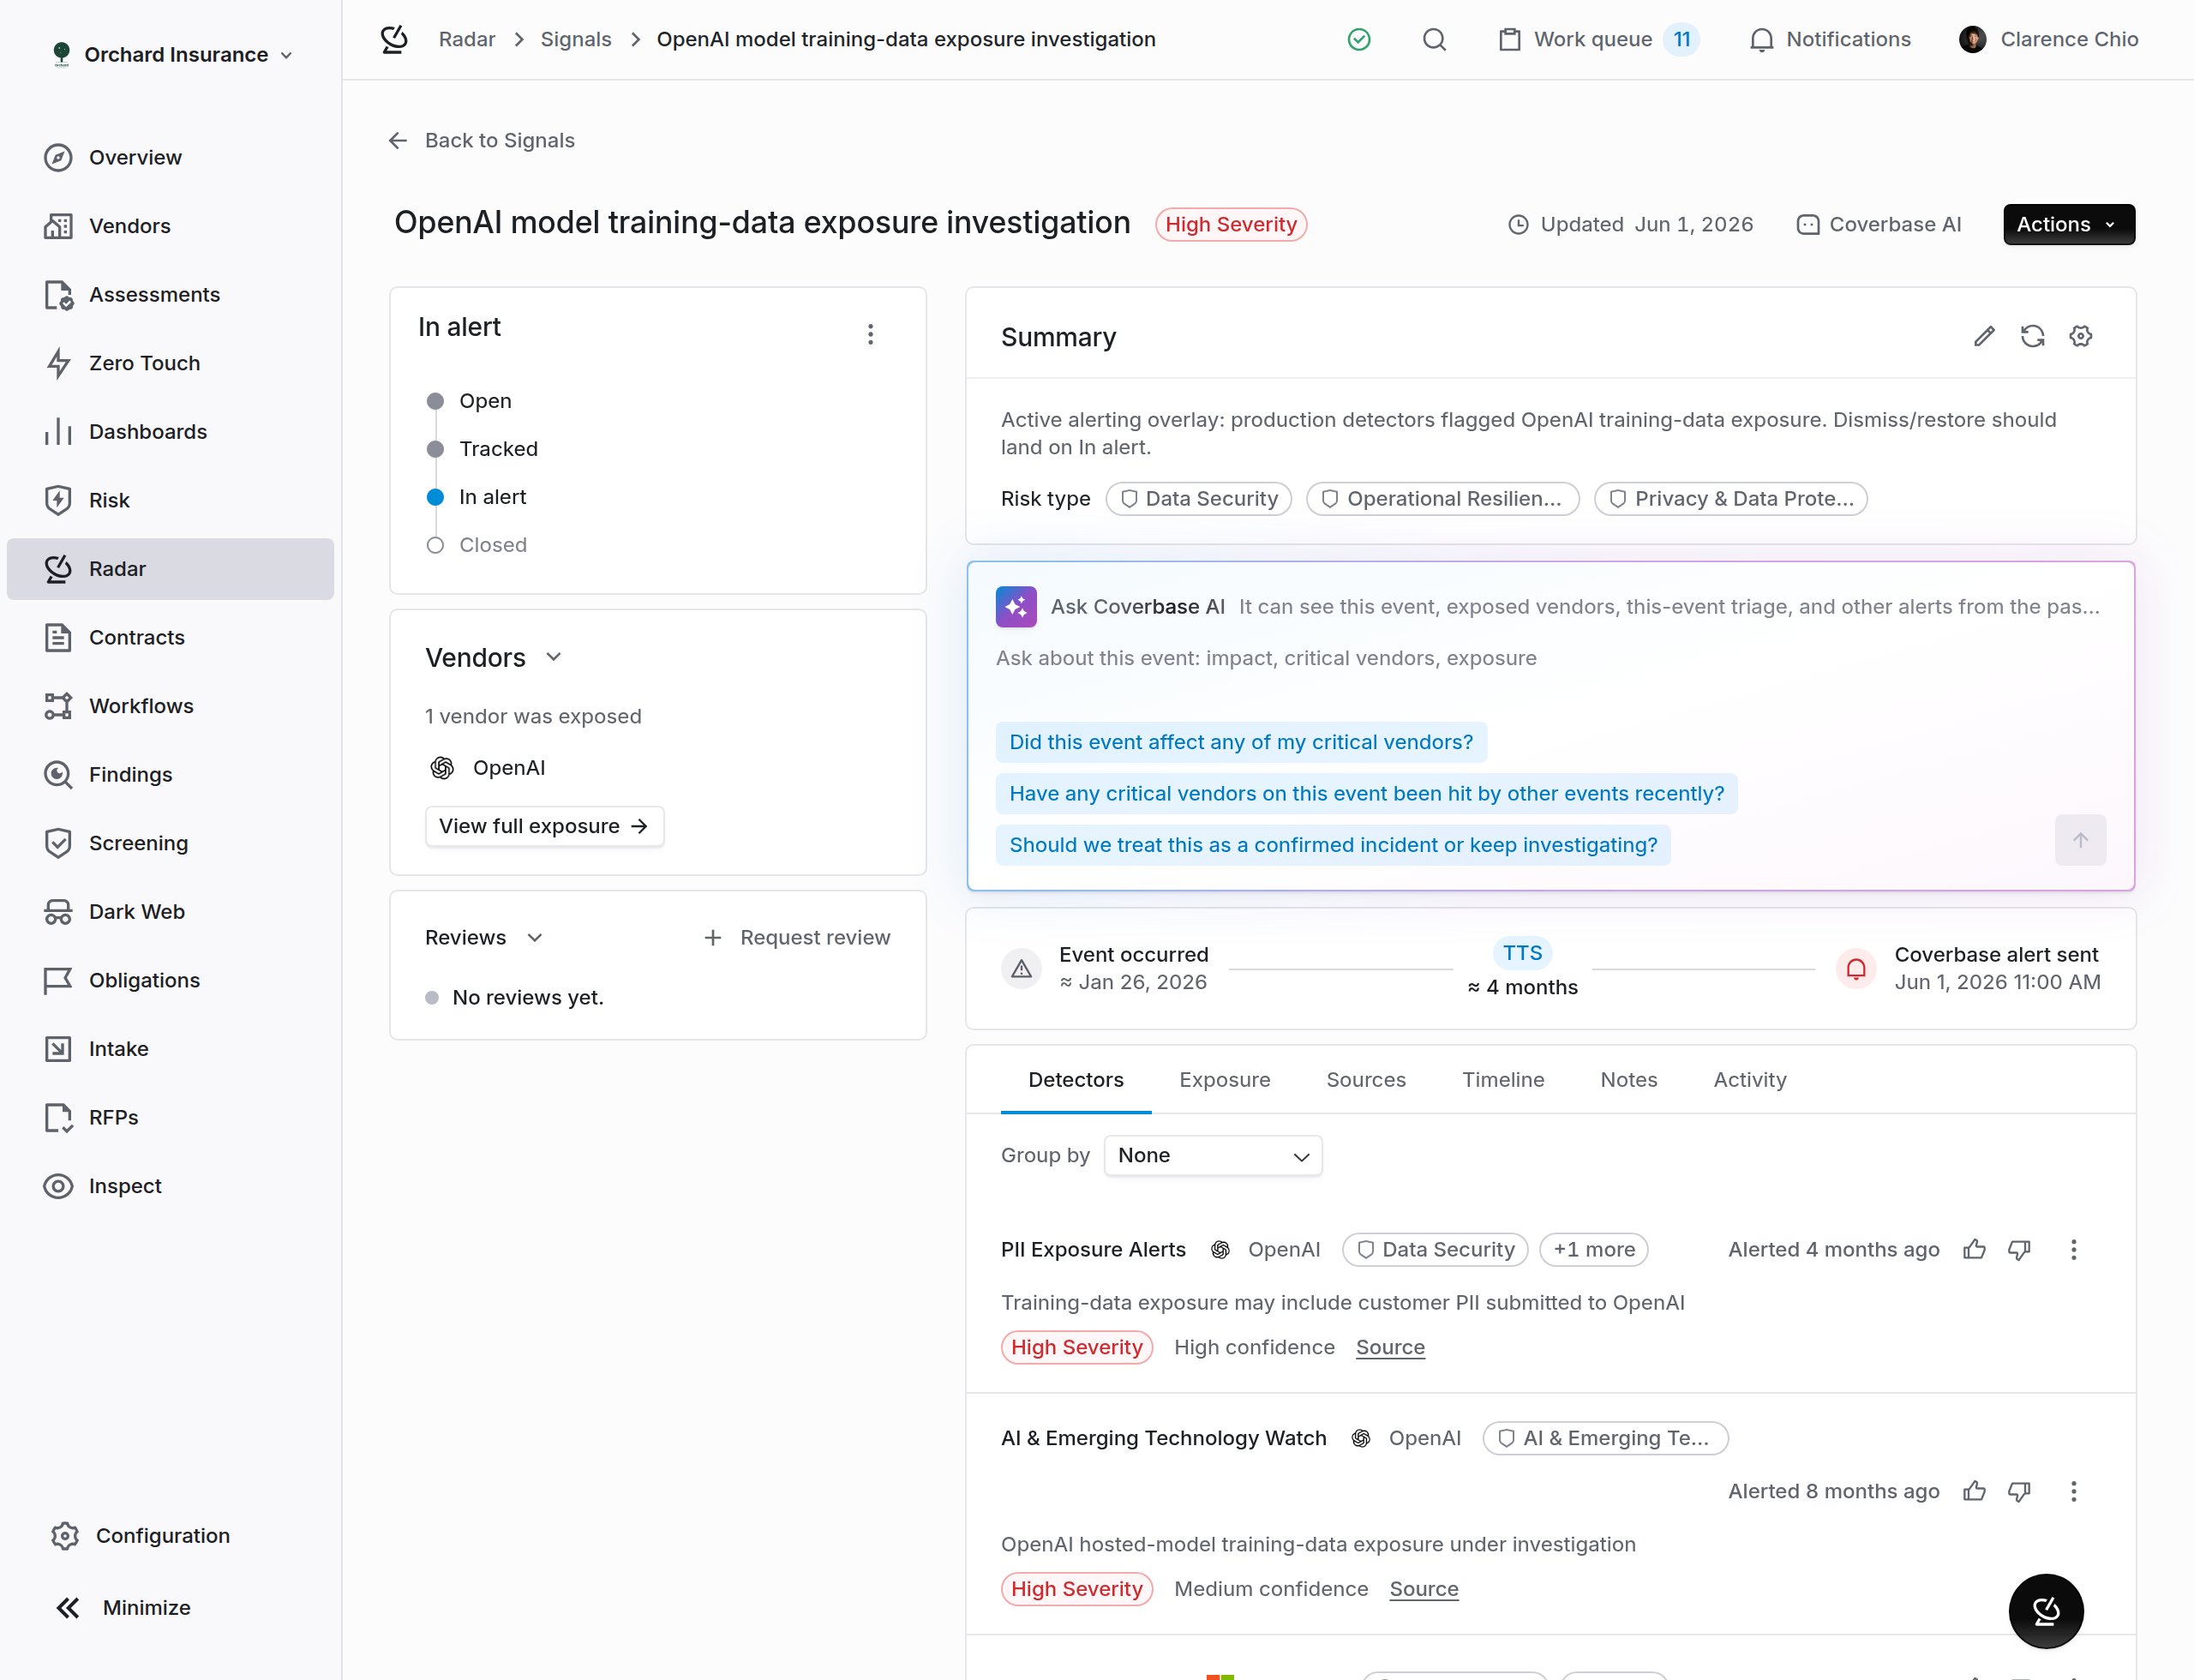
A signal. On the left, its status, the vendors exposed, and any reviews. On the right, the generated summary, Ask Coverbase AI, the time from event to alert, and the detectors that put the signal in alert.
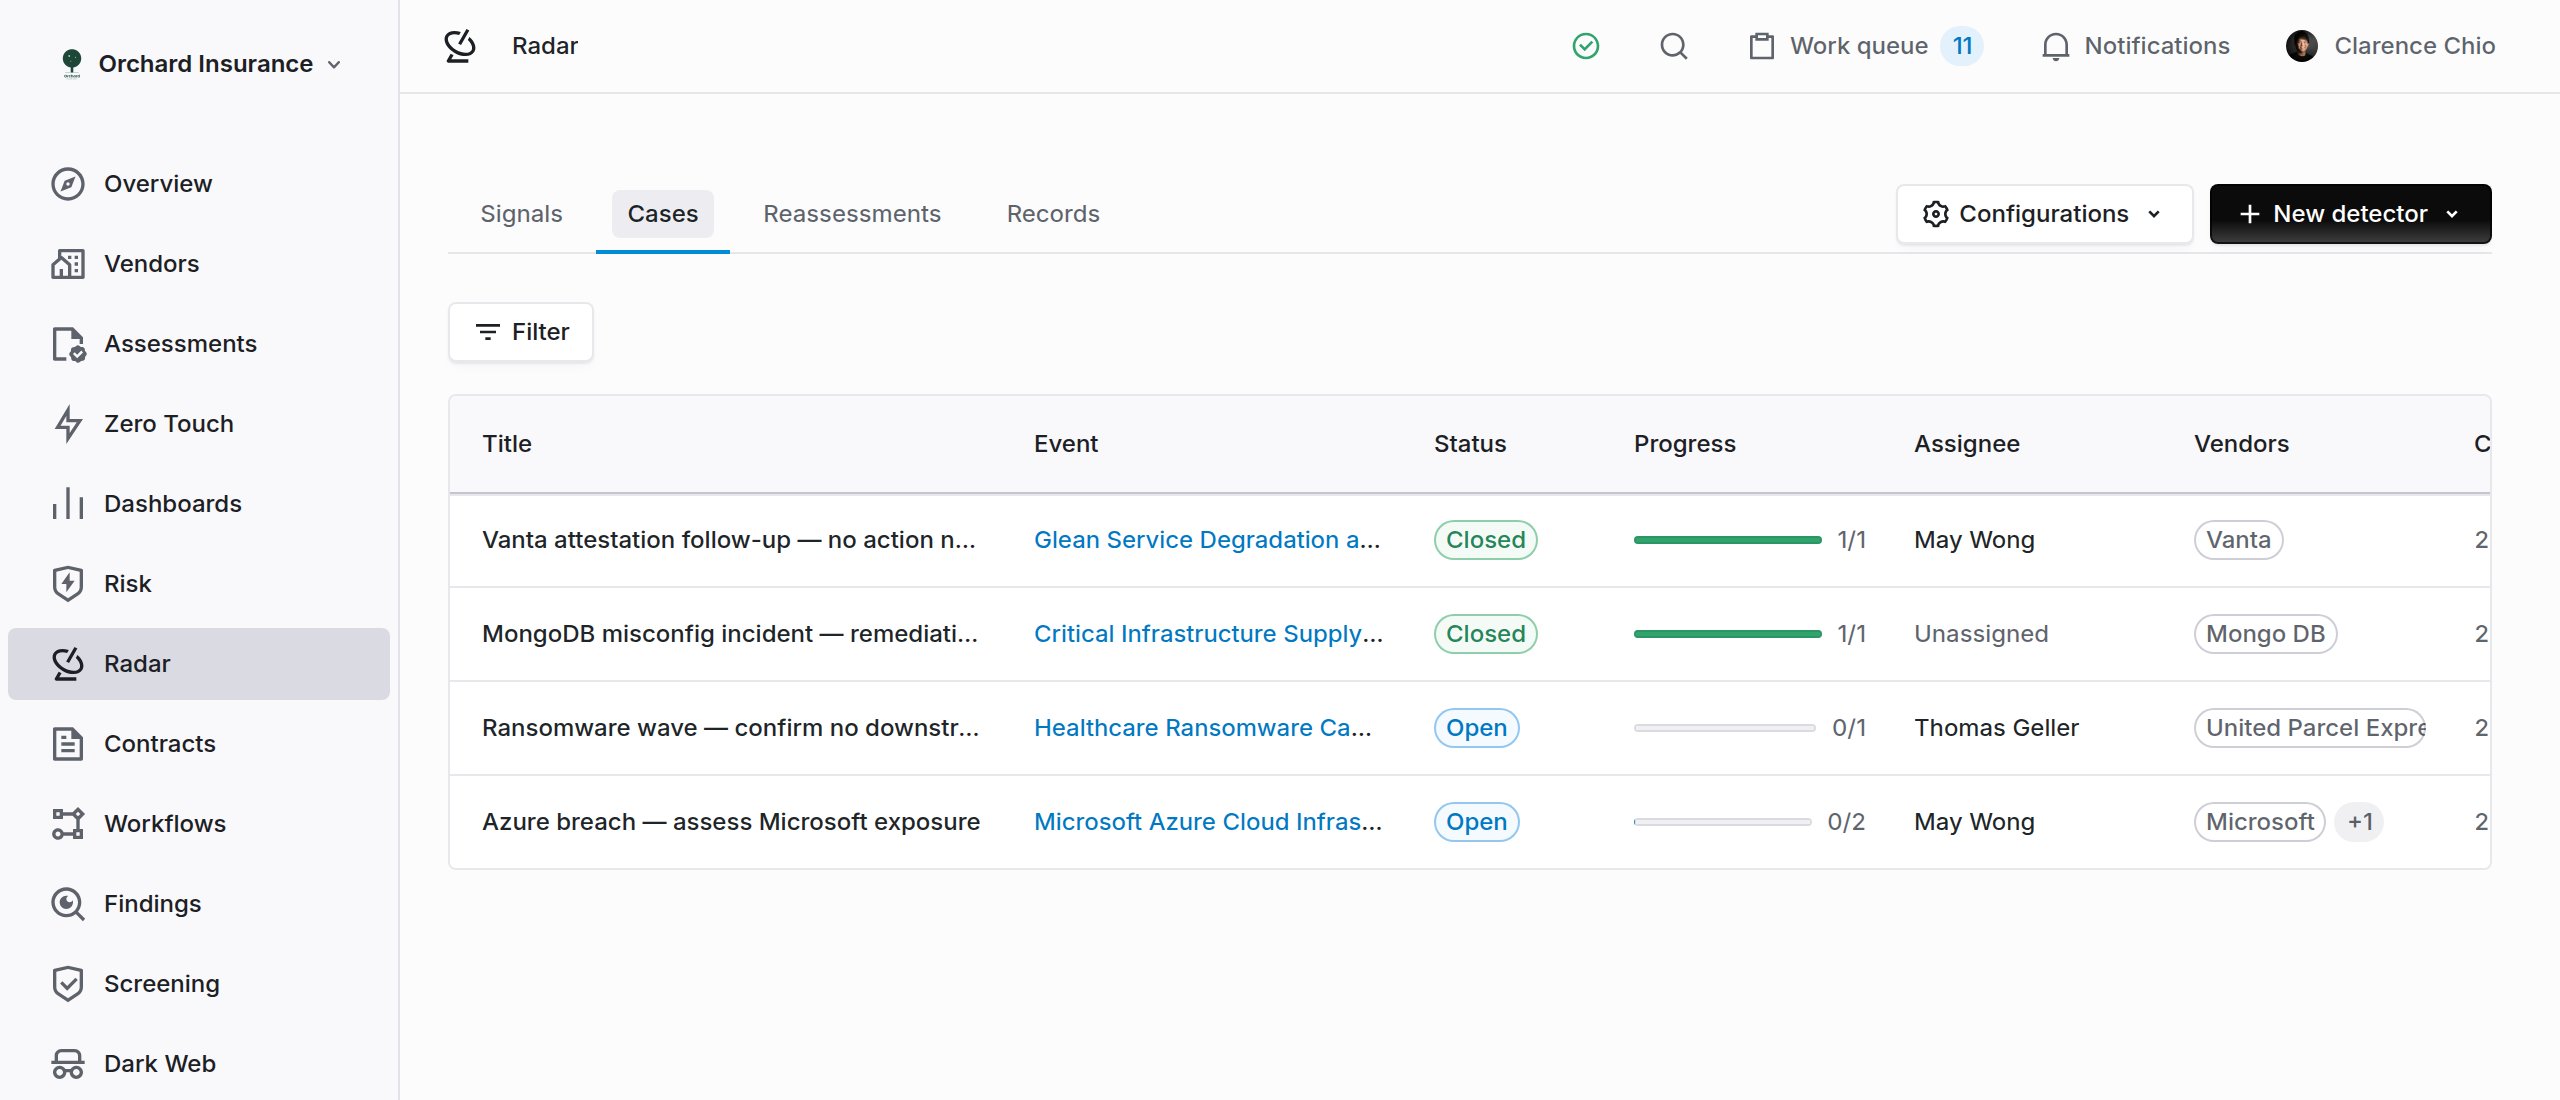
The Cases tab. Preliminary investigations tagged to affected vendors, each with its status, progress and assignee, ready to close, promote to a finding, or trigger a reassessment.
Step 9: Obligations at a glance
Alongside what you require of vendors, Coverbase extracts what vendors require of you: CUECs pulled verbatim from SOC reports, and shared responsibilities from contracts and terms. As a reviewer, you validate extractions against source language, assign owners and due dates, and send attestation requests to business stakeholders through a trimmed-down portal.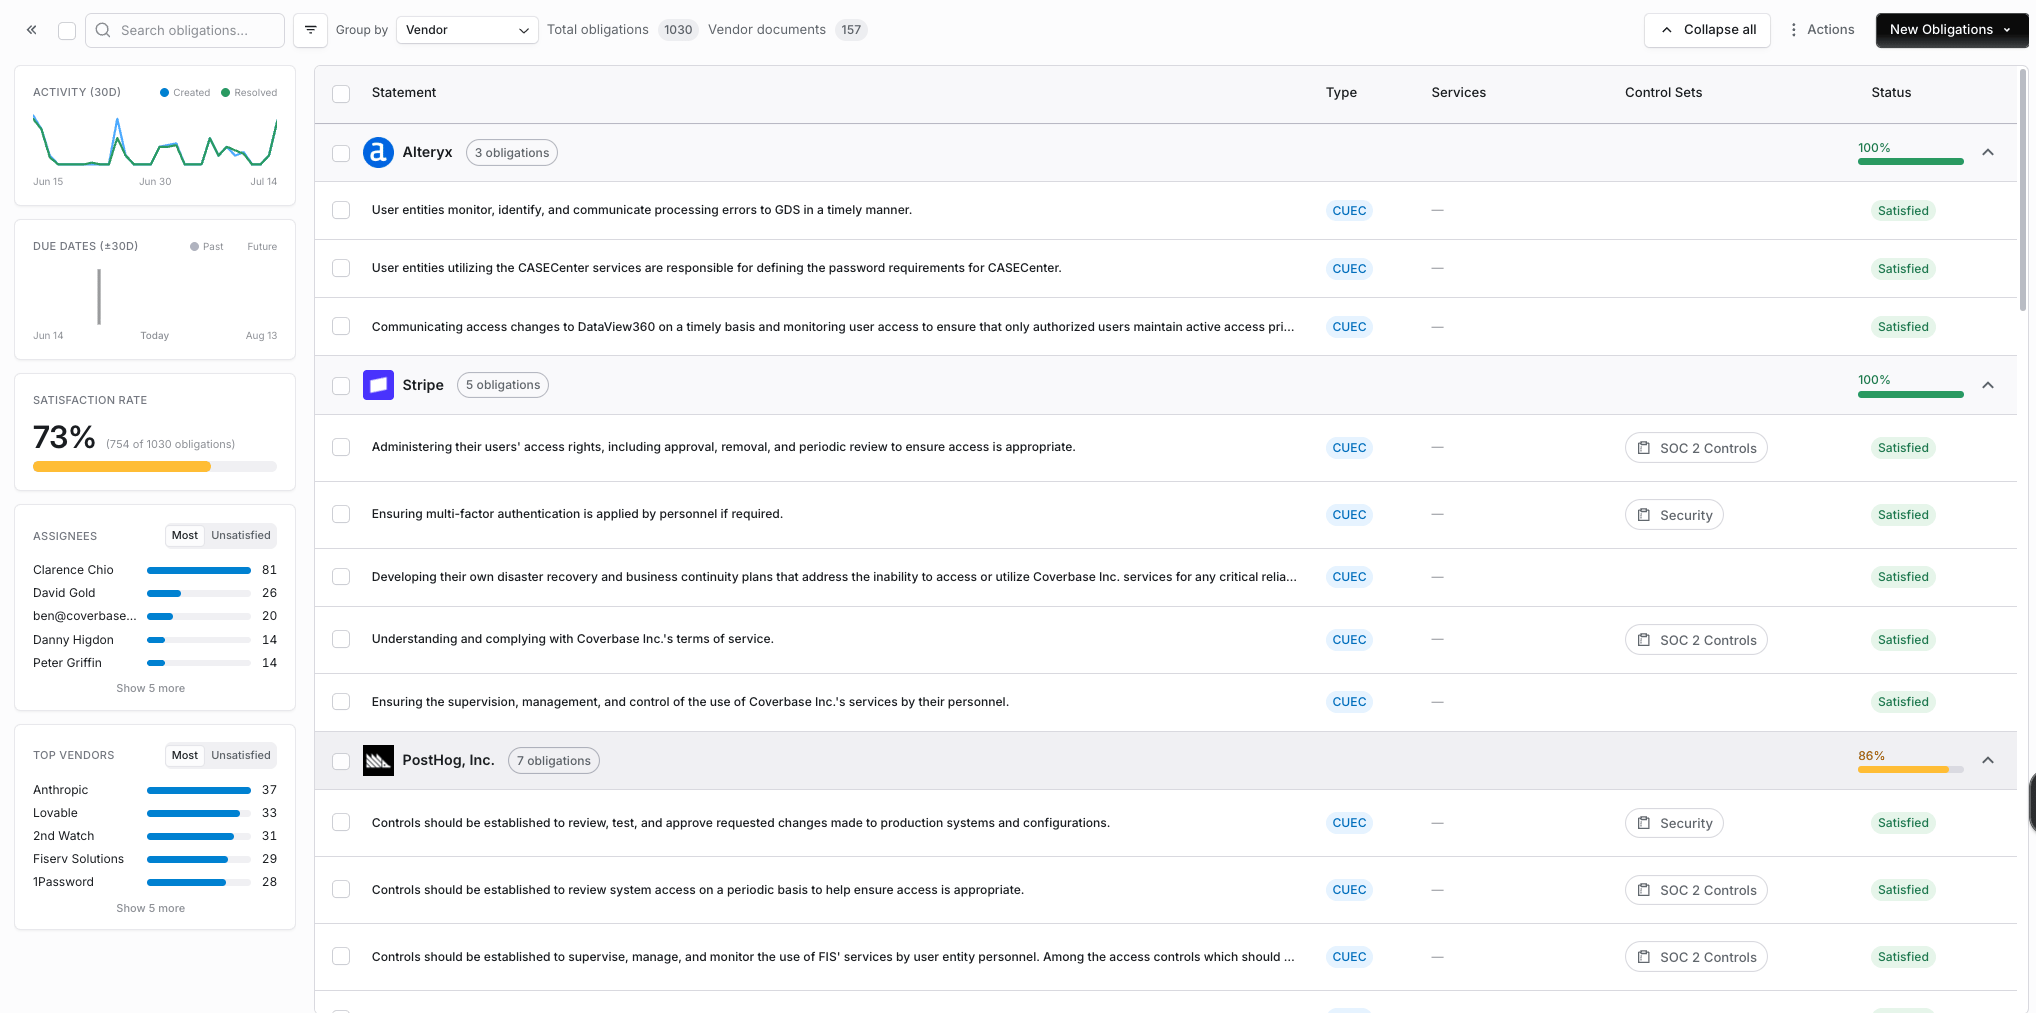
Obligations. CUECs and shared responsibilities extracted from documents, ready to validate, assign, and send for attestation.
Frequently asked questions
How long does analysis take?
How long does analysis take?
Will the same assessment give identical results twice?
Will the same assessment give identical results twice?
I assessed a service and the vendor's score didn't move. Why?
I assessed a service and the vendor's score didn't move. Why?
What if the AI is wrong?
What if the AI is wrong?
Do vendors respond to the portal?
Do vendors respond to the portal?
Where do Coverbase Library documents come from, and do ours go into it?
Where do Coverbase Library documents come from, and do ours go into it?
Can Coverbase get documents from gated trust centers?
Can Coverbase get documents from gated trust centers?
What file formats work best?
What file formats work best?