Set up and run Contract Guardian: build a clause set from the library or your own paper, write risk-tier variants, run clause reviews, decide each flagged clause, and export a redlined Word file for the vendor.
For AI agents: a documentation index is available at https://docs.coverbase.com/llms.txt. This page is also available in markdown by appending .md to the URL.
This guide is part of the User Guides collection. It covers the clause-review half of Contract Guardian. For the field-extraction half (pulling dates, caps, and terms out of every document), see the Document Insights guide.
Contract Guardian measures how far a contract is from language your legal and risk teams would accept.You write down your standard once. Coverbase then reads each contract, finds the vendor’s language for each of your standards, decides which tier of acceptability it lands in, and hands your reviewer a short list of deviations with the source text quoted and highlighted. Reviewers triage that list instead of reading agreements end to end.
Guardian decides which clauses deviate and how badly, then writes the asks up for you. It does not negotiate. You still review the marked-up file and decide what to send.
Field-level. Pulls values out of every document (effective date, liability cap, notice period, governing law), each with a page citation. Runs automatically on upload.
Clause Review
Language-level. Compares the vendor’s actual clause language against the tiers you have defined as acceptable, negotiable, and unacceptable. Runs when you start a review.
They stack: insights populate the contract record and the AI summary, and clause review scores the paper against your playbook. Set up insights first if you only have time for one; it is faster and applies to every document. Set up clause review when you are ready to standardize legal review.
You need the Contracts module, and Clause review on top of it. If your contract records do not show a Review tab, clause review is not enabled for your organization yet, so ask your Coverbase contact.
2
Confirm your permissions
Building clause sets requires the contract-update permission. If Configuration → Clause Sets is not in your navigation, an admin needs to grant it.
3
Have a few real contracts loaded
You will want two or three executed agreements to test your clause set against, plus, ideally, a copy of your own standard paper (your template MSA or DPA), which Guardian can turn into a clause set for you.
Clause review runs against a contract record and the documents linked to it.
Upload the agreement from Actions → Upload Documents on the contracts list, from the contract’s Documents tab, or from the vendor’s Documents tab.
Confirm the document type. Types like Master Service Agreement, Order Form, Statement of Work, NDA, DPA, Terms of Service, SLA, Software License Agreement, Contract Amendment, and Contract Addendum are what mark a document as contract paper. Type inference is good but not infallible on unusual formats, and scope decisions downstream key off the type.
Link every document that makes up the agreement to the same contract record: the MSA, the order form, the DPA, the security addendum, the amendments. Guardian analyzes the set, not the file.
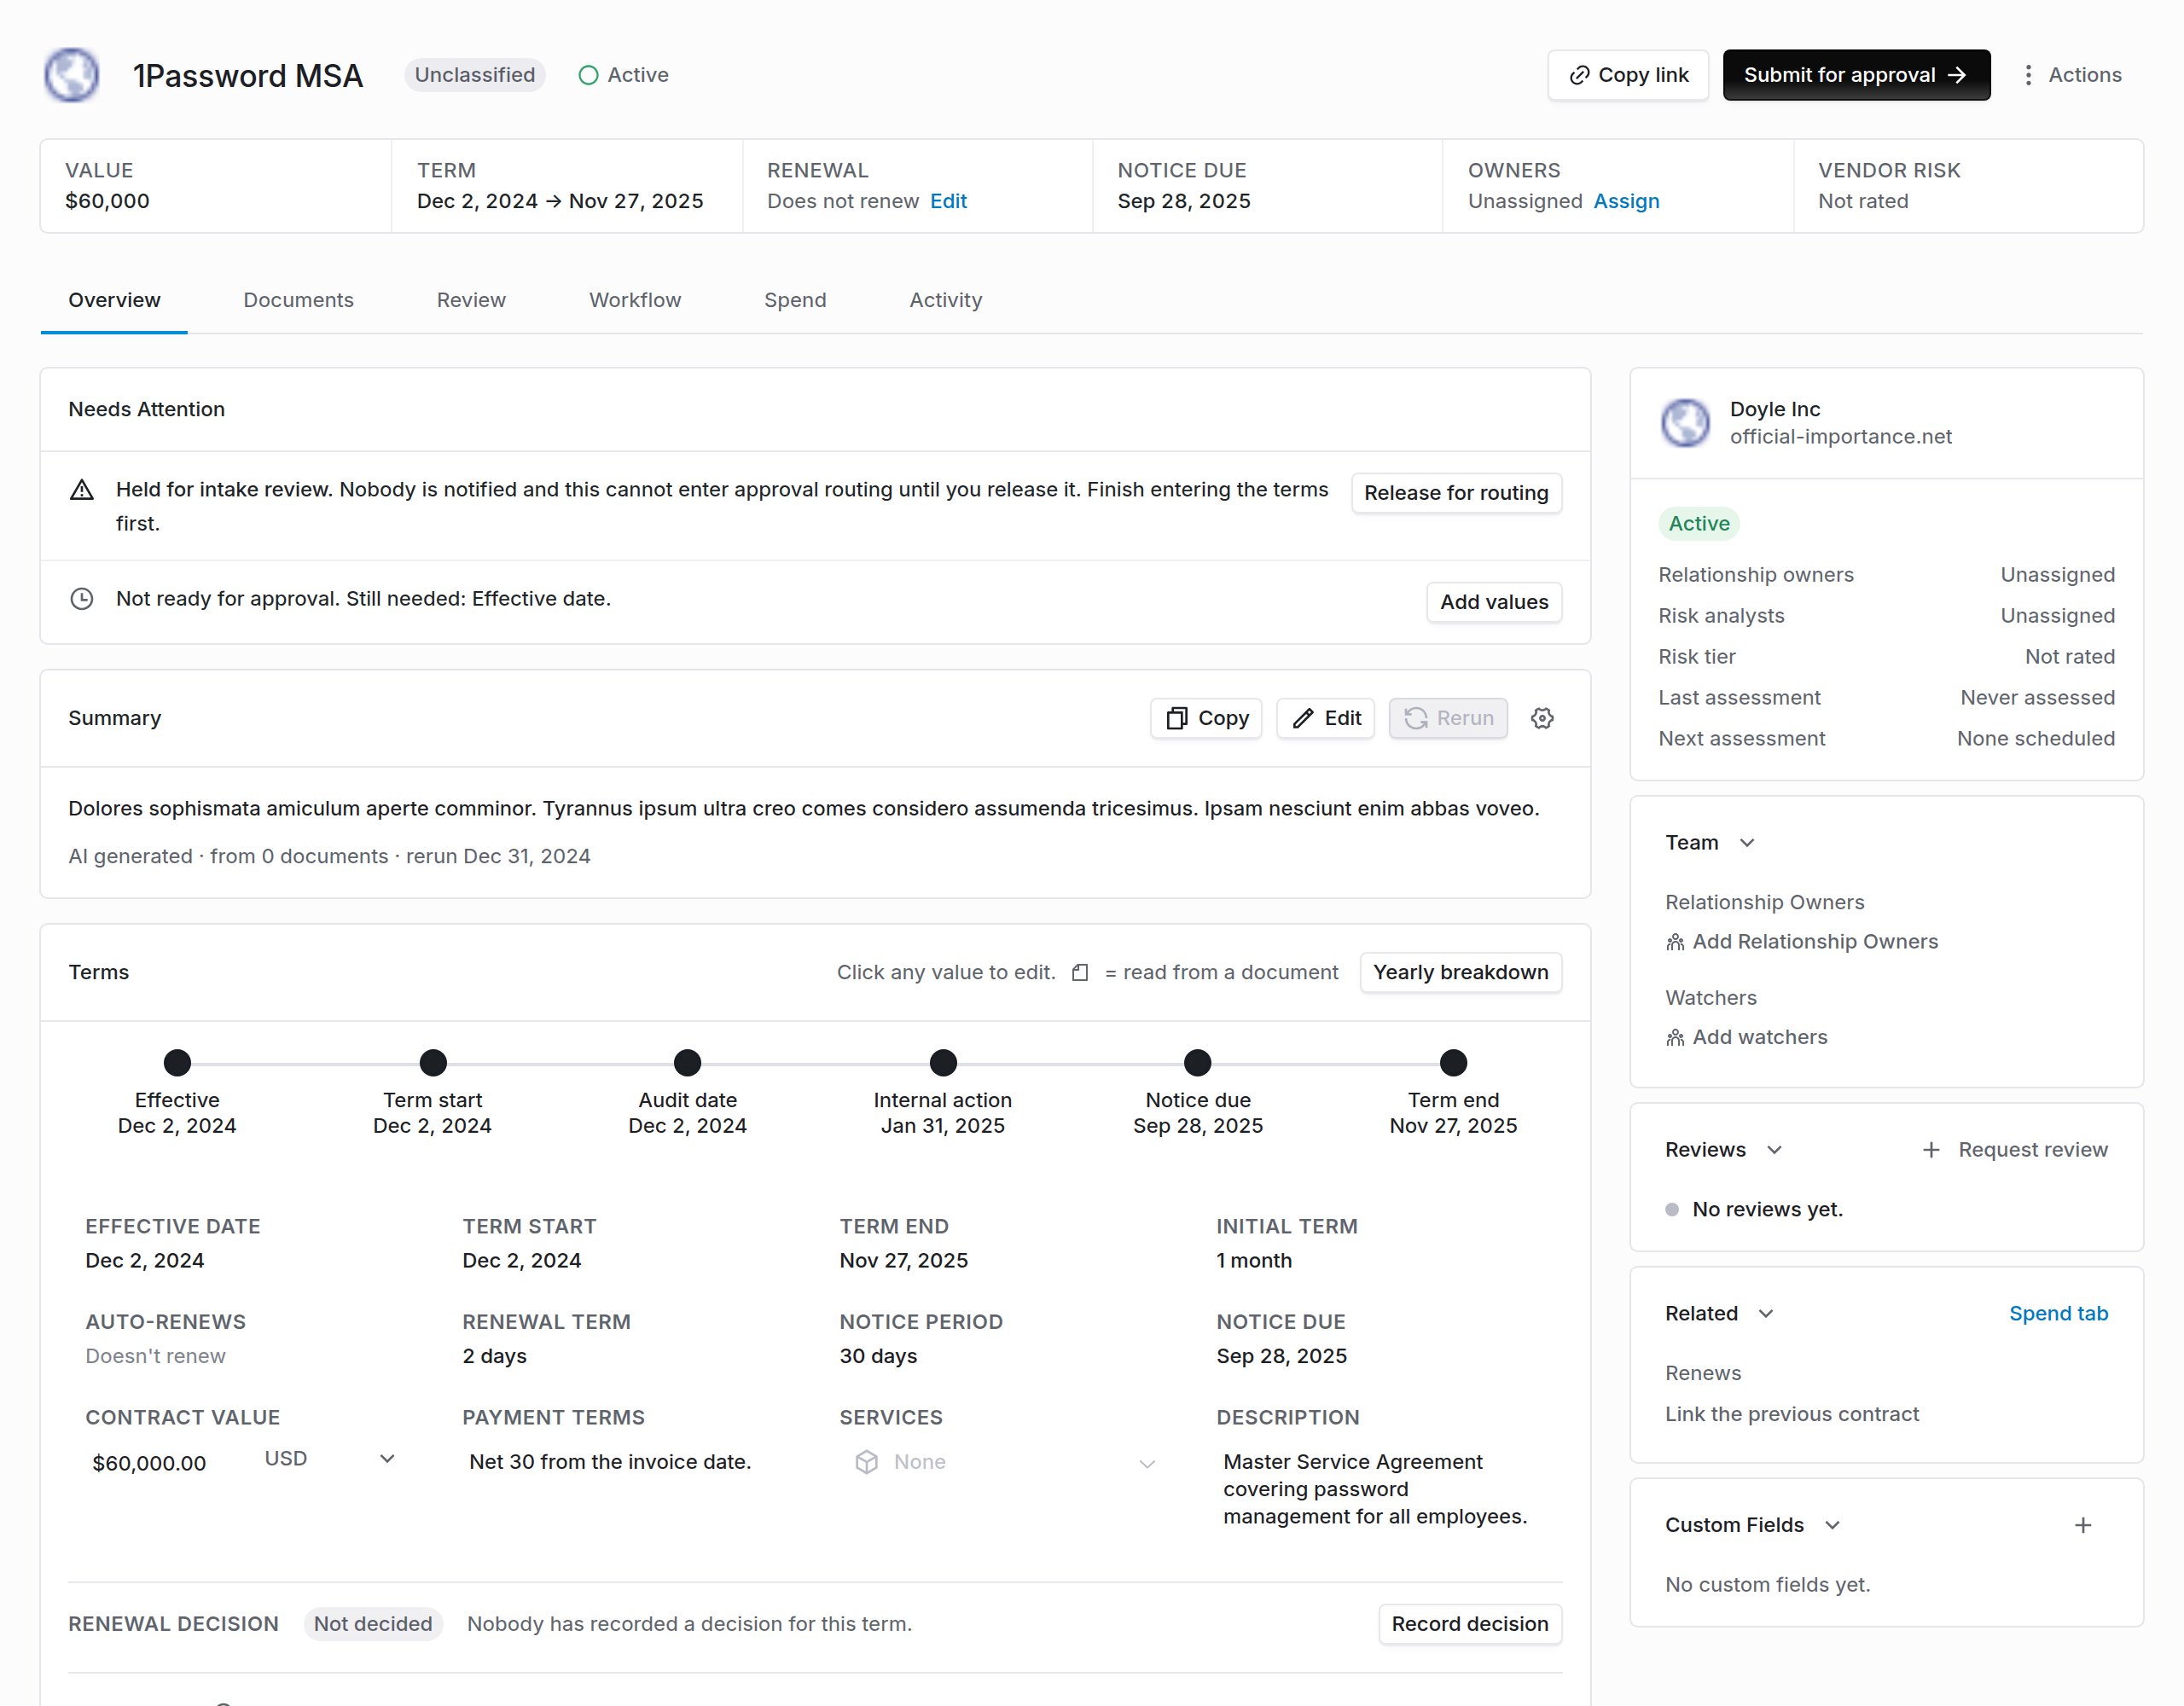
A contract record: the facts read from its documents, what needs attention, the AI summary, and the terms.
Amendments and addendums matter here. Guardian detects the logical components inside your linked documents. It will tell an order form apart from the MSA it hangs off, and an AI addendum apart from the DPA, and it scopes each of your clause standards to the components where that clause belongs.
A clause set is your playbook: a named collection of reference clauses, each with the language tiers you are willing to accept. You can have several: a standard SaaS set, a stricter set for vendors touching regulated data, a professional-services set.Go to Configuration → Clause Sets. There are three ways to start, and most teams use the first two together.
Coverbase ships 12 packaged clause standards you can copy into your org in one click, pre-written with severities, guidance, and full multi-tier variant language.
Open Add Clause Set and choose Clause Set Library, pick a template, and choose Create Clause Set. The copy takes the template’s name. Between them the templates carry 311 reference clauses, already scoped to the right contract components and already tiered:
Template
Clauses
For
Enterprise SaaS Subscription
26
Hosted software billed per seat or per unit
Professional Services & Consulting
24
Engagement letters, SOWs, change orders
Data Processing & Privacy
31
Any vendor processing personal data for you
Financial Services Third-Party Risk
33
Vendors to a regulated financial institution
Healthcare & HIPAA Business Associate
29
Vendors touching protected health information
AI & Machine Learning Vendor
27
Products that generate, classify or decide using a model
Pick by what the vendor does to your risk, not by the industry you are in. A hospital buying a CRM wants the SaaS set, unless that CRM will hold patient data.The copy is yours once you create it. Edit the language, retune the severities, archive the clauses you do not care about. Nothing syncs back to the library, so editing cannot break anything.
The clause set library
What each of the 12 templates covers, the clauses that carry the most weight in each, and what you get inside every copied clause.
Copy the library set, run it against three contracts you already know the answers on, and then tune. Starting from working language and adjusting beats starting from a blank page, and it shows you what a well-written reference clause looks like before you write your own.
If you have a standard template (your MSA, your DPA, your preferred terms), Guardian can turn it into a clause set.
1
Upload the baseline
On the Clause Sets page open Add Clause Set, choose Import from Document, and upload your template as a PDF, Word, or text file. Leave Document type on Detect automatically, or pick Baseline contract (one agreement). Processing runs in the background; you can leave the page and come back.
2
Review what it extracted
Guardian pulls out clause candidates with exact source text from your template, plus a suggested name, category, severity, and applicable component types. Language it cannot quote verbatim from your document is dropped rather than paraphrased, so what you get back is your own paper.
3
Add your fallback tiers
Each generated clause arrives with a single Tier 1 variant, labeled Preferred: baseline contract language. That is a floor, not a playbook: it marks anything that is not your exact template as needing review. Add the tiers you would accept in negotiation before you run the set against a live contract.
4
Activate it
Generated clause sets are created inactive, so a half-finished playbook cannot be run against a live contract: an inactive set is not offered when you start a review. The Clause Sets page has no switch to activate one yet, so ask your Coverbase contact once the tiers are in.
If your standard is a clause library or negotiation playbook that states a preferred and a fallback position for each clause, Import from Document reads that too, and the positions arrive as tiers.
Baseline contract extraction reference
What extraction proposes, why it drops language it cannot quote verbatim, how a playbook is read, and the tiering you have to finish before the set is usable.
If your standards already live in a spreadsheet, put them in the Coverbase template and upload the file instead of retyping them. One workbook can carry several clause sets, each with full multi-tier variant language.On the Clause Sets page open Add Clause Set, choose Download Import Template, fill in the Clauses sheet (one row per clause, with rows sharing a Clause Set value grouped into one set), then come back and choose Import from Spreadsheet.Preview import checks every row before anything is saved and lists any that will not import by spreadsheet row number, and one bad row never blocks the rest. Clauses whose identifier is already in the target set are skipped rather than overwritten, so a stale re-upload cannot replace negotiated language.
Spreadsheet import and export reference
Every column explained, the variant format, what happens on re-upload, how to export a set back out, and a troubleshooting table.
Open Add Clause Set, choose Create Clause Set, name it, then add reference clauses one at a time with Add Clause. This suits a narrow, high-stakes set (an AI addendum standard, say), and rarely a full playbook.
Every reference clause is one standard you hold vendors to.
Field
What it is for
Clause identifier
Your stable reference, like SVR-001. Use it in tickets and email so everyone means the same clause.
Name
What reviewers see. Use the heading a lawyer would recognize.
Severity
Low, Medium, High, or Critical. Drives triage order and grouping, but does not change the verdict. Reserve Critical for clauses that would block a signature.
Rationale
Why the clause matters. Written for humans; it is the context a reviewer needs when they hit a deviation.
Guidance
Written for the AI. This is what tells the matcher how to find and evaluate the clause. See below.
Applicable component types
Which parts of a contract this clause should be found in. Leave empty to apply everywhere.
Variants
Your acceptability tiers, covered in the next step.
Guidance is the instruction the model reads when hunting for vendor language. The library clauses are worth copying as a format. This is the shape that works, from the packaged Limitation of Liability clause:
Guidance
Aliases:- Limitation of Liability- Liability Cap- Limitations on Liability- Maximum LiabilityTypical contract types:- MSA- SaaS Agreement- Services AgreementExtraction signals:- ALL CAPS BLOCKS containing 'IN NO EVENT'- phrases: 'aggregate liability', 'total liability', 'fees paid'- multipliers: '1x', '2x', 'twelve (12) months'- carve-outs: 'except for', 'notwithstanding', 'shall not apply to'Common deviations:- Cap is unspecified or 'unlimited'- Cap is asymmetric (one party capped, other uncapped)- Carve-outs are too broad- Missing carve-outs for IP indemnity, data breach, confidentiality
Four sections: aliases the clause hides under, contract types it appears in, extraction signals (distinctive phrases, formatting quirks, numbers), and common deviations you have seen. You do not need all four on every clause, but aliases and signals make the biggest difference.
This is the step that determines whether Contract Guardian is useful or noisy.A variant is one version of the clause language at one level of acceptability, on a scale of 1 to 5. Coverbase matches the vendor’s actual language to the closest variant, and the tier of that variant becomes the verdict:
Risk tier
Meaning
Resulting clause state
1
Your preferred language
Conforming
2
Acceptable without escalation
Conforming
3
Negotiable; a reviewer should look
Needs review
4
Materially worse than standard
Non-conforming
5
Unacceptable
Non-conforming
Two more rules apply on top of the tier mapping:
Low-confidence matches never auto-pass. If the matcher is not confident enough in the match, the clause is set to Needs review regardless of which variant it landed on.
Language found outside its scope is escalated. If a clause turns up in a component it was not scoped to, or if the language materially conflicts with the matched variant, the clause goes to Needs review rather than being scored.
You do not need all five on every clause. Start with three and add as you learn:
1
Tier 1: your ask
The language you would put in your own paper. If you generated the set from a baseline contract, this is already filled in.
2
Tier 3: your fallback
What you would sign after a round of negotiation without escalating. Most real vendor paper lands on this tier, and it is what routes a clause to a person for review.
3
Tier 5: your walkaway
Language you will not accept. Writing it down turns “this feels bad” into a consistent, defensible verdict.
Add tiers 2 and 4 once you have seen enough contracts to know where the intermediate lines sit.
A clause with only a Tier 1 variant flags nearly everything, because almost no vendor’s paper matches your template word for word. That is the most common cause of a noisy first review, and the usual state of a freshly generated baseline clause set. Add a fallback tier before judging the false-positive rate.
Guardian first detects the components inside your linked documents (the MSA, the DPA, the order form, the SLA, the NDA, the amendment, the SCCs, the AI addendum, and so on), then evaluates each reference clause only where it belongs.Set Applicable component types on each reference clause accordingly. A data-processing standard belongs on the DPA and MSA. A pricing standard belongs on the order form. Governing law belongs everywhere, so leave it unscoped.Scope decides what a missing clause means:
Situation
Result
The clause’s component is present, but no matching language found
Missing: a genuine gap in the vendor’s paper
The clause’s component is not in this contract at all
Not applicable: correctly ignored
A component could not be classified, so the answer is uncertain
Needs review: flagged for a human
Unscoped clauses (empty component types) are evaluated against everything, so a missing one always reads as Missing. Scope the clauses that only apply to one kind of paper, and your Missing list stays meaningful.
A review runs in five steps, shown in the rail at the top of the page. You move through them in order, and the rail says where you are.
The five steps of a review. The rail marks the steps behind you as done.
Step
What happens
1. Choose documents
You choose the standards to check against and the documents to read.
2. Analyze the contract
Coverbase reads the documents and matches every reference clause.
3. Review results
You see the counts and pick what to work.
4. Summary
You decide each clause, one at a time.
5. Communicate
You draft the follow-up and export the redlined Word file.
Only active clause sets are offered when you start a review. Sets you create by hand, copy from the library, or import from a spreadsheet are active from the start; generated sets are not. Open the contract, go to the Review tab, and choose Start review.
Step 1. Pick the standards to check against and the documents to read.
Four things sit on this step.Suggested for this contract lists the clause sets that cover components this contract has. Other standards lists the rest, and tells you their clauses will mostly come back as not applicable. Pick at least one.Documents to analyze lists every live document on the contract. All of them are selected. Clear the checkbox on any document you want left out, and the review skips it.Each document shows its type, when it was uploaded, and who uploaded it, so you can tell two similar files apart before you commit to reading both.
Start from everything selected and take documents out, rather than adding them one at a time. A review that reads a subset can miss a clause that was in the file.
Reviewer puts the review in someone’s work queue. You can leave it unassigned.Job estimate tells you how many clauses, standards, and documents the run covers once you have picked a standard. Only in-force language is checked, so superseded clauses are excluded.If the contract has no documents yet, this step says so and links you to the Documents tab. The start button stays disabled until there is something to read.
Coverbase extracts the text, detects components, and matches every reference clause across the documents you selected. If the vendor has a completed assessment, it then layers that evidence onto each flagged clause.A progress indicator runs while it works. You can navigate away and come back.
Each run takes a snapshot of the clause set at the moment it starts. Editing a reference clause mid-run does not change the verdicts of a review already in flight, and old runs stay readable against the standard they were judged by.
One review runs at a time, but a finished review does not lock the contract. Start a new review sits in the header on every step after the analysis. Use it when a run read the wrong documents, when you picked the wrong standard, or when new paper has landed since the last run.Starting a new review takes you back to step 1 with the pickers open. Previous runs stay readable.
The Review results step. Four cards sort what the run found, and the table lists every clause it read.
The step opens on how many clauses need you, and four cards that sort every clause the run read:
Card
What is in it
Needs a decision
Clauses that came back Non-conforming or Needs review.
Clause not found
Clauses whose component is in the contract but whose language is not (Missing).
Clause fulfilled
Clauses that conform, or whose risk you have already accepted.
Not applicable
Clauses whose component is not in this contract.
Click a card to filter the Review clauses table to it. The table gives each clause’s clause set, category, status, severity, and confidence. Search it, narrow it to one clause set, or click a row to open that clause. Review N clauses walks the clauses that need a decision or were not found, most severe first. Show all N walks every clause.The contract’s Review tab keeps the latest run as a list, for triage without the step-by-step flow.
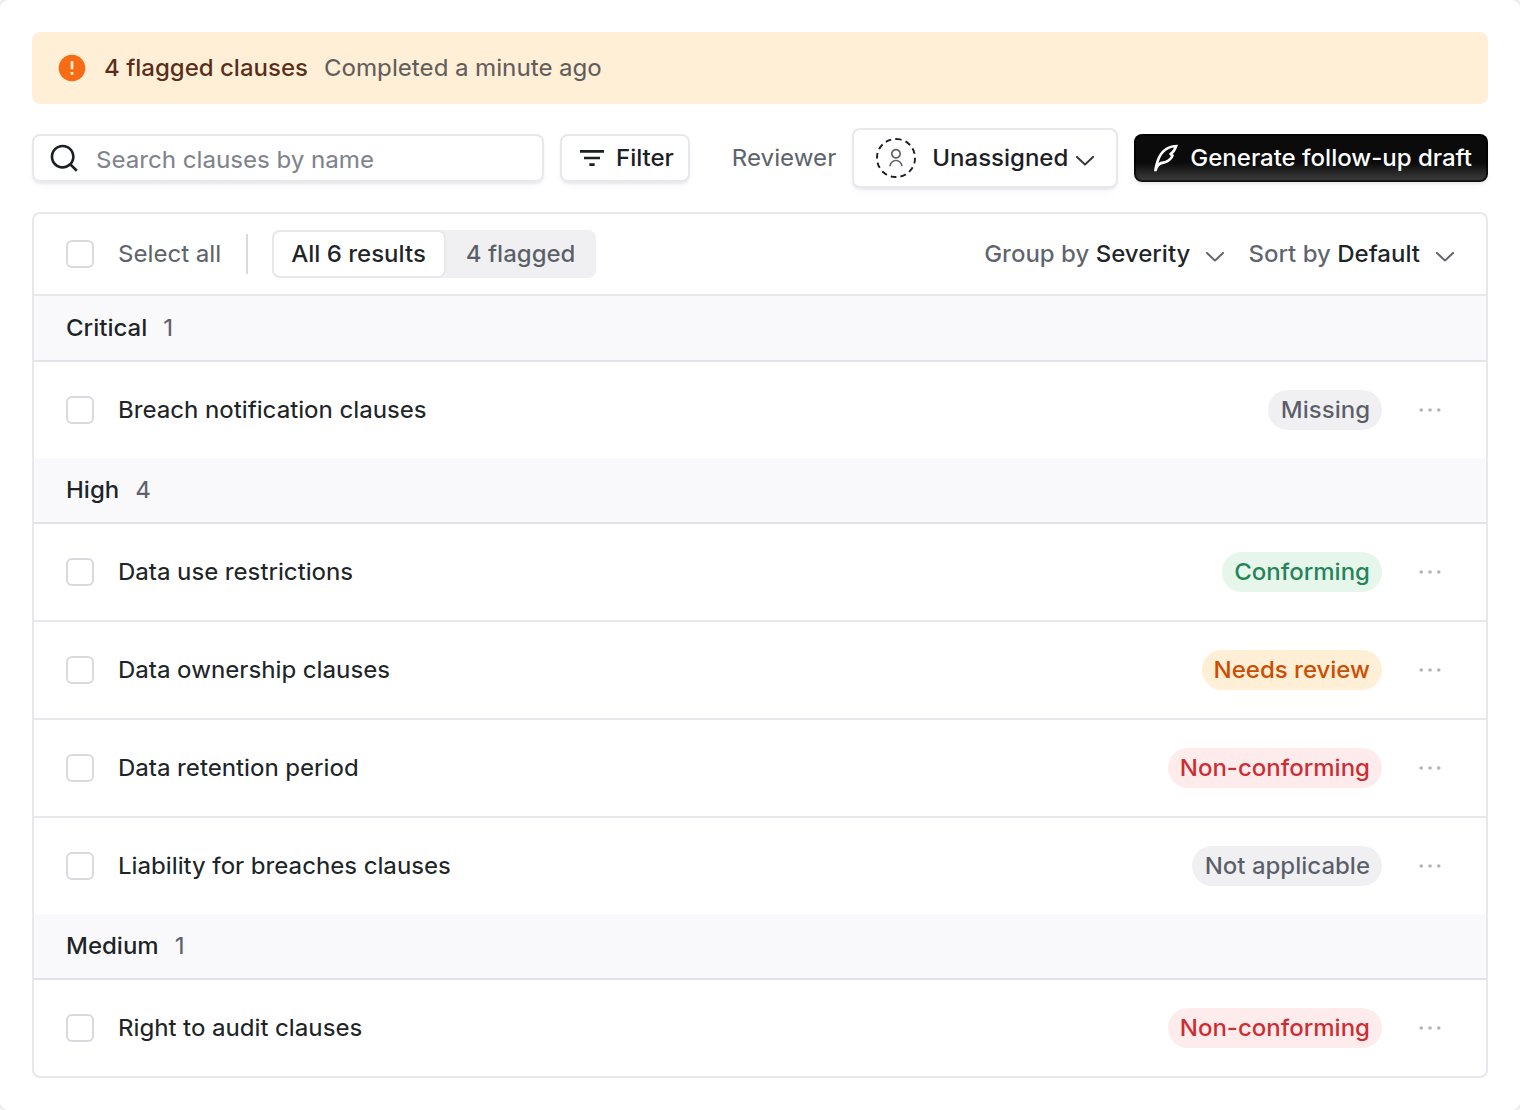
A clause review on the Review tab. Vendor language scored against your acceptable, fallback, and unacceptable tiers, by severity.
The list opens on All N results. Switch to N flagged to see only the clauses that came back Non-conforming, Needs review, or Missing and have not been triaged yet.
Each row shows the clause’s state and, when the vendor has a completed assessment, the suggested disposition. Click a row to open the clause in the review console, where the clause card carries the rest:
Element
What it means
State
Conforming, Needs review, Non-conforming, Missing, or Not applicable
Matched variant
Which of your tiers the vendor’s language landed on
Confidence
How sure the matcher was. Low confidence forces Needs review
Source
The document and page the language came from
AI analysis
A few bullets on why it landed where it did
Assessment insights
A suggested disposition drawn from the vendor’s latest completed assessment
Group by status, severity, or confidence, sort by severity, and search by clause name. On a 40-clause set against a heavily negotiated MSA, grouping by severity and working top-down is the fastest path.
When the vendor has a completed assessment, Guardian cross-references the clause against that evidence and suggests a disposition: No action, Revise language, Add clause, or Escalate, with citations back into the assessment.A weak audit-rights clause matters more when the vendor’s assessment already shows control gaps, and less when they hold a clean SOC 2. The suggestion is input for your judgment rather than a verdict, and it sits separately from the clause state.
Triaging is the review. Marking a clause removes it from the flagged list while leaving the system’s verdict visible, so the record shows both what the AI concluded and what you decided.
No action
Reviewed and fine as written. The most common outcome on Needs-review clauses once a human reads them.
Accepted risk
Materially worse than your standard, and you are signing anyway. This is your audit trail for a conscious exception.
False positive
The matcher got it wrong. Feed these back into the reference clause’s guidance so the next review does better.
Create finding
Escalate to a tracked finding with an owner and a due date. Triage flips to Action created automatically, and the finding stays linked to the clauses that produced it.
Triage a clause from the menu at the end of its row (Mark no action, Mark accepted risk, Mark false positive, or Create Finding). Select several clauses at once to Triage them together or Bulk Create Findings covering all of them, which suits a case where one negotiation thread touches liability, indemnity, and insurance together.
The fourth step, labeled Summary on the rail, gives you one clause at a time in a three-pane console.
The decide console. Playbook positions on the left, the redline and your decision in the middle, the source document and clause facts on the right.
Pane
What it holds
Left
Your playbook positions for this clause, with the guidance you wrote. Select a position to redraft the redline against it.
Middle
The suggested redline, with your decision underneath.
Right
The source document, and the clause card with state, severity, confidence, and the AI analysis.
Drag the dividers to resize the panes. Your widths are remembered for the next clause and the next review.Four decisions sit under the redline. Press 1 to 4 to pick one, or click it.
Key
Decision
Effect
1
Accept as-is
Closes the clause.
2
Flag for the vendor
Adds it to the follow-up you send at the end.
3
Accept the risk
Records the exception with an owner and an expiry date.
4
Not applicable
Marks the standard as not relevant to this contract.
Save (or Enter) records the decision and moves to the next clause. Skip for now moves on without recording one. Previous clause and Next clause sit in the header with your position in the queue between them, and the up and down arrow keys do the same.Show every clause switches the queue between the clauses that need you and all of them, including what conformed.
The Communicate step. A follow-up draft built from the flagged clauses, with the Word export beside it.
Four counts at the top say what you decided: Accepted as-is, Flagged for vendor, Risk accepted, and Not applicable. Back to results returns to the queue.The follow-up draft is built from the clauses you flagged, quoting your standard and the vendor’s language. Tick or untick clauses to change what it covers, then Regenerate. Nothing sends on its own:
Copy to clipboard copies the draft for your own email.
Send email opens the Coverbase email composer with the draft in it. It is addressed to the vendor’s contacts, copies the contract’s owners and watchers and the vendor’s owners, analysts and watchers, and attaches the redlined Word file when the review has one. Check it and send it from there.
Create Finding from selected escalates the ticked clauses to a finding, when findings are on for your organization.
If the review read a Word document, choose Download redlined Word file next to the draft. You get the contract’s own .docx back with:
The contract’s wording struck through and your playbook’s wording inserted, as tracked changes
One comment per clause carrying the clause name, the reasoning, and the language you are asking for
Open it in Word and the changes appear in the Review ribbon your vendor already uses. Send it as an attachment, or accept and reject changes yourself first.
Every clause goes into the file except the ones you marked Not applicable. Accepting the risk still sends the ask: accepting a deviation internally is not the same as withdrawing it from the vendor.
A clause whose wording already matches your standard produces no tracked change. A clause the export cannot locate in the document is named in a comment rather than dropped silently.
The export needs a Word document. A contract that only ever arrived as a PDF has nothing to mark up, and the button tells you so when you click it.
A run that flagged nothing offers a new review instead of an empty draft.
If no clause was flagged, there is nothing to draft. The step says so and offers Start a new review instead. That is usually the right move when a run read the wrong documents.
Your first review is a draft of your playbook, not a verdict on the vendor.
Too many flags
Almost always missing middle tiers. If your clauses only have Tier 1 and Tier 5, everything realistic lands in between and gets escalated. Add Tier 3 fallback language for the clauses generating the most noise.
Clauses come back Missing that are plainly in the contract
Either the component scope is wrong (the clause is scoped to DPA but the language lives in the MSA), or the guidance does not name the alias the vendor used. Fix the guidance first; it is the cheaper change.
Everything lands on Needs review with low confidence
Usually a text-quality problem. Scanned or image-only PDFs give the matcher little to work with. Re-upload text-based versions where you can.
Rerun after you change something
Reviews do not re-run themselves when you edit a clause set or add a document. Use Start a new review from the flow header, or Rerun from the run actions menu on the Review tab. Either one snapshots your current clause set, and starting a new review lets you change the documents as well as the standard.
Reference clauses are versioned
Editing a reference clause creates a new version and marks it current. Older reviews still show the version they ran against, and you can open a clause’s version history at any time. Edit freely; the record is kept.
Track your false-positive triages for the first month. Each one points at a specific reference clause whose guidance or variants need work, and fixing them is what makes a clause set reliable.
Copy the Enterprise SaaS Subscription set from the library. Run it against three executed contracts you already know well. Compare Guardian’s verdicts to your own and note every disagreement.
2
Week 2: tune the noisy clauses
Fix the five clauses that produced the most disagreement: add fallback tiers, sharpen guidance, correct component scope. Ignore the clauses that already work.
3
Week 3: add your own paper
Upload your template MSA as a baseline contract to generate a second clause set reflecting your own standard, then merge the best of both into the set you will run day to day.
4
Week 4: put it in the workflow
Start assigning reviewers on new contracts so reviews land in work queues, and make triage the definition of done for legal review.