

For AI agents: a documentation index is available at https://docs.coverbase.com/llms.txt. This page is also available in markdown by appending .md to the URL.
This guide is part of the User Guides collection. It covers an engagement’s Contract and Exit tabs. It sits beside The engagement record and Monitoring plans, whose owner attestation is the usual start of an offboarding. For what the module is, see Offboarding and continuity.
Step 1: Set lifecycle routing
Open Configuration, choose Communications, and under Lifecycle Routing and Reminders choose the TPRM Office and Supply Chain user groups. Offboarding approvals and the executed contract task go to these groups, each following the group’s own assignment rule (round robin gives one person the task, assign to all gives everyone one).- With no TPRM Office group, offboarding approval goes to the vendor’s first risk analyst, then the requester.
- Supply Chain approval is required only once its group is named. Left unset, the TPRM Office approves offboarding alone.
- The approvals a request needs are fixed when it is filed. Changing routing later does not change requests already filed.
Complete the contract handoff
The Contract tab lists the engagement’s Contracts and its Execution Handoff.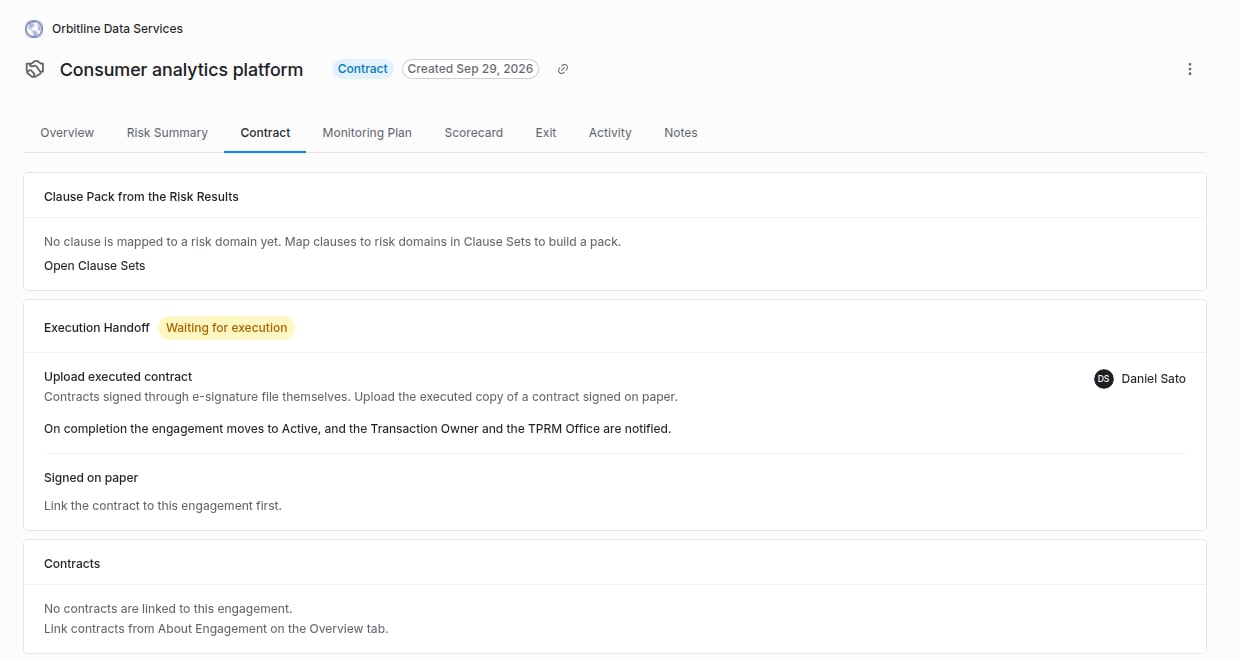
The Contract tab with an execution handoff waiting for the executed contract.
- Signed through e-signature: nothing to do. The handoff completes when the envelope is executed.
- Signed on paper: under Signed on paper, choose the Contract, drop the executed copy, and click File executed contract. If the contract is not listed, link it from About Engagement on the Overview tab first.
Write a continuity plan
An engagement whose inherent risk is the highest level of its scale is critical, whatever you call that level. When it reaches that level, a draft Third-Party Continuity Plan opens on the Exit tab and its Transaction Owner gets a task. Any other engagement can have a plan too. Fill in the Owner, Backup Suppliers (with readiness notes), the Exit Strategy, the Recovery Time Objective (Hours), Resiliency Notes and Transition Steps, one per line. Save draft keeps your work. Submit plan needs an exit strategy and a recovery time objective. Reopen plan makes a submitted plan editable again. If the engagement is offboarded, each transition step becomes an exit plan step.Step 2: Request offboarding
On the Exit tab, under Request Offboarding, choose a Reason (Consolidation, Contract ending, No longer needed, Performance, Risk, Cost or Other), write the Business Justification, optionally pick a Requested Date, and click Request offboarding. An engagement has at most one open request. One also opens automatically when:- an owner answers Start offboarding on a monitoring plan attestation, or
- someone marks the engagement not in use (a canceled status, or a status labeled Inactive or Not in use), or marks every service it uses not in use.
Step 3: Approve it
The Offboarding Request card shows Waiting for TPRM Office and, if required, Waiting for Supply Chain. A member of each group, or an admin, clicks Approve. The last approval starts the request: Coverbase generates the exit plan and runs the start of the cascade. From the moment the request is filed, the engagement’s tracker shows Exit as the current stage, reading Exit under way. See The engagement record. Cancel offboarding, with a Cancel Reason, closes every open step and task, and the tracker goes back to Active. Anything already stopped stays stopped.Step 4: Work the exit plan
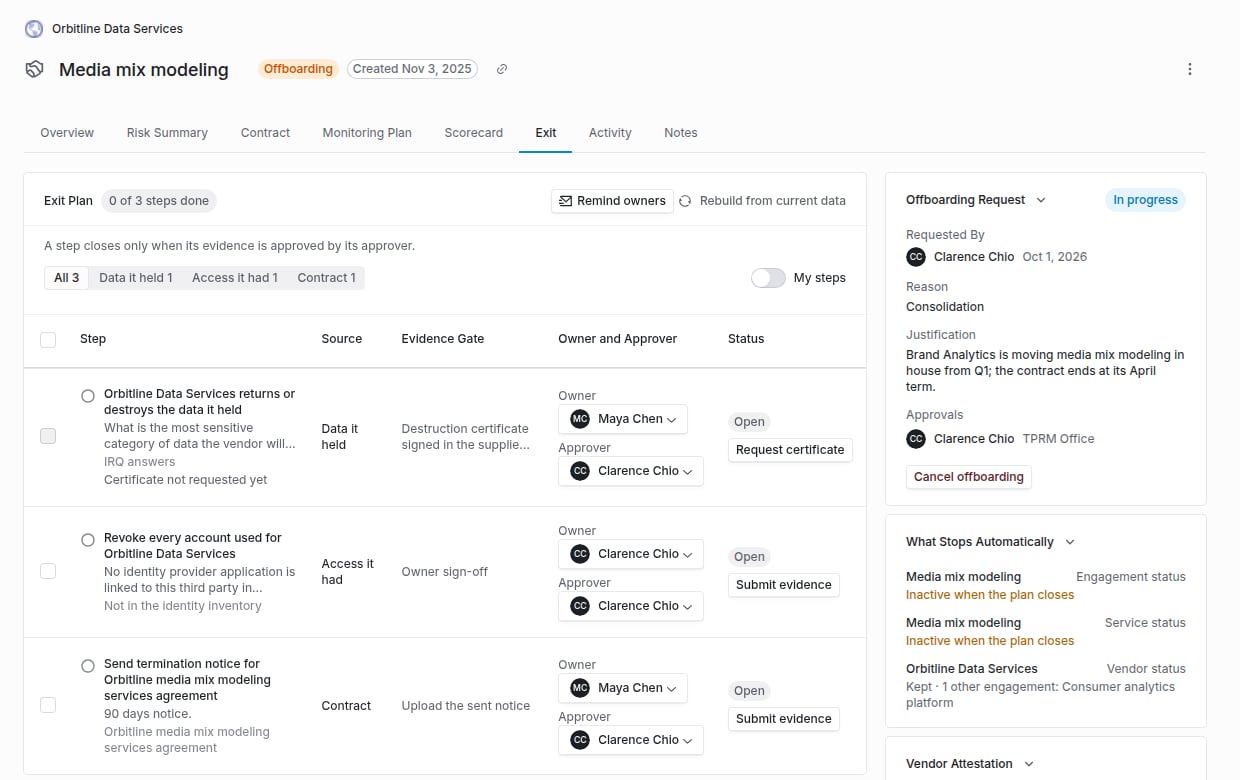
The Exit tab with the exit plan, the offboarding request and what stops automatically.
1
Submit evidence
The owner clicks Submit evidence. A document step needs a file, a sign-off step a note. The step moves to Awaiting approval.
2
Approve or return
The approver clicks Approve, or Return with what needs to change. A returned step goes back to its owner with the note.
- Submit evidence for N steps sends one file, one note or both to every selected step. Each step still has to pass its own gate, so a document step without a file or a sign-off step without a note is listed with what it needs, and the rest go through. A certificate step goes through only once the vendor has signed.
- Approve N steps approves the selected steps that wait on you. Each closes with the evidence it has; a step you cannot approve is skipped and listed with the reason.
Get the vendor’s destruction certificate
The data step closes on a certificate the vendor signs. Click Request certificate on the step. The vendor gets an informational request in the supplier portal with a data destruction certificate to sign; Copy portal link gives you the link to send. When they sign, the step shows Signed by, with their title and the date, and Vendor Attestation shows a digest of the certificate. Submitting the step records that digest. If the signed certificate changes afterwards, approval is refused, so the approver always approves the certificate they saw. If the engagement held no data on record, the data step is instead an owner sign-off that no data is held.What stops automatically
What Stops Automatically lists what the offboarding will change, and keeps a line for anything another live engagement still needs (Kept).
Approving the last open step completes the request, and the requester, the Transaction Owner and the TPRM approver are notified. The card then reads Offboarded, and the tracker’s Exit stage reads Exited with the date. An exited engagement leaves the figures in Program Insights.
Troubleshooting
Related
Monitoring plans
Owner attestation and Start offboarding.
The engagement record
The Risk Summary decision that opens a handoff.
Contract intake and approval
Approval chains and sending for signature.
Assignment, delegation and out of office
How a group assigns its tasks.