

For AI agents: a documentation index is available at https://docs.coverbase.com/llms.txt. This page is also available in markdown by appending .md to the URL.
This guide is part of the User Guides collection. It covers Risk Acceptance Routing under Findings Settings and the Decision Path on a finding. It sits beside Findings and remediation, which covers statuses and vendor commitments, and Due diligence methods and the portal. For what the module is, see Due diligence.
How the chain works
- Escalate skips the recommendation and goes straight to the decision.
- The deciding group can decide at any point, before or against the earlier steps. That is recorded as an overrule.
- Accepting risk always needs an end date, no more than 366 days from today.
- A rejected extended acceptance goes back to the decision step.
- Group members and the group’s lead can act for the group.
Step 1: Write routing rules
Open Configuration, choose Findings Settings, and find Risk Acceptance Routing. With no rules, every finding follows the single-approver path. Click Add rule:- Name the rule, for example “High severity on critical data”.
- Choose the Severity or Risk Levels it matches. Leave it empty to match every finding.
- Choose the Recommending Group, or No recommendation step.
- Choose the Deciding Group, or Any risk acceptance approver.
- Optionally set Days and the Approver Beyond That: an acceptance longer than that many days also needs that person.
- Click Save rule.
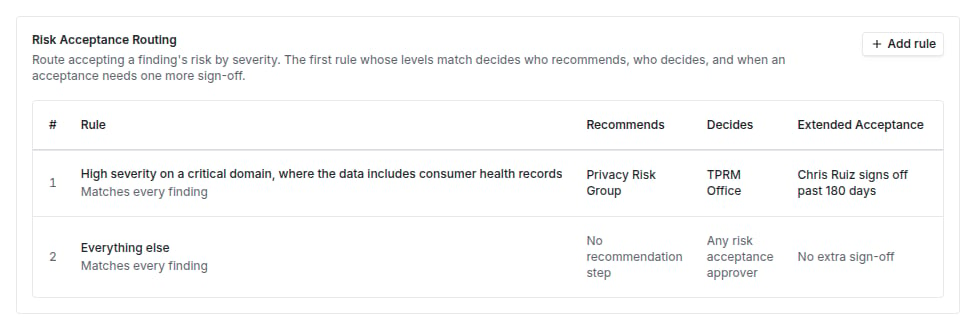
Risk Acceptance Routing under Findings Settings, with a specific rule above a catch-all.
Step 2: Read a finding’s path
Open the finding. Three cards explain where it stands:- Acceptance Routing names the matching rule (Rule 2 of 4) and who proposes, recommends, decides and approves. No routing rule matches means the finding follows the single-approver path.
- Decision Path shows each step recorded so far, its outcome and rationale, and the next step, such as Risk group recommends or Sign-off on acceptances over 90 days.
- Effect on Risk shows the vendor’s residual risk now, If closed and If accepted, using the finding’s recorded residual risk reduction.
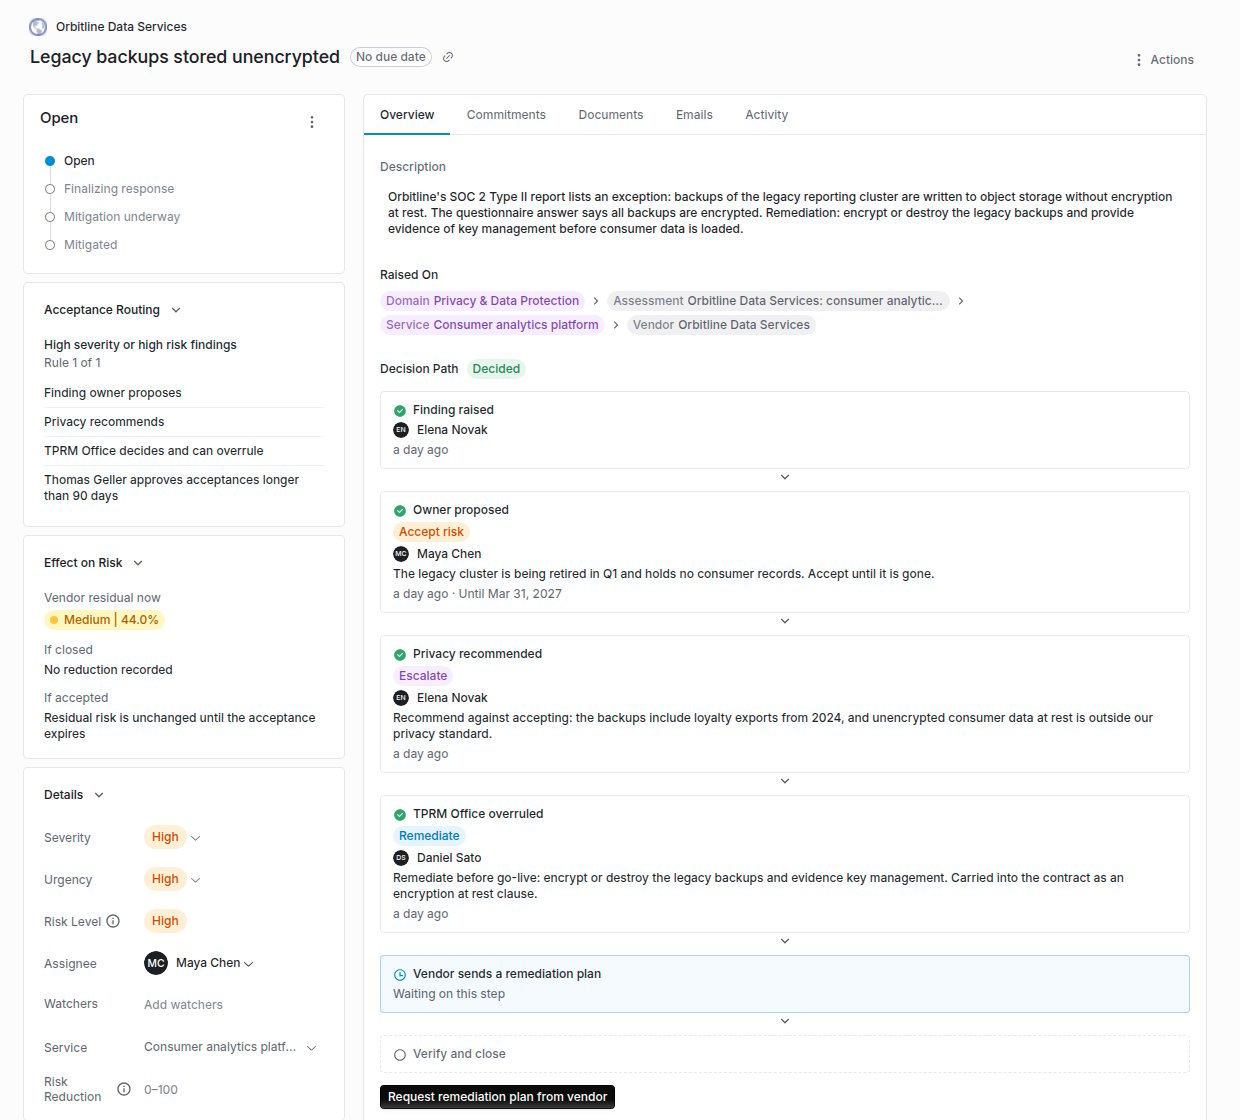
A routed finding with its Acceptance Routing, Effect on Risk and Decision Path.
Step 3: Record a step
Click the button for your step on the Decision Path: Propose, Recommend, Decide (or Decide now to overrule), or Review acceptance. Choose the Outcome, write the Rationale, and for an acceptance pick Accept Until. Then record it. With Teams approvals on, the person or group the chain waits on can also approve or decline the step from a Teams card, with their own Coverbase permissions. A card for a step the chain has already moved past is refused. If the button is missing, the chain is waiting on someone else: Waiting on another step. You’ll be notified when this finding needs you.Step 4: Apply the acceptance
When the chain approves accepting the risk, click Apply risk acceptance. This sets the finding to risk accepted through the ordinary finding update, with an exception that ends on the date the chain approved. An exception cannot outlast that date. When the outcome is Remediate, Request remediation plan from vendor asks the vendor for a plan through the portal.Decide in bulk
On the Findings list, select findings and choose Record decision. Pick the Step (Propose, Recommend or Decide), the outcome and a rationale, which is recorded on each finding. Turn on Accept the risk right away on findings this decision fully approves to apply acceptances in the same action. Findings that are not at that step, or whose step is not yours, are skipped and stay selected. The summary reports each group, for example “12 findings accepted, 3 need a decision”, so you can act on the rest next.Troubleshooting
Related
Findings and remediation
Statuses, commitments and verification.
Due diligence methods and the portal
Raising a finding on a question.
Assignment, delegation and out of office
User groups and their leads.
Findings Manager
Time-bound risk acceptance and remediation.